Portal 2

Portal 2

50 ratings
p0rtalmaster's Hammer Guide Series Part 01/19
By The Sojourner
Hello and welcome to part 01/19 of my series of mini-guides, designed to help you learn perhaps what is the biggest part of the Portal 2 Authoring tools: Hammer.

For a super-quick version of this series, please check out my other guide, Hammer for the Flustered.
   
Award
Favorite
Favorited
Unfavorite
Welcome to Hammer
Most likely, you have come here because you're interested in weaning yourself off of the Puzzlemaker (a.k.a. in-game editor, PTI/PeTI editor, etc.), but feel discouraged with getting down and dirty with the back end of Portal 2 level creation. To be a good Hammer mapper requires the mindset of an architect and an artist, as well as a little bit of the programmer/script writer mindset. You're not just a Portal 2 Test Chamber designer anymore.

Using the Puzzlemaker, all those buttons, panels and such were taken care of automatically. All you had to do was shape up some rooms, add some testing elements, make sure a test subject could reach the entrance from the exit, and then a team of octopuses (or what have ye) would build it for you.

In Hammer, you can see for yourself what's really going on. Portal 2 maps (like Portal, Half-Life, Team Fortress 2, etc.) are comprised of 3 things:
  • Worldbrushes. These are basically the walls, floors, and ceilings of your rooms. It's best to keep them rectangular as much as possible. Good thing that over 95% of Portal 2 environments are exactly like that.
  • Brush entities. These include things such as portal bumpers and triggers. To create one, right-click on any worldbrush and select "Tie to Entity." You can also use Ctrl+T. You may want to remember this because it comes up. A lot.
  • Point entities. These make up the bulk of any map. In Portal 2, that means lasers, buttons, elevators (and the things that make them move), hard light bridges, catwalks, vents, panel arms, etc. etc.. Even the player's starting point is an entity. But although the list is long, don't be overwhelmed! I'll only include the important ones.
And for those who ask, a brush is just a 3D shape. Nothing to be afraid of nor anything specially tied to "brush" in the other sense of the word. Also, for more information on specific entities, there's a highly complete reference at the VDC Wiki.
Features and Toolbars of Hammer
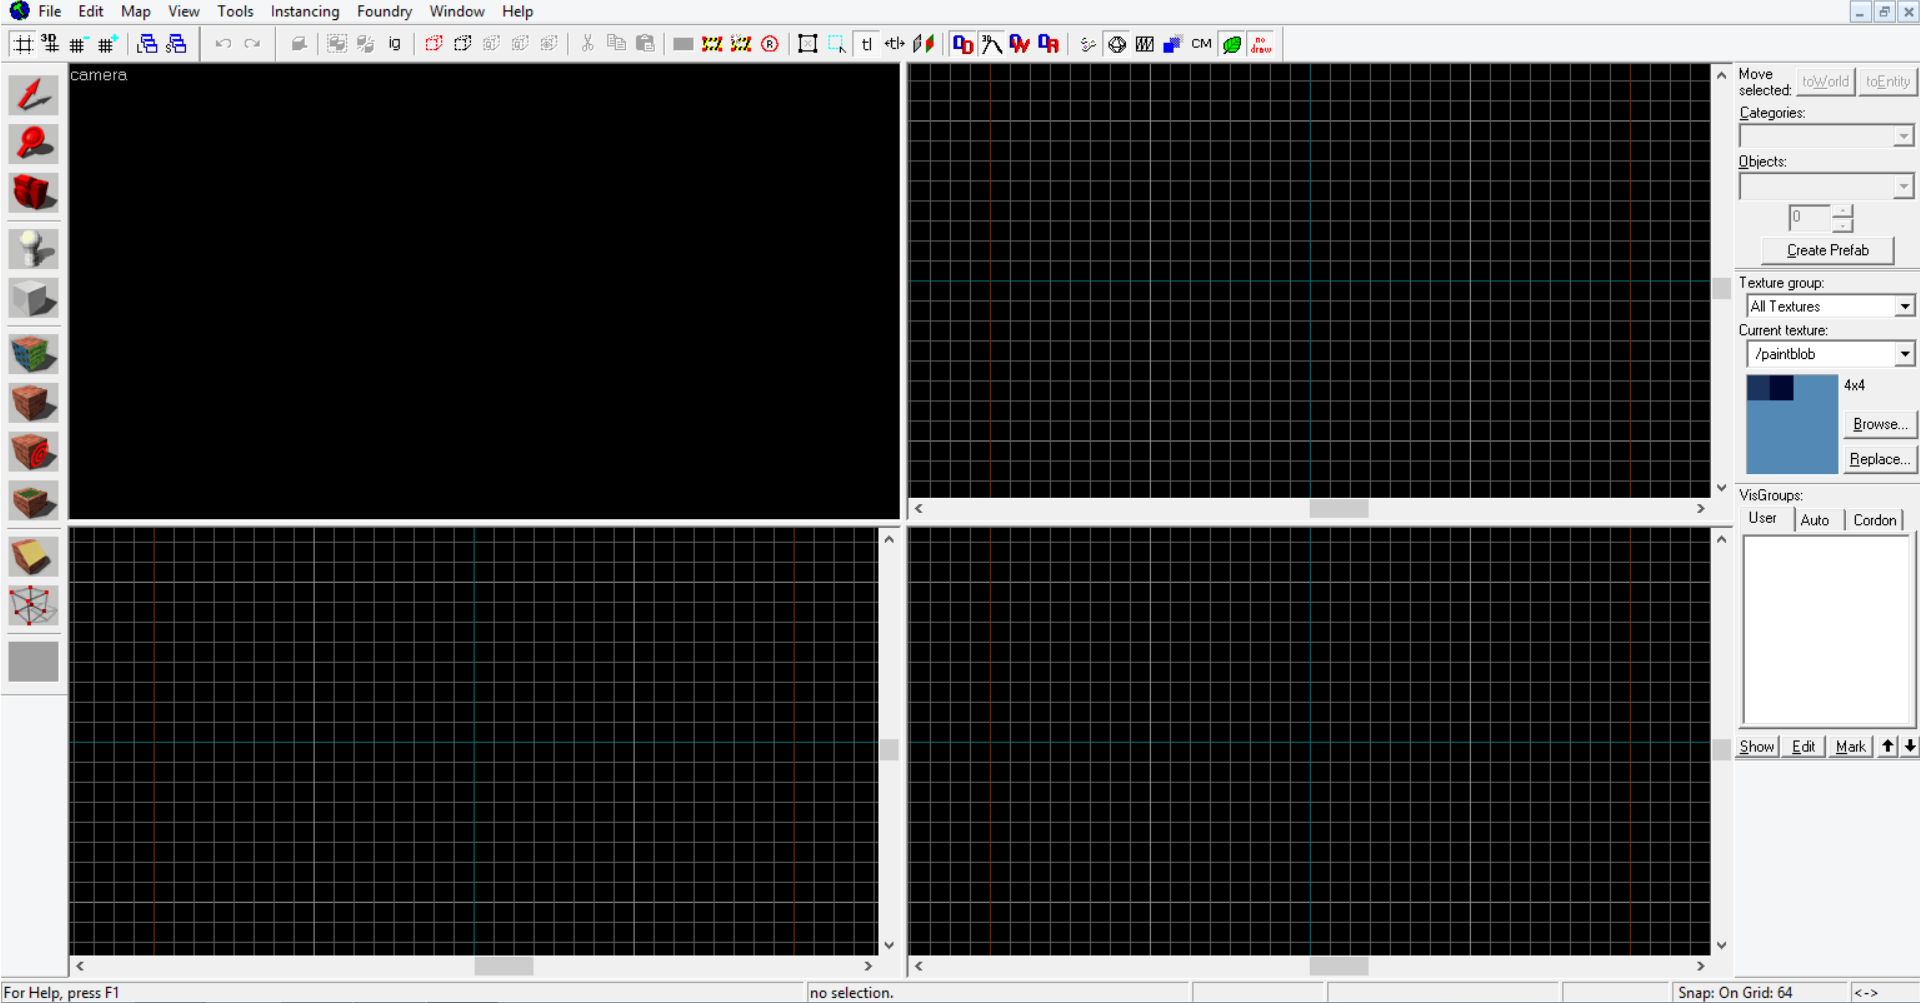
This first guide will give you a litle laydown of what's important in Hammer and what you can safely ignore. First up: a screenshot of Hammer with a new, blank file loaded (hit Ctrl+N to do this):


...and here's a little bit about the features:

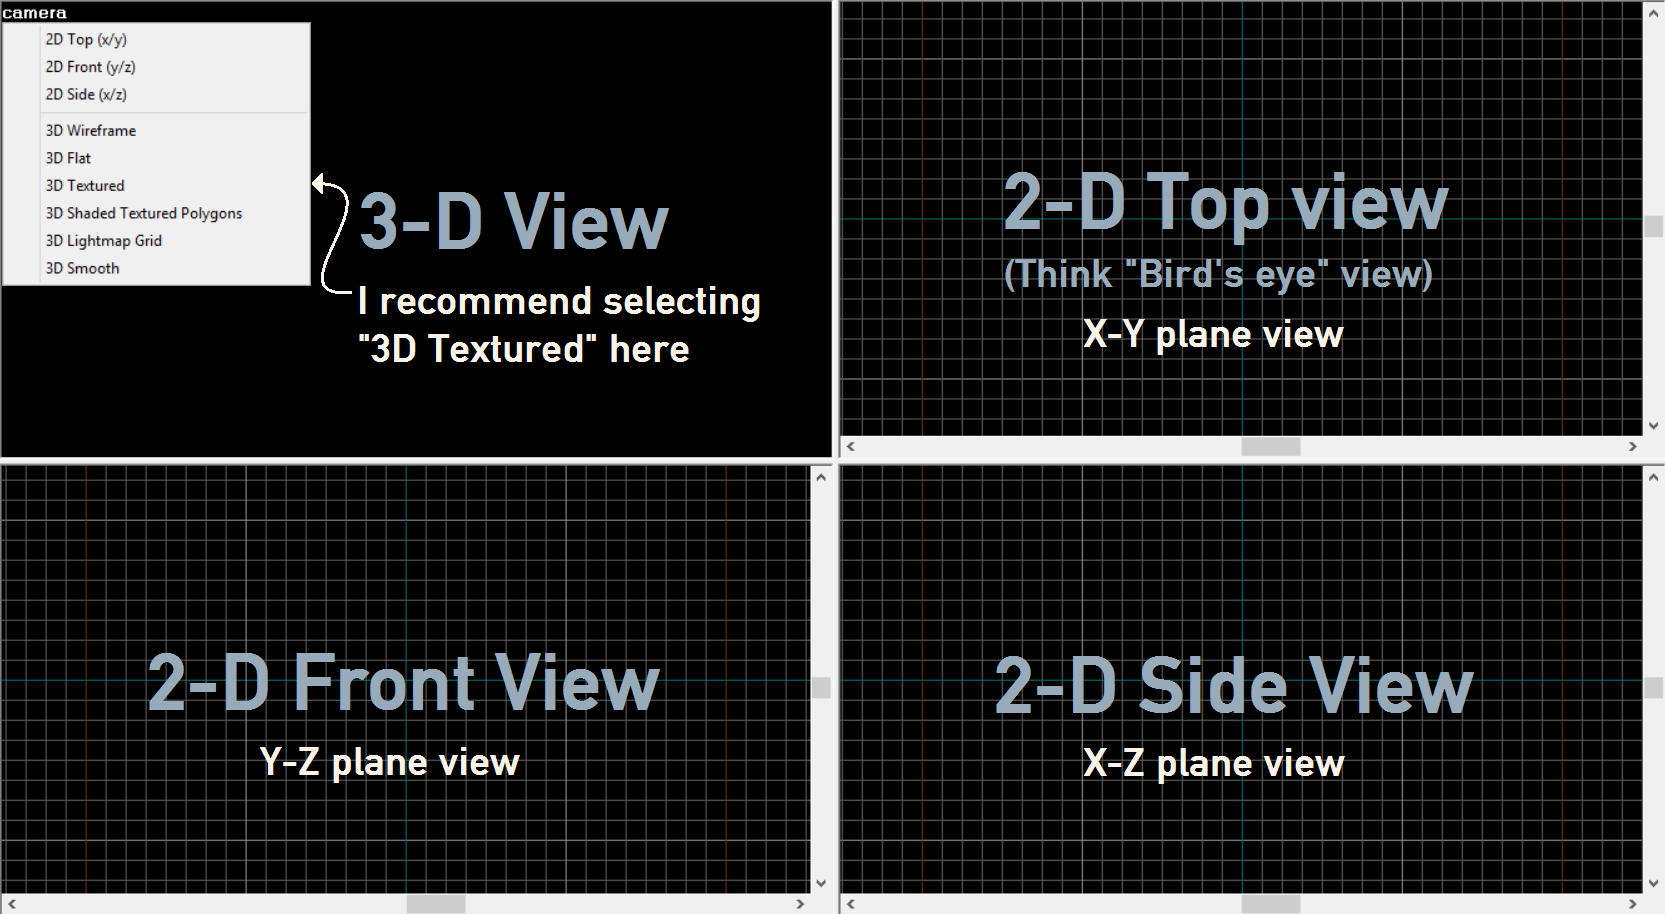
In the center, we see four screens:


  • The 3D view has several options:
    • Wireframe
    • Flat, which is just solid geometry
    • Textured. I highly recommend using this to check texture alignments, as well as apply textures.
    • Shaded Textured Polygons
    • Lightmap Grid. Useful for checking lightmap scales (lightmap scales are occasionally used to control shadows and brightness)
    • Smooth. This includes a little dialog box to check smoothing groups (up to 32; 24 soft and 8 hard); used for antialiasing, but don't worry about them, as antialiasing works fine without them.
  • The 2D "Top" view is essentially a birds-eye or overhead view of your map.
  • The 2D "Front" and "Side" views should be fairly self-explanatory.

On the left, we have:

1) Selection tool. Use this to select stuff. Click on the selected objects to move, resize, rotate (in increments of 0.5°) and/or skew them.
→ TIP: to rotate around a point other than the center of the entity, duplicate the object and rotate both objects. The original object will rotate around the average of the two origin points.

2) Magnify tool: Used for zooming in/out.

3) Camera tool: This can be used to set a default point-of-view when opening your map.

4) Entity creation tool. This is how you'll be creating point entities. Just click anywhere you want in any 2D view and hit Enter to see your new point entity. By default, it's info_player_start, but this can be changed.

5) Block creation tool. This is how to create brushes. There are several primitives of common geometrical shapes besides cuboids: arch, cylinder, sphere (also ellipsoid), spike (cone/pyramid), torus and wedge. Arch and torus have somewhat complex options, but all the others except wedge have a number for the number of sides there should be in a "circular" cross section of any one of these shapes.
→ TIP: If you do not see options for complex shape creation, go to View -> Screen Elements and check the Object Bar.
→ TIP: You can also create your own shapes and use them as prefabs.
→ TIP: Unless you're using it as a func_detail or other brush entity, don't carve circular brushes into into other brushes! Doing so has some very messy results. It should be OK to carve cuboids into other cuboids though.

6) Texture Application tool a.k.a. the Face Edit tool. This is how textures are individually applied to the faces of a brush. Many other special properties will be covered below.

7) "Apply Current Texture" tool. Pretty straightforward; it just applies whatever the current texture you have selected on the right to whatever brush(es) are selected (all faces of that brush will be textured).

8) Apply decals. Basically a texture on a surface, similar to overlays. A decal is a point
entity: infodecal.

9) Apply overlays. Basically a resizeable texture on a surface. An overlay is a point entity: info_overlay.
With either of these, you might notice something like "unsupported value 'angles'." Just ignore it; everything will render fine.

10) Clipping tool. Use this to chop off edges of your blocks or split them up. There are three modes which can be used by clicking the icon again: keep one side, keep the other side, and keep both sides. Remember, you can't go wrong with the clipping tool.

11) Vertex Manipulation tool. A powerful and intuitive tool which allows you to manipulate the vertices of a brush. While this can conveniently turn a cuboid into a wedge or other cool-looking shape with 6 sides or less, it can also be abused and create invalid solid structures (these will be corrected during compilation, as well as next time you open the map in Hammer). Just know what you're creating, and if it looks strange, be sure to check to see if it's valid or not (Alt+P or Map → Check for Problems).
Also, using this tool means that it can be easy to create concave solids, which are not allowable at all (anything that looks concave in-game is actually two or more brushes)!

The last option is only for those who have Maya installed and only appears when brushes are selected. Unless you're creating custom models for your map using Maya, don't worry about this option.


On the top (not the menu bar, the other one):
1) Toggle Grid (2D views), Toggle 3D Grid
2) Increase/Decrease size of grid; will also change the "snap to grid" setting (not on/off, but to what degree of smallness).
3) Load/Save window state (should be safe to ignore unless you're picky about your viewing settings)
4) Undo/Redo
5) Carve tool (select one brush to carve another selected brush)
6) Group/Ungroup (applies to selected objects) and Group Ignore
7) Create new visgroup, alongside various show/hide options; more about visgroups below...
8) Cut/Copy/Paste
9) Various cordon editing tools and radius culling. Cordons are used for map debugging, but only recommended as a last resort. Read: you can safely ignore these tools and should be fine.
10) Select by handles only, Toggle auto-selection
11) Texture lock and Scaling texture lock tools. Used frequently to keep textures aligned.
12) Toggle world/face alignment. This can also be tweaked in the Face Edit tool.
13) Various displacement viewing options. It's highly unlikely that you'll need to touch them as Portal 2 rarely uses displacements.
14) Compile/run your map (also F9). Just be sure to use the "expert" compile mode on your final compile!
15) Toggle helpers, Toggle 2D model views (for things like prop_static or prop_button): turn these off to reduce clutter, or leave them on if you need the visual perspective.
16) Toggle model fade preview. Only useful for optimization across different systems/gaming platforms.
17) Show collision model wireframe. Only useful if you have a PhD in physics.
18) Show detail models/sprites on materials (another control that you'll likely not need to mess with)
19) Toggle visibility of nodraw brushes (yet another control that you'll likely not need to mess with)
More Features


On the bottom, we have the status bar:
1) Selection information. If a single object is selected, it will say what it is.
2) Gives 2D coordinates of the cursor if it's in a particular 2D view. For example, if the cursor is in the top view, this section will give off the XY coordinates.
3) Geometric information about the selection, including the width, length, height, and center (not the same thing as an entity's origin). This section will also tell you what angle you are rotating by while rotating (Note: Hammer uses "ø" instead of ° to indicate degrees), and how much you're skewing while in skew mode.
4) Zoom scalar.
5) Snap information: on or off the grid and by how much.

And finally, on the right, we have:

1) Object creation tool. Useful in creating special brush shapes from a preset list or from custom prefabs. Here you can also create your own prefabs, and finally, you can create brush entities or make them worldbrushes again.

2) Texture selection tool. Not nearly as sophisticated as the Face Edit tool (and therefore not a substitute!), but it will allow you to conveniently select textures, as well as find and replace textures. Chances are, you've already been through the texture browser, saying to yourself, "I know where I saw that in the game!" and "I wonder where that was used in the game? ... Ah, I know now...." If you haven't had thoughts like these, you're already very familiar with the game inside and out, or just don't care about it. As long as it looks consistent, coherent, pleasant and plausible, it should be a good map.

3) Visgroup manager. Imagine you're creating a very large and/or cluttered map. This could be a Wheatley-themed map or an Underground-themed map, to name a couple. Select some objects and place them in a visgroup. Now you can select, show/hide or otherwise modify this visgroup from here. Auto-created visgroups are also created here.
The Texture Application/Face Edit Tool
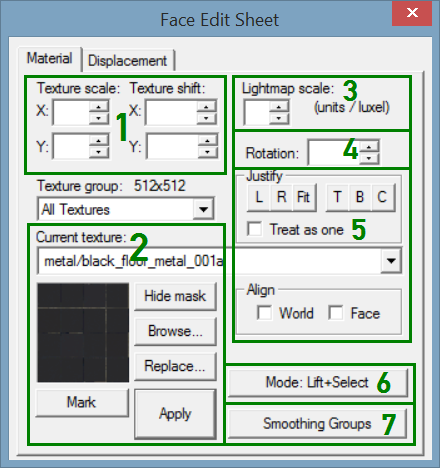
A little bit more about the Texture Application/Face Edit tool:


1) Scaling and shifting. Before you mess with these ask yourself the following questions. If any of these is "no," then don't use these options yet!
  • Did you create the brush while aligned to the grid, so as to prevent texture misalignment in the first place?
  • Did you check the other alignment options the tool has to offer, such as world vs. face alignment?
  • Were any options in the "Justify" section clicked?
  • If the brush got transformed (i.e. scaled, skewed, rotated or moved) in some way, was texture lock on? If not, undo, turn it on, and then do it again (but don't redo).
2) Current texture name and preview, along with a few options.

3) Lightmap scaling (units/luxel). Rarely touched.

4) Texture rotation. Pretty self-explanatory. Few (if any) textures are rotated in Portal 2.

5) Various texture alignment options:
  • The "Justify" section is useful for aligning textures to a particular edge: Left, Right, Top, Bottom, or Center. You can also "Fit" the texture to a rectangular face.
  • "Treat as one" is typically used for multiple faces.
  • "Align to World" and "Align to Face" are two of the most commonly used options. Use this before you use anything else if a texture looks misaligned!
6) Various modes for the Face Edit tool:
  • Lift, which sets a chosen texture to be the current texture to apply in the texture browser.
  • Select. Nothing else.
  • Lift+Select. Combination of the above two options; default option.
  • Apply (either the texture or the texture plus the values). I don't use this too often, but if you get tired of clicking "Apply" all the time, feel free to use this.
  • Align to view. I highly don't recommend you use this, as it's prone to creating misaligned textures.
7) Smoothing groups editing tool

There's also a separate tab for all sorts of displacement stuff. Displacements are basically rough terrain, common in other games such as Left 4 Dead 2 or Counter Strike: Source but uncommon in Portal 2. The main places they're seen are the underground caves. Almost everything else is just props or straight-edged walls, floors, and ceilings. Be careful that you use a non-portalable texture with displacements, otherwise weird things are prone to happening!
The Menu Bar
And last but not least, there's the menu bar:
  • File
    • New, Open..., Close, Save, Save As.... Pretty standard stuff.
    • Version control and export options: no need to worry about these.
    • Run Map... (well, compile/run actually, but just use F9; much faster)
    • Convert WAD to VMT.... Maybe some legacy thingie. I haven't touched it.
    • Reload Sounds
    • Recently edited maps (up to 4)
    • Exit
  • Edit
    • Undo/Redo, along with a disable option for reasons I will probably never truly know.
    • Find entities.... Searches for the entity's name rather than its class.
    • Replace...
    • Cut/Copy/Paste/Paste Special.../Delete. More standard stuff.
    • Clear Selection (NB this doesn't delete anything, it just removes the selection handles.)
    • Select all. Why on earth Ctrl+A does not do this I have absolutely no idea! Someone should have a serious talk with VALVe again...
    • Properties (used for editing an entity's properties; with worldbrushes, only the visgroup tab is available). More on this below...
  • Map
    • Snap to Grid, Show Grid
    • Grid Settings (smaller or bigger)
    • Units (None, Inches, Feet+Inches)
    • Show Selected Brush Number (used for debugging)
    • Entity Report... (used primarily for finding entities)
    • Entity Gallery. Heck, even a "texture gallery" would be more useful! And even then...well...
    • Check for Problems. Very useful. Use this before your very first compile, but beware, as many "problems" aren't really issues at all. The most common ones are broken inputs/outputs (I/O) and "no player start" due to instancing and the overlay/decal "unused angles" issue I mentioned above.
    • Diff Map File. Another seldom used option.
    • Load/Unload Pointfile. Used for detecting leaks after a failed compile. Note that if a Portal 2 map has a leak it simply will not finish compiling. However, it can finish with an areaportal leak (although those leaks should be fixed too!).
    • Load/Unload Portal File. No, nothing to do with those blue and orange things you see in the game. This is useful after compiling at least the BSP portion of your map to check the visleaves to figure out the best way(s) to optimize your map. Useful if you notice the second phase of compilation (vvis) take a very long time.
    • Show Information (just to see how close to...or far away from...the limits you are)
    • Map Properties. This is yet another special entity called worldspawn. Here you can (critically) set the skybox texture and allow/disallow painting gels in your map (the physics system will also be affected by this option).
  • View
    • Screen Elements: select from various toolbars...
    • Autosize 4 Views. VALVe decided to attribute Ctrl+A to this instead...
    • 2D/3D views (except 3D lightmap and 3D smooth), as described above
    • Center (3D) Views on Selection
    • Go to Coordinates.../Go to Brush Number... (used for debugging)
    • DotA Camera. Nothing to worry about...
    • Show Connections
    • Show Helpers/Show Models in 2D: as described above...
    • Hide Items: hides or shows all point entities.
    • Hide Entity Names: hides or shows those little pieces of text above and below the rectangle where the entity is.
    • Use Radius culling: as described above
    • Some show/hide options...
    • Move Selection To Visgroup
    • Draw Materials Opaque
    • ...and a couple more seldom-if-not-never-used options.
  • Tools
    • Carve (with caution...unless they're grid-aligned cuboids[mathworld.wolfram.com])
    • Make Hollow. Again, take caution with circular and weird-shaped solids, as this tool is similar to carving.
    • Group/Ungroup
    • Tie to Entity/Move to World
    • Texture Application (a.k.a. Face Edit tool)
    • Replace Textures... (also accesible elsewhere)
    • Texture Lock
    • Model Browser.../Sound Browser... (so that you can look around without ever having to place an entity)
    • Transform (Rotate by XYZ degrees, or scale or move by XYZ units; not limited to the 1×1 grid like the other transform tools!)
    • Snap Selected to Grid/Snap Selected to Grid Individually
    • Center Origins (primarily for brush entities)
    • Align objects (To Left, To Right, To Top, To Bottom)
    • Flip Objects (Horizontally or Vertically)
    • Create Prefab (the other way to create prefabs)
    • Sprinkle... (another hardly used option)
    • Options... (i.e. settings and configuration stuff for Hammer. Tweak at your own risk!)
  • Instancing
    • Create New Instance From Selection
    • Collapse (Selection, All)
    • View Instances (Hide, Show Tinted, Show Normal)
    • Windows (Show/Hide All Instances)
    • Manifest stuff that you don't need to worry about.
  • Foundry
    • I won't go into detail here, but I've read that you can do some tremendous updating stuff between Hammer and Portal 2's game engine!
  • Window
    • Various window options for your viewing convenience. Included (though somewhat buggy at times) are open windows. I won't go into detail here either.
  • Help
    • Contains the usual: an "About" option and a link to the VDC Wiki. But then again, I'm trying to make what's in the VDC Wiki a tad more comprehensible, right?

Quite often, right-clicking an object will bring up a useful menu:
  • Cut/Copy/Delete/Paste Special...
  • Undo/Redo
  • Carve/Make Hollow
  • Group/Ungroup
  • Tie to Entity/Move to World
  • Snap to Grid
  • Transform
  • Center Origins
  • Align objects (To Left, To Right, To Top, To Bottom)
  • Flip Objects (Horizontally or Vertically)
  • Properties
The Properties Box
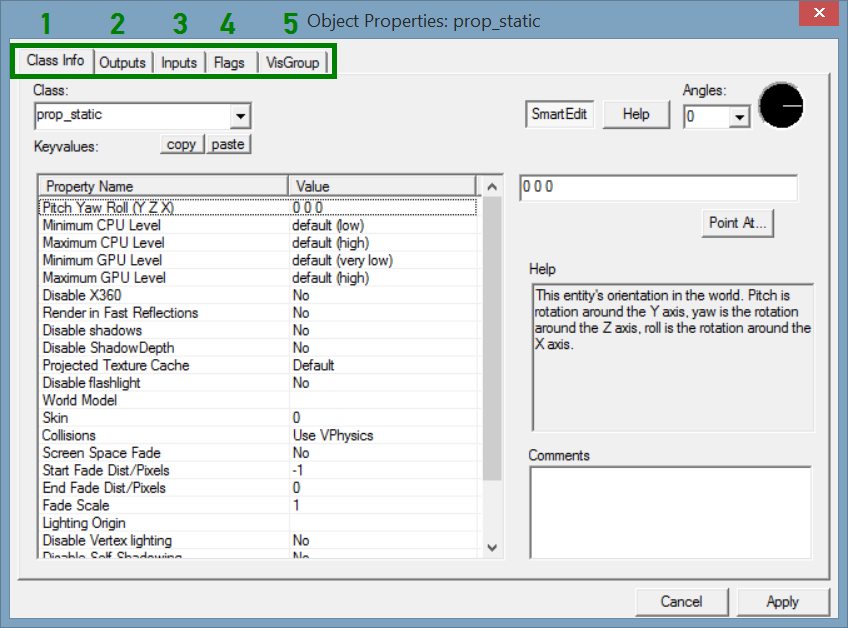
A dialog box you'll be using a lot to edit entities is the Properties box. It has 5-6 tabs:


1) Class Info. This is where you'll edit what the pros call "keyvalues." To make the tool easier to use, the game's developers included a "SmartEdit" option, enabled by default. There's also a "help" button for quick reference about the entity: keyvalues, inputs and outputs. For each keyvalue, you'll be able to do things like select a sound or model or color, or set angles, or select another entity off your map.

2) Outputs. Many entities such as buttons, laser catchers, and logic entities send outputs to other entities. Click "Add..." to add a new output. You can also copy, paste, and delete outputs between entities. For each output, you'll see the following:
  • My output named — allowable outputs for this entity. For example, a logic_auto has OnLoadGame and OnMapSpawn, among others, so they will be listed here.
  • Target entities named — where are you sending your output to? This should be something that has a legitimate input, such as a lightbridge, an excursion funnel, a laser, a sound, or even a light. The list contains all the entities in the map that you've named.
  • Via this input — allowable inputs for the entity you're sending your output to. For example, an ambient_generic has inputs of PlaySound and StopSound, among others, so they will be listed here.
  • With a parameter override of — some inputs need more information. For example, if you tell a math_counter to add, it needs to know by how much. Most of the time though, you won't need to worry about this field.
  • After a delay in seconds of — pretty self-explanatory, as is the Fire once only check box.
3) Inputs. Nothing to edit here; you edit the outputs, not the inputs. So, you'll need to select the input you want to edit, hit "Mark", and then you'll automatically be taken to the entity sending the output. The "Mark" option is very useful elsewhere in Hammer too.

4) Flags. The game's developers included this tab because trying to recall powers of 2, what they mean, and adding them up was too difficult. Technically this is yet another keyvalue, "spawnflags," but it's easier to use this tab. The descriptions are right there and shouldn't take much explaining.

5) VisGroup tab. Available with anything.

Depending on the entity properties, there may also be a Model tab. This can be used to show the model animations outside of the Model Browser, as well as how they work frame by frame.
Keyboard Shortcuts
Let's not forget these valuable keyboard shortcuts! Here they are (there may be more):

F1
Takes you to this guide the VDC Wiki.
F2
Select top view in the current viewport.
F3
Select side view in the current viewport.
F4
Select front view in the current viewport.
F5
Select 3D view in the current viewport.
F9
Compile/Run your map.
H
Quickhide selected objects.
U
unhide Quickhidden objects.
I
Toggle unselected object borders in the 3D view.
O
Toggle FPS and position information.
P
Toggles 3D grid.
W/A/S/D
Used like the arrow keys in the 3D view, much like you would use in Portal 2.
X
Toggles editing in the 3D view.
Z or F11
Toggles mouselook, which simulates noclip in Hammer.
1 thru 0
Preset zoom options for the current 2D viewport.
+/-
Zoom in/out on all 2D viewports.
{Left Bracket}
Smaller grid
{Right Bracket}
Bigger grid

Ctrl+N
New Map (VMF file)
Ctrl+O
Open...
Ctrl+S
Save (who doesn't know this one? Use it like crazy!)
Ctrl+Z
Undo
Ctrl+Y
Redo
Ctrl+X
Cut
Ctrl+C
Copy
Ctrl+V
Paste
Del
Delete

Shift+Q
Clear Selection (de-select)
Shift+W
Snap to Grid
Shift+R
Show Grid
Shift+A
Texture Application (a.k.a. Face Edit tool)
Shift+L
Texture Lock
Shift+Z
Toggle Fullscreen (selected viewport)

Ctrl+G
Group
Ctrl+U
Ungroup
Ctrl+T
Tie to Entity
Ctrl+Shift+W
Move to World
Ctrl+M
Transform
Ctrl+L
Flip Horizontally
Ctrl+I
Flip Vertically
Ctrl+R
Create Prefab

Ctrl+A
Autosize 4 Views
Ctrl+E
Center Views on Selection
Ctrl+B
Snap Selected to Grid
Ctrl+Shift+B
Snap Selected to Grid Individually

Alt+F3
View Messages
Alt+Enter
Object Properties
Alt+P
Check for Problems

Ctrl+Shift+C
Carve
Ctrl+Shift+F
Find entities...
Ctrl+Shift+R
Replace...
Ctrl+Shift+G
Go to Brush Number...
Ctrl+Shift+M
Model Browser...
Ctrl+Shift+S
Sound Browser...
Ctrl+Alt+S
Sprinkle...

Using the mouse:

Mousewheel
Zoom in/out
Space + Left Click
Pan/rotate the camera in 3D View; move the camera in 2D view.
Space + Right Click
Move the camera in 3D view (WASD also does this).
Ctrl + Left Click
Multi-select
Shift + Drag
With an object (or objects) selected, duplicate the object(s). Often easier than copy-paste.
Alt + Drag
Bypass snap, even on a 1×1 grid.
Four Walls, a Ceiling and a Floor...
Throughout my early mini-guides, I'll be doing this somewhat "cookbook" style, providing the "ingredients" and the "recipe" for each mini-guide as I go along. Or maybe it's just like being an engineer who has to assemble something given some parts.

This first guide has no real ingredients, as it's just a little tutorial on how to create a simple room. I've seen Hammer newcomers create more complex spaces though, so it seems that I don't need to say much here.

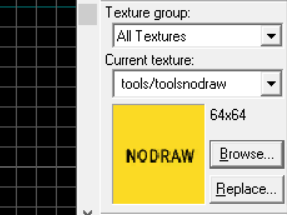
1) Set the texture to tools/toolsnodraw (this is for optimization reasons — nodraw practically has no lightmap, shortening compile times):


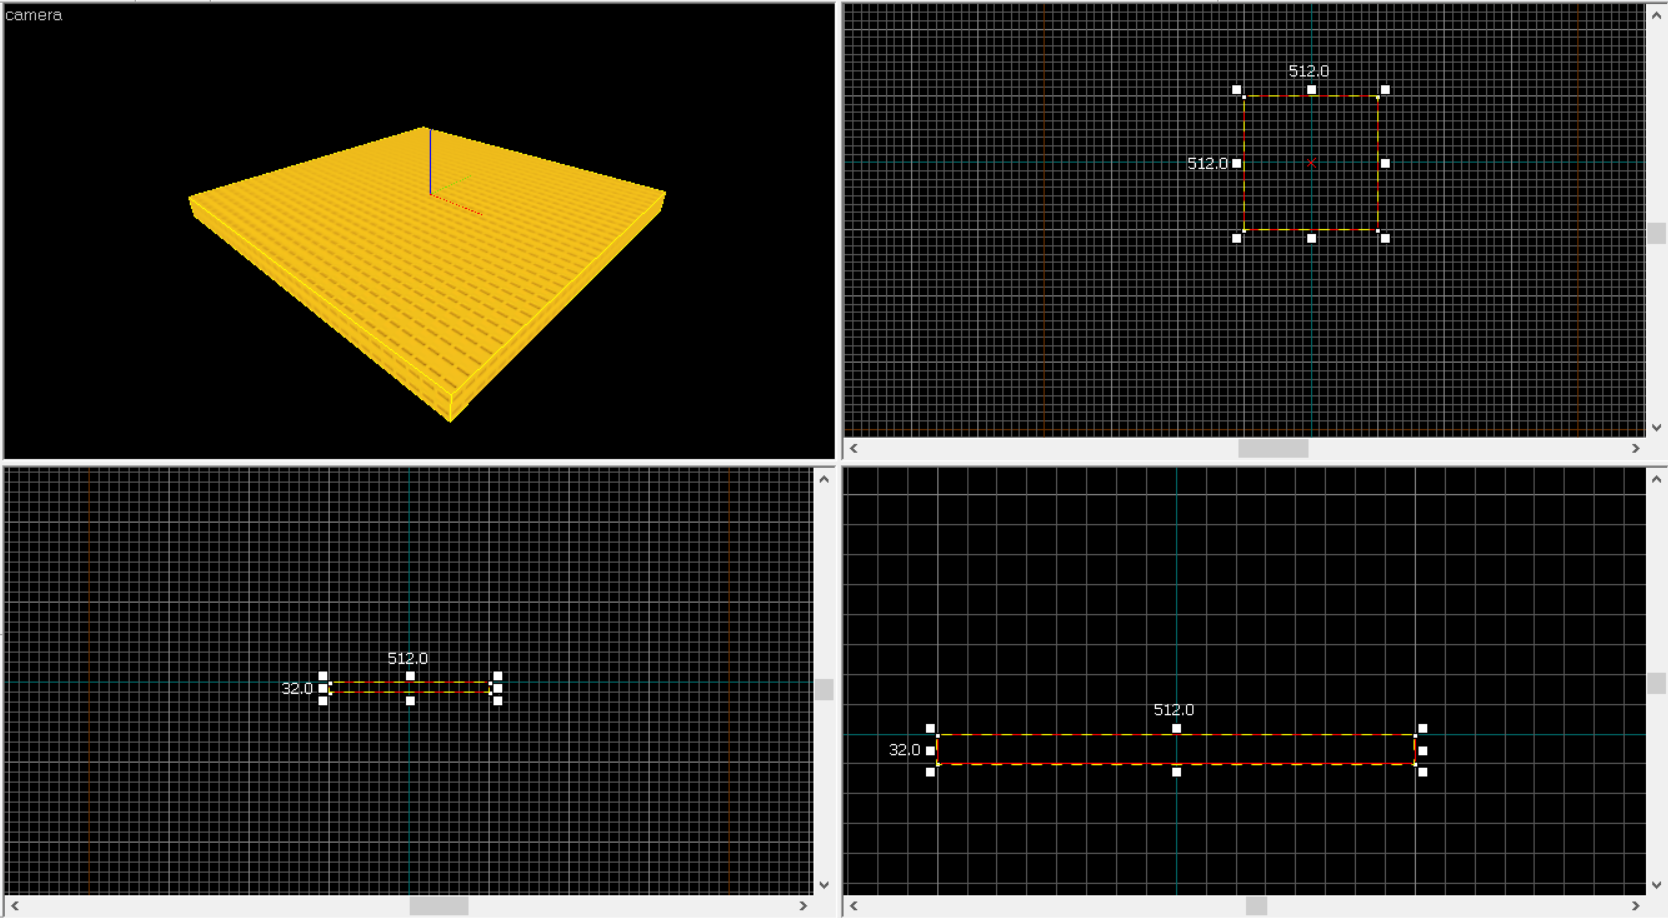
2) Create a block 512 units long, 512 units wide and 32 units high (you may need to resize the grid to do this):


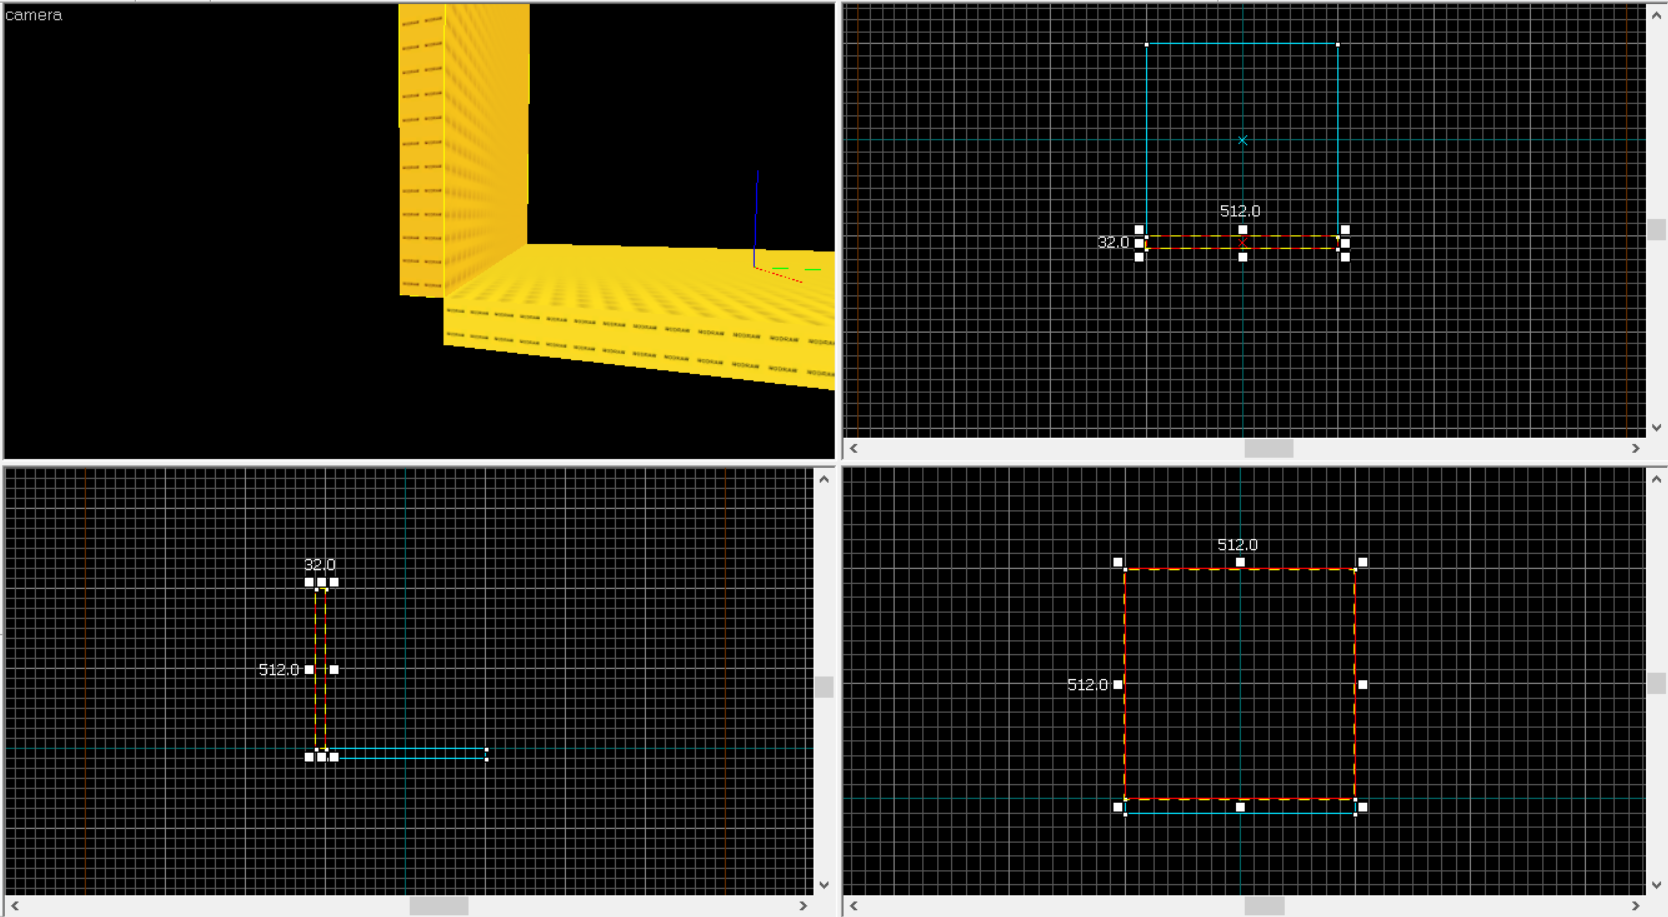
3) Duplicate the block and resize it to 512 units high and 32 units wide. This will be your wall. Move it so that it touches the edge of your floor:


4) Duplicate the wall and move it to the other side, again, just touching the edge.

5) Duplicate both walls and rotate them 90° (use the Transform tool for a cleaner rotation).

6) Duplicate the floor and move it up so that it touches the edges of the four walls. This will be your ceiling.

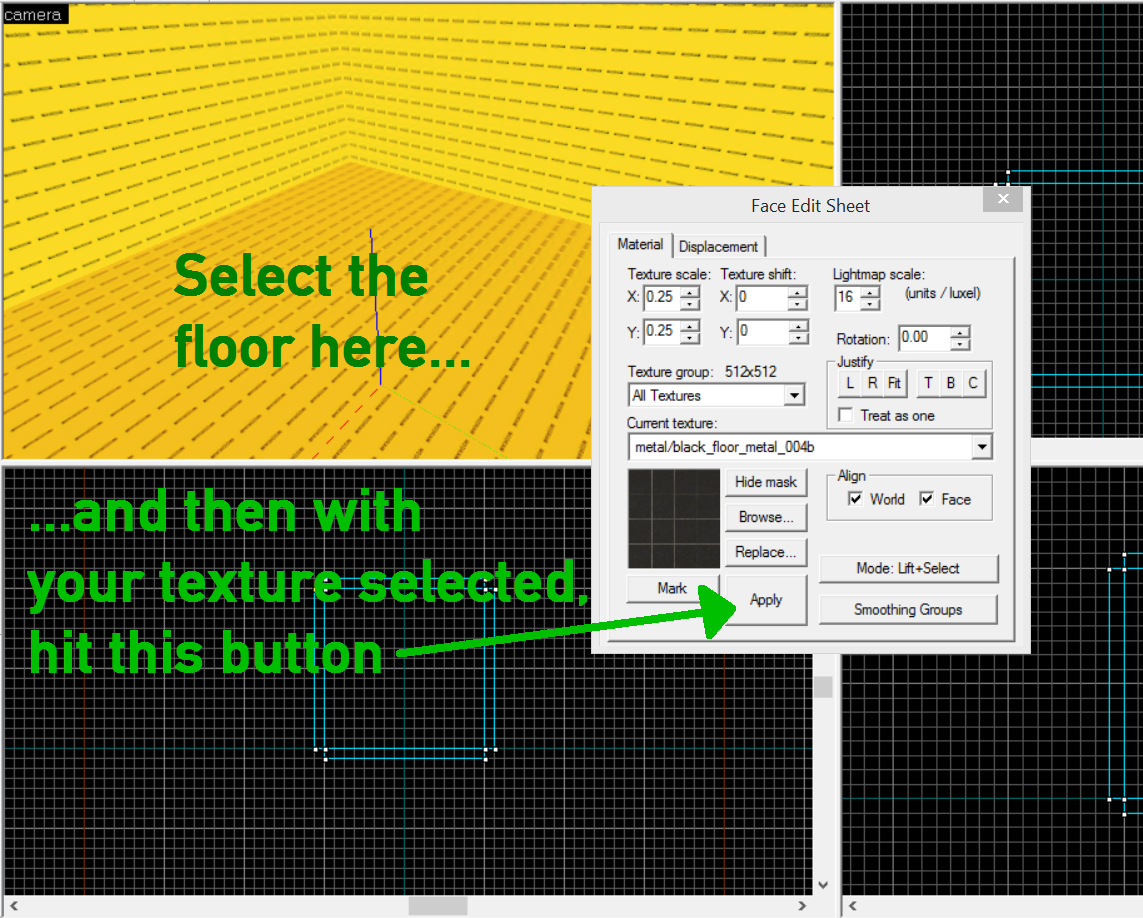
7) Now we're ready to texture things. Using the Face Edit tool, select the floor of your room and texture it something like metal/black_floor_metal_004b:


8) Do the same for the walls. Recommended texture: metal/black_wall_metal_004c

9) And finally, do the same for the ceiling. Recommended texture: metal/black_ceiling_metal_001a.

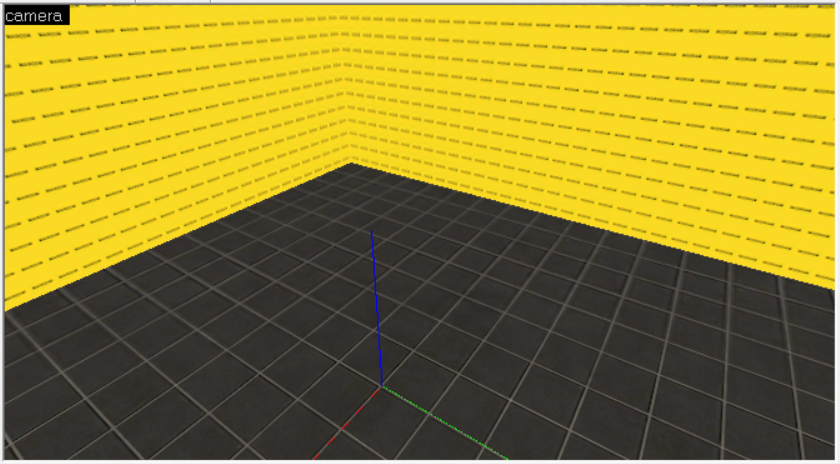
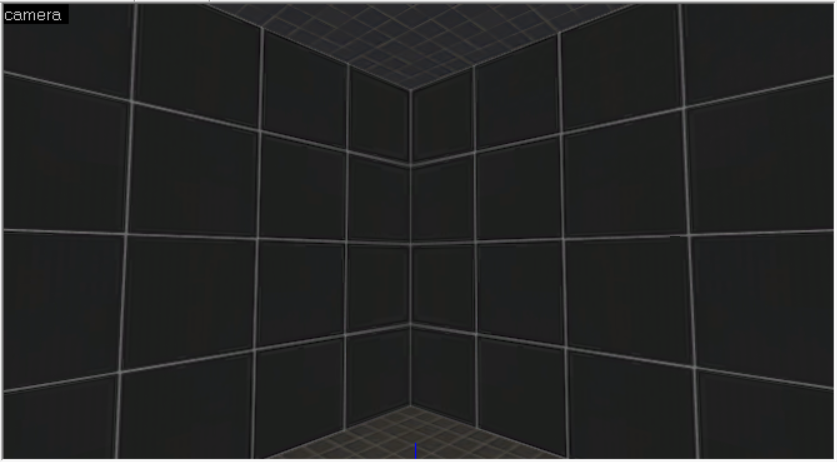
By now your little room should be looking like this:


10) Your room is ready. All you need to do is add an info_player_start, maybe a light entity or two (the most basic light entity is light), compile and run your map, learn from the result and please, do not publish it.

The room should resemble a retextured 4×4×4 PeTI room without an entrance, exit or observation room. It's also a lot more optimal since it was not built using 96 128×128×128 voxels (none of which have nodraw at all), but instead using a mere 6 brushes.

As noted on the VDC Wiki, you can also use the "Make Hollow" tool. Just make your nodraw block a 576 unit cube, and set the width to 32 units (should be the default). From there on out follow steps 7-10 above.

Of course, such spatial architecture alone isn't really a test (unless you count all those "No Elements" tests), so let's move on to the next few guides in the series (check the Master Guide List below).
Mistakes to Avoid & More Information


There are a lot of them, so pay attention
  • Not knowing Hammer well enough. Hammer is a powerful tool — much more powerful than you might think it to be at first.
  • Publishing empty or near-empty rooms. Seriously, we're all sick of it! If ol' Cave could afford it, he'd be firing so many more employees than you think right now. Don't be one of them!
  • Publishing maps that have no ending (which I define here for now to mean "taken to the voting dialog page").
  • Not knowing how to make a brush entity, such as a trigger.
  • Not knowing enough about Portal 2's entities. For instance, who can tell me without looking anything up right now what the entity to auto-align portals is?
  • Bad lighting. Please don't use light to annoy the player. To help with other aspects of bad lighting, I wrote this guide.
  • Not detailing maps that are to be published. MAKING A MAP IN HAMMER IS AN ART, not just a process of puzzle creation. In fact, art creation is the primary purpose of Hammer. Either add some detail or don't publish it, or you're fired.
  • Not respecting Portal 2 themes enough. Please don't mix in underground textures with tile textures, as it just looks weird.
  • Using wall textures on the floors and vice versa. If I had to choose, I'd err on the side of using floor textures too much. Seriously though, don't do either one!
  • Other forms of texture abuse: visible triggers, nodraw, areaportals, or basically anything that really should be invisible.
  • Asking too much from the test subject. That isn't Science! That isn't Science one bit!
  • More details about all of the above can be found in RectorRocks' guide.

More information from the VDC Wiki:
Master Guide List
Please note that there are still some works in progress. This section will be updated as I finish more guides for you!

You are currently viewing part 01/19 in the series.

| 00 | 01 | 02 | 03 | 04 | 05 | 06 | 07 | 08 | 09 | 10 | 11 | 12 | 13 | 14 | 15 | 16 | 17 | 18 | 19 |

Previous Guide (Table of Contents and Test Element Index)
Next Guide (about textures and lighting in Portal 2: observation rooms and light strips.)

Please feel free to leave a well-reasoned question or comment below. Either I or a qualified Test Chamber Associate (you'll know because they make all the good maps on the workshop) will respond. If your question or comment is not well-reasoned, I recommend reading over my guides again until you understand them 100%. No further information is required here or will be provided, and you will become an excellent Test Chamber Designer — using Hammer!

40 Comments
cupofspiders 14 Oct, 2021 @ 7:13pm 
as someone who is relearning hammer after making some bad, undetailed test maps, i am already loving it. thank you!
The Sojourner  [author] 23 Apr, 2021 @ 11:58am 
Thanks for the typo alert. Fixed.
ChaosContrl 17 Apr, 2021 @ 6:53pm 
Typo: 16) Toggle model fade preview. Only useful > or < optimization across different systems/gaming platforms. Should be > for <.
ChaosContrl 17 Apr, 2021 @ 6:41pm 
I do wonder if Portal 2 is using normal maps for its textures. If that's the case, are these normal maps sort of "bundled" with the hammer textures? That would most likely be the best argument for not putting wall textures on floor and vice versa, since their normal maps were not designed to be on the floor (or the other way around), which in turn would give weird visual results (no matter how subtle they might become).
The Sojourner  [author] 14 Nov, 2020 @ 11:25pm 
Funny, I said nothing about the ceiling tile textures. They look similar to the floor textures, so Valve lazily used floor textures in their place in PeTI maps when the initiative first started. However, you will never see a wall texture on a floor or ceiling in a PeTI map.
The Sojourner  [author] 14 Nov, 2020 @ 11:25pm 
Also, a bit of context: this series was created at a time that there were a lot of garbage Hammer maps on the Portal 2 Workshop, so there may be a bit of that inherent bias, e.g. to nudge new mappers toward proper texture use, and to understand why the textures were designed the way they were. The VDC Wiki at the time was the only viable source of information for Hammer mappers, and I wanted to make something more accessible for mappers who have felt that PeTI wasn't enough for them. I haven't looked, but I suspect the quality of Hammer maps has improved since the creation of this series. Case in point: your very own maps.
The Sojourner  [author] 14 Nov, 2020 @ 11:24pm 
And so using a wall texture on the floor might not be the biggest mistake (or "mistake") compared to the others listed here, but it's not particularly pleasant to look at (or perhaps even to listen to) when a floor texture could've clearly sufficed. Actually, a significantly worse error is using the _vertex textures in place of the regular ones since those react bizarrely to lighting or changes in viewing angle.
Shinval 14 Nov, 2020 @ 3:00am 
One quick item: Did you know the portal PETI editor puts floor textures on the ceiling?

So it can be done and it's not a mistake. Your argument holds no water for me.

Listen up everyone put textures wherever you feel they work best in your map. It's YOUR map!
Shinval 14 Nov, 2020 @ 2:50am 
When you play a map and don't like things about it you are free to post your comments to the mapper about it.

This article is teaching or suggesting it's wrong to do something when its not up to you - don't to teach limitations. You should give people unbiased information and skills and don't judge how they use that information or those skills.

I am saying this guide is either strictly a GUIDE on how to do things (you write that stuff well) or its you hoping to change what you seem to think is wrong.

It is bad writing to put judgmental opinions into an informational article. It's a mistake. Are you then saying you can say what a mistake is and I can't?

I guess we will just have to continue to disagree then.
The Sojourner  [author] 13 Nov, 2020 @ 10:39pm 
You could mix up the tile textures, but I daresay that wouldn't be in good taste (unless you're doing it satirically), and part of this series is to learn how to make maps with class and style.

But answer me this: is an art instructor being contradictory when they suggest "do"s and "don't"s of art? Yes, art is meant to be free, but at the same time, it works best when there's some coherence to it.

And if you want to argue "you don't have to like it," then why are you even commenting? Just read my guide as you will and move along, thank you.