Hotline Miami 2: Wrong Number

Hotline Miami 2: Wrong Number

Not enough ratings
How to make a sprite replacement mod
By decay1994
How to do it
   
Award
Favorite
Favorited
Unfavorite
PLEASE READ BEFORE CONSIDERING MAKING A SPRITE MOD
Creating sprite mods aren't easy. It takes a lot of patience and precision. Contrary to creating a music mod, this method of modding takes a lot more effort on your end. You may already know these things, but I am here to help, if you need it.
TOOLS YOU'LL NEED
  • HLMWadExplorer[github.com] (most up-to-date-version)
  • Advanced image editing software (GIMP, Photoshop, whatever you've got on hand. Anything that isn't MS Paint, it doesn't support transparency.)
  • Patience, and a lot of free time. If you choose to do this kind of stuff, just know it's going to take a good deal of time, depending on what you're editing.
  • Music to listen to while you work (if you prefer to work in silence, that's okay. I just like to listen to music while I work, it helps me not go insane.)
Step 1: Get HLMWadExplorer (if you haven't already)
In order to modify the sprites used in the game, you'll need a program called HLMWadExplorer. You can get it here[github.com] if you haven't already gotten it.
Step 2: Open HLMWadExplorer
Open your HLMWadExplorer program.

(THIS STEP ONLY APPLIES TO THOSE USING THE TOOL FOR THE FIRST TIME.)

I think the first time it opens it asks for the directory in which your Hotline Miami 2 copy is based. C:\Users\(USERNAME)\Documents\My Games\HotlineMiami2 is where all your mods will be saved when they're done. The directory where you want the program to use is C:\Program Files (x86)\Steam\SteamApps\common\Hotline Miami 2 (It might not be in Program Files (x86), depending on how you're set up with games. You can easily find the directory by right-clicking Hotline Miami 2 in your Steam library, going to Properties, clicking the third tab called Local Files, and clicking Browse Local Files.)
Step 3: Switching the base WAD.
Verify that, after you've set the directories right, your program shows the options below. If not, go to the upper left and select "Switch Base wad" and select "hlm2_data_desktop.wad". This is where you'll find all the spritesheets you'll be editing later.

NOTE: Attempting to open the "hlm2_patch_desktop.wad" file will cause the HLMWADExplorer program to crash, so don't try to open it.
Step 4: Choose something to replace.
Because the majority of the game's files are based in sprites and other content, there will be a lot of options here. You can change enemies, playable characters, furniture, and even the HUD elements like ammo displays for guns and the Fans' masks for when they start a level. I will list all the modify-able sprites using the "sprites" .wad below.
  • Tiles/Flooring
  • Walls
  • Enemies
  • Playable Characters
  • Weapons (It's best to change playable character sprites as well if you want to change weapons.)
  • UI Elements (For controllers)
  • Effects (Blood, gore parts, explosions, etc...)
  • VHS Covers (not that you'd need to mod them, but they're there to do whatever you want with them)
  • "Tiny Sprites" (Particle elements, for whatever use you may find them.)
  • Fonts

Step 5: Extract the source .png file
Odds are you're just here to change character/enemy sprites, so you'll need to find the .png file of the character(s) you wish to edit. After highlighting your choice, go to the "Resource" tab and select "Extract". Choose a location to extract the .png file to, and press save.
Step 6: Editing
Using GIMP, you can use the Select by Color tool and select every instance of the selected color, and either delete it or paint it a different color using the paint bucket. This makes reskinning jobs much easier and very quick. Just be careful because the color white is used in sprites of characters carrying knives, and any melee weapon being swung has a white trail following it. If you want to change all that is white in a sprite sheet, make sure to go find all the melee and knife sprites and re-paint the trails and gleam on the knife back to white for consistency.
Step 7: Testing
To apply your edited sprites, go to the HLMWadExplorer, find your character/sprites' .PNG file, click "Resource" and click "Replace". Locate your edited .PNG file and select it. Then, click "Save as..." and name your mod. (This option is only available when you've changed something) Then, as you would with a music mod, go to "File" and click "Merge patch". Then start up your game. Check to make sure all the animations are fluid, and that there are no dots or specks appearing in the corner of your sprite animations. If you see specks/dots, that usually means that another sprite is too close to the sprite showing specks, meaning it is showing a tiny bit of the other sprite along with that one. Crop or delete the dots to ensure each sprite is clear of "debris".


Every time you need to update the sprites, you'll need to make a new version and delete the old version. You'll need to do the procedure listed above every time you need to fix something or change something. I suggest naming each one "your mod name, version #" with the corresponding fields being filled out with information. Depending on how good you are at editing, you can go as high as version 7 or 8, even 10 if you're really bad at it. Don't get discouraged, it's a great idea to make mods for people to enjoy new content, like re-skinning factions or making entirely new factions. Just know that if you want good feedback, make sure the animations for walking and pumping shotguns are smooth and accurate. I suggest you edit a good deal of sprites at one time, test them, then see what work still needs to be done.


I suggest creating a level called "Test". Put the character you are editing, all the weapons that they can carry and use, and every enemy that is available to kill for that character. You can make this test level as simple or elaborate as you want, as long as you can test each and every sprite used by your character in one level, save for sprites used in cutscenes, unless you want to be thorough and get those too. If a sprite for the default character shows up, odds are you missed a sprite you were supposed to replace.
Step 8: (OPTIONAL) Compile your mod and release it.
If you want to release your mod out to the public and let others mooch off of your success enjoy your content, there are many websites out there that allow you to upload and share your files. I highly suggest using an archiving program (WinRAR, WinZIP, etc...) to collect your files all in one place. I also suggest leaving a readme, despite the fact hardly anyone will read it, just in case some curious fellow wonders who made the mod and whether or not to give credit if they use it in a level and release it.

It is probably best to release a sprite mod if you're planning on making a campaign using them, and plan on uploading said campaign.

Here are a couple websites I would upload to if I were to upload any mods related to Hotline Miami 2.
  • Hotline Miami Wikia (Mods Section)[editor.wikia.com]
  • Gamebanana - Hotline Miami 2 Mods[gamebanana.com] (I don't use Gamebanana, nor do I think it will get much publicity there, but if you're aquainted with Gamebanana and already have an account, this is a good option for you.)
  • Last Bullet[lastbullet.net] (This website mostly contains mods for the game PAYDAY 2, but they have a section for Hotline Miami 2 mods, so you can upload your mods here if you already have an account, or you can sign in via Steam.)
29 Comments
InfoWars 27 Dec, 2020 @ 6:06pm 
Hello, do I have to change every pixel for every character? For example, do I need to bother changing sprites that I have no intention of using? Thanks!
Angry Zliden - ShinobiVIVIVI 18 Feb, 2018 @ 12:26am 
But it works at all levels in the campaign, and I need it to work at only one level of the campaign
decay1994  [author] 17 Feb, 2018 @ 1:23pm 
Go to the folder of the level you want the mod to effect (press "O" on it to open it) and create a folder called "mods" and throw the .patchwad into it. Then, it will only be active when you play that specific level.
Angry Zliden - ShinobiVIVIVI 17 Feb, 2018 @ 12:42pm 
How to install the mod in the campaign so that it does not work on all levels but only one?
Rippertear 11 Jan, 2018 @ 12:44pm 
Do you know as to how the game seperates the individual textures? I'm making a mod with different sprite sizes, and don't want textures to be cut apart or misplaced or anything.
decay1994  [author] 9 Jul, 2017 @ 1:46am 
@☭Ailurophile456☭
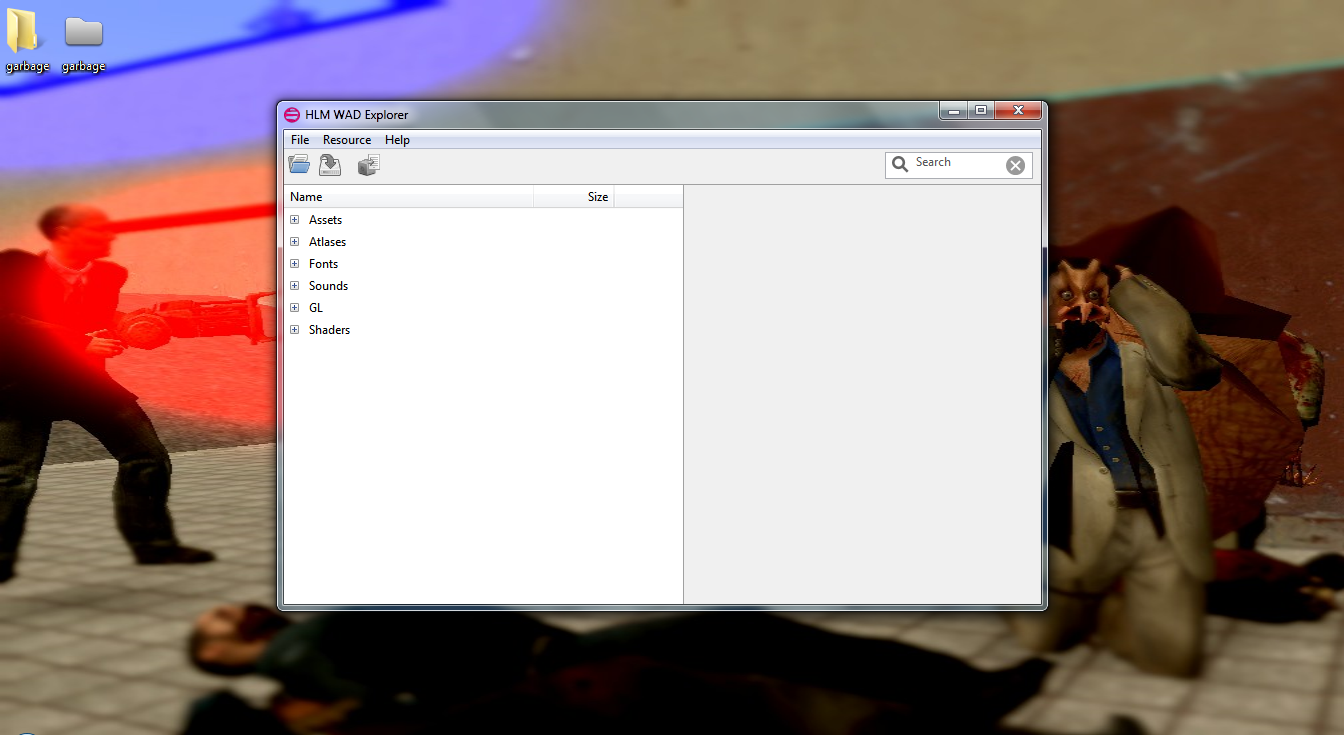
Are you using the link I provided, and the most up-to-date version? If you are, delete the files associated with HLMWadExplorerer and do a fresh re-installation of the program.
Billy 8 Jul, 2017 @ 11:58pm 
HMLWadExplorer doesnt work for me, all the options are grayed out and if i open anything it crashes
decay1994  [author] 3 Jul, 2017 @ 1:54pm 
@DillJ1120
Good to hear everything worked out, I hope you enjoy making new content for the workshop, you may've seen some of the creative stuff on the front page. You should check out the Synthwave genre of music if you're into the music in Hotline Miami, it can help you get in the mood. There's also a New Retro Wave group on Steam, where I posted all the Synthwave artists I knew of in the discussions board, if you're looking for more of this kind of stuff.
DillJ1120 3 Jul, 2017 @ 1:30pm 
Alright, I replaced the official sprites with the modded sprites, and the error was a false alarm. At least for the face sprites. Also, I see why music is recommended. Only hearing the noises of "click,click,click,click,click" from my mouse can drive me crazy, so I play Hotline Miami 2 soundtracks to listen to while I work.
decay1994  [author] 3 Jul, 2017 @ 10:40am 
@DillJ1120
Make a backup of the original sprite file and apply the modded sprites despite the warning. If the sprites crash the game, then the warning was valid. If not, the error may have been a false alarm. This error might disappear if you open + close the program, I have found.