Steam

Steam

891 ratings
Steam Console
By Смайл
In this tutorial, you will learn about such a useful thing as the Console Tab in the Steam client. What is it and how it works. Let's get to it!

Note: I might update this guide occasionally and add some new info. If you want to keep up with the changes, make sure to bookmark the guide.

Your questions in the comments help keep this guide current. The more you ask, the faster new stuff shows up in the guide.

6
2
2
15
5
3
3
2
   
Award
Favorite
Favorited
Unfavorite
What is the Steam Console?
Console in Steam — Is a tool that lets experienced users customize their Steam client preferences. It also doubles as a browser. To set up Steam client through the console, you can use commands that use your basic settings menu.


How to open a console in the Steam client?
The console tab in the Steam menu can be opened in various ways, and I will demonstrate all of them. Let's begin with the simplest method.


Method №1 — Use the "Run" command in Windows.


Open a command window by pressing "Win + R" and enter the command: steam://open/console — then press Enter.


Method №2 — Using your Internet browser in Windows.

Here's what you do:

Open up any browser and type in the URL bar the command: steam://open/console

As an example, I will use the Opera browser, you all know him, trying to drive the team: steam://open/console and press Enter. Check out the screenshot:


Automatically open the hidden console tab when launching Steam
There's also a way to make the console launch every time you launch the Steam Client itself. It's suitable for those who like to automate everything.

To do this, you will need to click on the Steam shortcut with the RMB. Open Properties, then click on the Shortcut tab, then type the -console parameter into the Target field, just like in the screenshot below:


In your context menu, Steam will now feature a new item: Console. See a screenshot of how it looks below:


You can also include additional console commands as launch options.
What is the Steam client console and how to work with it?
Here is a console window into which you enter the different commands. To use the Steam console for client settings, you will not need extensive knowledge. A description is provided for each command. Configuring the Steam client via the console involves entering commands in the input field below. I will provide a screenshot below:


Unfortunately, the 'open' command now only opens URLs using the Steam protocol.

To open a link or site via the Steam Web Helper (Steam Browser), you need to hold Ctrl and click on any link in your profile.


Left Ctrl + click on any link in the profile — This is now the only way to browse sites through the Steam Web Helper (Steam Browser).
Download files from Steam Storage
There's a plenty of console commands that will be useful for everyone. In this paragraph I will tell you about a useful command, such as download_depot. Let's start with a description.

download_depot <appid> <depotid> [<target manifestid>] [<delta manifestid>] [<depot flags filter>] — download a single depot.

For example, I type in the command: download_depot 220 225 1185898365931644616 — This command will start to download "Russian Half-Life 2 voiceover" files into Steam directory.

Before downloading Steam will say that the files are ready and download process will start. The message looks like this: Downloading depot 225 (674 MB) ...

Here's a screenshot below (check the files that you downloaded):


When downloading is complete the Steam console will show you this message: Depot download complete : "..\Steam\content\app_220\depot_225" (9 files, manifest 1185898365931644616) — This means that files are downloaded successfully.

Note: When you download files from the repository Steam will not display anything in downloads section.

Where can I see the Depot-ID and ID applications?
ID applications and Depot-ID can be viewed on the website: https://steamdb.info
  • If you are interested in the application, then click the top of the site: Apps, and then enter the name of the game in the search field.

  • If you are interested in Depot-ID, then click the top of the site: Package, and then in the search field, enter the name of the game.

You can also browse Depot-ID through the app search. To do this, click on the tab: Package, which is located to the right of the tab: Apps. For those who do not understand, see the screenshot:


Then you find the right package, open it and write down the manifest ID and ID of the package that you want to download.

I'll tell you in detail for those who do not understand how it's done.

1. Go to the website: https://steamdb.info/depot/225/ — it is a depot for Half-Life 2 with a Russian voice acting. This package can be downloaded only by Russian users or those who set Russian as client's language.

2. Look at the screenshot below and remember 1 and 3 row with numbers:


3. Open the Steam console with the command: steam://open/console

4. Enter the depot downloading command and insert required numbers that we obtained in step 2: download_depot 220 225 1185898365931644616

Done!

The files are downloaded to the folder: Steam → steamapps → content → app_220 → depot_225 → hl2 and you can use them for free!

What is the meaning of downloading? It's very simple: game developers are splitting games into certain packages that are downloaded by regular users. This method allows you to download packages of certain application which you obtained by entering a digital key or bought in Steam.
Downloading files from the Steam Workshop and Steam Cloud
I just want to mention one significant disadvantage of this method: workshop files can only be downloaded for games that you have purchased from the Steam Store, activated by a key, or for F2P games as well. For example: Dota 2, Team Fortress 2, Synergy, and so on. This includes every game that is registered on your account, including games or apps you have added to your library from the Store page.

The Steam client console offers two completely identical commands. This indicates that these commands perform the same function: when a user enters a command into the console, Steam sends a request to the Workshop for a specific item page by its ID.

If you don’t own the game or app from the Store, you aren’t downloading files from the Workshop of this game. The only exception may be an Anonymous account. That account has access to some dedicated servers, so with the Anonymous account and SteamCMD, you can get files from the Workshop of certain games that the Anonymous account has access to.

For example: You can get free access to files of the Counter-Strike: Source or Counter-Strike: Global Offensive files if you download the dedicated server using SteamCMD on your PC.

Note: Some RP servers in Garry's Mod require the CS:Source content. You can download the dedicated server files for CS: Source and place them into your Garry's Mod game folder.

Commands:
workshop_download_item — <App ID> <ID file from the Workshop>
download_item — <App ID> <ID file from the Workshop>

Example of TF2 workshop command:
workshop_download_item 440 791213600

Example of Garry's Mod workshop command:
workshop_download_item 4000 790375930

Once you enter commands into the console, your client will start downloading files from the workshop. Whether it is an add-on or merely a map, the Steam client will save all files in the same directory: Steam → steamapps → common → workshop → content. This folder will contain all the downloaded workshop files.

For instance, using the workshop_download_item command, I downloaded a file from the Workshop. Here is a demonstration screenshot:


As you can see on the screenshot, Steam client has downloaded certain files and folders, which are used by the addon itself.

Note: If you have managed to download files without purchasing a game, then congratulations! You are fortunate, although this may simply be a bug in the Steam client.
Commands: user_friends and user_info
In the console, there are commands that allow users to view information about their Steam accounts and obtain a list of all their friends to save in a notepad or simply keep as souvenirs.

user_friends — This command displays a list of all your friends in the console. The command will not display friends who have been deleted.

This command is only helpful if one wishes to see who has unfriended him or her. Although it is not a trade offer log, it remains useful.

user_info — This command shows personal info about you. All relevant information will appear in the Steam client console, including your email, account confirmations, SteamGuard, username, status, language, country, and the number of friends you have.

What is the purpose of this command in the context of Steam usage? This data may be utilized to compose letters in support of Steam. What are your thoughts on this matter? Please share your thoughts in the comments section below.
Family Sharing — Library for friend (Regionally limited)
Finally, we've come to a very interesting topic. Now I will reveal you a little secret that will help you to increase slots and share library with all your friends. This method increases the number of slots for friends that are sharing your library.

As you can see in the picture below, I exceeded the value of the slots 100 times. This is more than usual.


Some of you are thinking: «This was photoshopped!»

Unfortunately, no, you're wrong. This isn't photoshopped at all. Steam Client has a very interesting command that allows to increase the number of Family Sharing slots so you can share a library with more than five of your friends or relatives.

Command:
library_sharing_account_max = "5" — This command controls the number of Family Sharing slots to share the library with friends or relatives.

Enter the following command: library_sharing_account_max "999" — and you will see that the slots in your client's settings to increase by 999. It's very simple and easy!

And now the use of this method. In order to properly share the library with your friend or relative, you must enter this command on your computer first, and then you connect to a computer of your friend or relatives to open the console in the Steam client and once again enter this command after logging into your account.

1. Enter the command library_sharing_account_max "999" on your account.

2. Connect to your friend's computer, switch to your account.

3. Open the Steam console on your friend's computer and enter the command from the first step again: library_sharing_account_max "999".

4. Share your library to a friend and then make sure that he can access the library.

5. Check if value of library_sharing_account_max "999" has changed.

If value of this command remains the same and your friend has access to your library, then you have done everything correctly.
Downloading DLC without downloading the game itself from Steam storage
You all know that if you begin installing a DLC for a game that is not already installed on Steam, it will first install the game itself, as it has not yet been downloaded, and only then will it proceed to download the DLC. However, there is a solution to this issue.

Steam console commands can facilitate the downloading of DLC without the necessity of downloading the game itself onto your PC.

Notice: Downloading a DLC without downloading the game itself is possible only if you own the game.

What you need to do?
You need to grab the ID of the game that the DLC is from, then grab the ID of the DLC itself.

For this you need:
— ID of the game
— ID of the DLC

After this open the console — steam://open/console

And type this: download_depot <ID of the game> <ID of the DLC>

For example:

https://steamhost.cn/app/317400

ID of this game: 317400

This application has a DLC:

https://steamhost.cn/app/322420

ID of this DLC: 322420

To download the DLC without downloading the game itself, you need to enter the following console command:

download_depot 317400 322420 — and Steam will start downloading DLC without downloading the game itself.

Note!
And if the game and DLC are both free, then you can download the DLC straight away.
Drag and Drop function
Saving images to the desktop through Steam

With the updated Steam client interface, showcased in the Beta version, a function was added that may be useful for us. It pertains to saving images to the desktop using the drag and drop method.

Drag and drop is now available in the Steam client. This is how it appears in the following example:


Keep in mind that this could not be done previously.
Search Console Commands
The Steam Console has a find command to search for various console commands.

Syntax: find <keyword> — For example: find depot


clear_console is a command that clears your console window and removes all text from it, leaving you with an empty screen.

Note: clear_console is a hidden command, so you have to type it in manually.
Now Steam can download files via links — Like other browsers
Steam client can now download files straight from the internet. Valve added the feature to download files through links in the Steam client's code.

For instance, you can try grabbing a music file from a website with a direct link. This will come in handy for those with less powerful computers.

Commands that help with installing or removing apps via the console
app_info_print — Dumps app info for appID.
app_status <appId> — Info about app by ID.
app_dlc_status <appId> <dlcId> — Status DLC of app by ID.
app_set_update_flag <appId> — Set update flag of app by ID.
app_stop <appid> [force:0|1] — Stop this running app by ID.
app_info_update — [0|1] : trigger app info update, optionally for update all.
app_license_request — <AppID> — Requests a free licenses for this app if not already owned.
app_uninstall [-complete] <appId> — Uninstall app by ID.
app_restore <appId> <backup folder> — Backup app by ID.
app_move <appId> <volumeindex> — Move app to another directory by ID.
app_backup <appId> <max size MB> <target folder> — Backup app by ID.
app_start_validation <appId> — Validation app by ID.
app_install <appId> [volumeindex] — Install app by ID.
library_folder_list — List all mounted Steam volumes.


The volume index value in the Steam console commands is used to specify which volume or drive to install the game or application on. When you enter a specific volumeindex number, Steam will install or move the selected app or game on that particular volume. This can be useful for users who have multiple storage drives and want to select where to install their games.

For example: app_install <appId> [volumeindex]

0 — Disk: C
1 — Disk: D
2 — Disk: E

Etc...

Subscription to an item from workshop by ID
1. Start Steam with launch parameters: -dev -console


2. Go to any Workshop item page on Steam:

https://steamhost.cn/steamcommunity_com/sharedfiles/filedetails/?id=3490989275
3. While on the Workshop Item Page, press F12 to open the Steam DevTools:


4. In the DevTools window, select the Console tab:


5. In the console tab, write the command: SubscribeItem(ID-of-Item) — Without spaces!

Example: SubscribeItem(851659462) — Without spaces!

Then press Enter. Once clicked, you will see the Steam client start downloading something.

Open Downloads in Steam and check if the addon you specified has downloaded from the Steam Workshop or not.
Steam Achievement Commands
Commands that may be useful to you:

reset_all_stats — Clears all stats and achievement.

achievement_clear — Clears an achievement.

There are no other console commands for achievements or stats in the console.
Running Steam client only with 1 browser's process
Steam Web Helper is basically the browser for the Steam client. You use it to check out the Store, Community, view profiles, or visit different sites through the Console tab.

If there's a setting to turn off the Steam client's web browser, there should be a setting for limiting the number of processes too.

I found the following parameters:

C:\Steam\steam.exe -dev -console -no-dwrite -nofriendsui -nointro -nobigpicture -nofasthtml -cef-disable-xcomposite-workaround -cef-disable-renderer-restart -nocrashmonitor -cef-disable-gpu -cef-disable-occlusion -cef-disable-js-logging -cef-disable-hang-timeouts -noshaders -no-shared-textures -cef-disable-seccomp-sandbox -disablehighdpi -cef-single-process -cef-in-process-gpu -cef-disable-delaypageload -single_core -cef-disable-d3d11 -cef-disable-sandbox -disable-winh264 -no-cef-sandbox -vrdisable -cef-disable-breakpad -vrskip -skipstreamingdrivers -cef-use-shell-exec -cef-disable-gpu-compositing -browser-offline -disable-overlay-gpu-pri -compat-disable-filtering -cef-disable-site-isolation -cef-disable-touch-focus-workaround

Attention! The shortcut in operating systems has a limited input of parameters for launching, for this you will need to use a batch file.

What do you need to create a batch file?
1. Create a Text Document
2. Open a Text Document and write down the path to the file Steam.exe
3. Add such launch parameters to it:

C:\Steam\steam.exe -dev -console -no-dwrite -nofriendsui -nointro -nobigpicture -nofasthtml -cef-disable-xcomposite-workaround -cef-disable-renderer-restart -nocrashmonitor -cef-disable-gpu -cef-disable-occlusion -cef-disable-js-logging -cef-disable-hang-timeouts -noshaders -no-shared-textures -cef-disable-seccomp-sandbox -disablehighdpi -cef-single-process -cef-in-process-gpu -cef-disable-delaypageload -single_core -cef-disable-d3d11 -cef-disable-sandbox -disable-winh264 -no-cef-sandbox -vrdisable -cef-disable-breakpad -vrskip -skipstreamingdrivers -cef-use-shell-exec -cef-disable-gpu-compositing -browser-offline -disable-overlay-gpu-pri -compat-disable-filtering -cef-disable-site-isolation -cef-disable-touch-focus-workaround

4. Change the file format from * .txt to * .bat

Done! Now you can run and check the batch file.

I did like this:


I tested this method on a netbook running the Windows 7 operating system with only 1GB of RAM.

P. S.
1 GB of RAM can be used to accept trades through the Steam client.

You can also run Team Fortress 2 with 1 GB of RAM and confirm your accepted in-game items to save them in your in-game inventory. But if you try to advance beyond the game menu, the game will crash.

Warning!
Implications of parameters

[+] Client's web browser will consume less RAM on your processor.

[+] The load on Steam applications will decrease.

When you start up the app on Steam, it puts a lot of strain on your computer's RAM if it isn't strong enough. By adjusting some settings, you can ease the strain on your RAM by running only one process of the Steam Client Browser, allowing you to play games like CS:GO smoothly.

[+] If you open up a music site in the Steam client and play CS:GO while listening to music through Steam, you won't have any freezes or lags. You can keep on playing for fun because Steam Web Helper only runs on one process.

Note: Sometimes even one Steam Web Helper process (Steam Client Browser) can consume a lot of RAM. To do this, launch Task Manager (Ctrl + Shift + ESC), select the process: Steam Web Helper and End the process.

This, you restart the Steam Web Helper process and after restarting the load will decrease again.

[-] Occasionally, when Steam Web Helper (Steam Browser) is overloaded, the Steam Client may shut down and restart at any time.

But don't worry! The Steam client will restart on its own, and you will be temporarily disconnected from your friends list until Steam Web Helper reconnects.

This usually happens when you visit a site or page that puts a heavy load on RAM due to JavaScript and CSS styles.

Note!
If, under the specified parameters, Steam Web Helper constantly crashes and reboots, then turn off the Steam client and set these parameters:

C:\Steam\steam.exe -dev -console -no-dwrite -nofriendsui -nointro -nobigpicture -nofasthtml -cef-disable-xcomposite-workaround -cef-disable-renderer-restart -nocrashmonitor -cef-disable-gpu -cef-disable-occlusion -cef-disable-js-logging -cef-disable-hang-timeouts -noshaders -no-shared-textures -cef-disable-seccomp-sandbox -disablehighdpi -cef-single-process -cef-in-process-gpu -cef-disable-delaypageload -single_core -cef-disable-d3d11 -cef-disable-sandbox -disable-winh264 -no-cef-sandbox -vrdisable -cef-disable-breakpad -vrskip -skipstreamingdrivers -cef-use-shell-exec -cef-disable-gpu-compositing -browser-offline -disable-overlay-gpu-pri -compat-disable-filtering -cef-disable-site-isolation -cef-disable-touch-focus-workaround

These options only allow two Steam Web Helper processors to run. If only two Steam Web Helper processors are allowed to run, there will be no reboots or restarts.
How to Clear the DNS cache via Steam Console
Flushing your DNS cache can be a useful tool to resolve any host connection errors that you may experience with Google Chrome (Steam Web Helper). It is very simple to do and can be done directly in Chrome or from an Elevated Command Prompt window in Windows 7 or 8.

What is the DNS Cache?
Your browser (Steam Web Helper) DNS Cache (Domain Name System) is essentially a small databank that stores all the IP (Internet Protocol) addresses for websites you access. The main purpose of this database is to make it easier for your computer to reach and access the IP addresses of websites when their servers change or if they create new servers.

When IP addresses become outdated or if a website switches to a new server, you may encounter DNS errors when you try to access them. Sometimes, due to continued use and accessing sites with a less than perfect web safety rating, your DNS cache may also become corrupted. This is where a DNS cache flush comes in handy.

What is Flushing?
Just like flushing a toilet and getting rid of any old water that is stored in the tank, a DNS flush will make your computer erase any existing information regarding DNS names and IP addresses that is has stored. After you perform a flush, the next time you try to access a website, your computer will ask for all the new IP and DNS information related to that site resulting in an error free browsing experience.

Flushing your Cache through Google Chrome (Steam Web Helper)
If you experience any DNS or host error related browsing issues, it can sometimes help to perform a DNS and Socket flush using your Google Chrome browser (Steam Web Helper). In order to fix these problems, follow these simple steps.

Begin by opening Steam Console and type in this address: chrome://net-internals/#dns


And press the Enter key.

If you look at our screenshot, you will notice that there are 24 active entries and a list with details of all the IP addresses that the DNS cache has picked up and stored.


In order to flush your Google Chrome browser’s DNS cache, simply find the button that says: Clear Host Cache and click it. You can click it more than once if you want to make sure it did what it was supposed to, but a single click is usually enough. You will notice that the number of active entries has gone down to 0 and the list of websites accessed has been cleared.

You can open and make manual adjustments to the parameters. To do this, open the CONSOLE tab and type the command:

open chrome://chrome-urls


Open the settings page and make the settings you want.
Commands no longer work in the Steam client Console! What to do?
Use SteamCMD. Download, unzip, and run SteamCMD to update your console version of the client, and then you can start using all the cool features.

You can also download old packages by using the download_depot command, for example. Check out the official Valve Wiki links for more info:

https://developer.valvesoftware.com/wiki/SteamCMD
Some Helpful Tips
You can use the find command in the console to see all the different options and commands for starting up Steam.

Try using console commands and startup options to disable any features in Steam that you don't need while playing.

For example, if you type in the command find CEF in the console, you'll see all the startup options for the Steam Web Helper.

Make a list of the options you want, and put them in a text file. Then, make some BAT files to run Steam with those specific options.

For example:

The first BAT file could disable features you don't need while playing games, and another could do the same for when you're just online.

The second BAT file will disable unnecessary settings when you are online and not playing any games.

Choose the options and commands that will help your Steam run better by disabling any unnecessary features while you play or when you're online but not gaming.

Put some BAT files in the Steam folder next to Steam.exe, and in each one put your chosen settings and commands.

Create shortcuts for the BAT files and place them on your desktop for easy access. Use the first BAT file to play games on Steam with all features disabled, or use the second one to simply browse online with those same features turned off.

These simple settings will help you tweak your Steam client and make it easier to handle.
Depot's console commands
patch_dump <filename> <depotid> — This command allows you to dump patches for a specific depot into a file with the specified filename. This can be useful for troubleshooting or analyzing patch data.


bShaderCacheDownloads — This command enables the downloading of shader cache depots. Shader caches store pre-compiled shader programs for faster loading times in games. Enabling this command allows Steam to download and store these shader caches on your system for better performance.


bFinishStagedDepotVersions — This command is used to finish the staging process for depot versions in Steam Console Tab. When set to 1, it indicates that the depot versions that have been staged are ready to be finalized and made available for distribution.


nDepotSaveCorruptChunks — This command sets the option to not save corrupt chunks for a particular depot in Steam Console Tab. When set to 0, it indicates that any corrupt or incomplete chunks encountered during the depot creation process will not be saved.


DepotDeltaPatches — This command determines the level of delta patching that will be applied to the depot versions in Steam Console Tab. A value of 2 typically indicates that both incremental and full patches will be generated for the depot versions.


bDepotDeltaPatchUseAPI — When set to 1, this command enables the use of API for depot delta patching in Steam Console Tab. It allows the Steam API to be utilized for creating and applying delta patches to reduce the size of updates for users.


DepotUseSparseFiles — This command enables the usage of sparse files for the specified depot in Steam Console Tab. Sparse files only allocate disk space for data that is actually written, helping to reduce the amount of storage space needed for depots.


@DepotBuilderNumHTTPSocketsToMDS — This command determines the number of HTTPS sockets that can be used for communication with the Metadata Server (MDS) during the depot building process.


@DepotBuilderParallelUploadChunks — This command specifies the number of chunks that can be uploaded in parallel during the depot building process.


@DepotBuilderMaxParallelUploadChunks — This command sets the maximum number of chunks that can be uploaded in parallel during the depot building process.


@DepotBuilderProgressTimeout — This command sets the timeout duration (in milliseconds) for the progress of the depot building process.


@DepotBuilderEnableVZd — This command enables the use of virtual zoning during the depot building process.


@DepotBuilderVZdMinRatio — This command sets the minimum ratio required for virtual zoning to be utilized during the depot building process.


@DepotBuilderXORMatchPercent — This command sets the percentage of matching content required for XOR deduplication during the depot building process.


@DepotBuilderDeltaMaxChunks — This command sets the maximum number of chunks that can be generated for delta patching during the depot building process.


DepotReconstructionNumIOThreads — This command sets the number of I/O threads used for depot reconstruction to 32.


DepotReconstructionLowPrio — This command enables low priority for depot reconstruction, which can help optimize system resources.


DepotDownloadProgressTimeout — This command sets the timeout duration for depot download progress to 900 seconds.


DepotUseAlternatingReadWrite — This command enables the use of alternating read—write operations for depots.


DepotReconstructionBadChunk — This command specifies whether bad chunks should be used during depot reconstruction (0 means disabled).


DepotMinWriteGapSizeMB — This command sets the minimum write gap size to 64 MB, which can help improve performance.


bShaderDepotNative — This command enables the use of native shader depots for improved performance.


@bDepotBuilderReadBufferSizeKB — This command sets the read buffer size in kilobytes for the Depot Builder. A larger buffer size may improve performance when reading data from the depot.


@bDepotBuilderUnbufferedReads — This command enables unbuffered reads for the Depot Builder, which means that data is read from the depot directly to memory without being buffered. This can improve performance for certain operations.


@cDepotBuilderFileChunkingThreads — This command sets the number of threads used for file chunking in the Depot Builder. File chunking is the process of dividing files into smaller chunks for more efficient storage and retrieval. Increasing the number of threads can help speed up this process.
Slow steam downloads? Try this!
Have Steam downloads slowed down recently?

Have none of the usual fixes helped (restarting, changing servers, etc) ?

These will need you to have all downloads paused (unpause the download after entering the command) and the steam console opened (openable with steam://open/console in your web browser).

HTTP2 disabling
Here are the console commands with settings:

Steam Console Command for Windows:
@nClientDownloadEnableHTTP2PlatformWindows 0

Steam Console Command for Linux:
@nClientDownloadEnableHTTP2PlatformLinux 0

MacOS doesn't seem to have HTTP2 toggles in Steam.

For some reason, HTTP2 causes download slowdowns in certain cases. For me, this caused downloads to go (on Windows) from about 10-20MB/s to my connection's maximum, around 60MB/s. A pretty huge jump, eh!

Now, there's no guarantees that these convars will stay in the future, but if we help Valve fix the HTTP2 downloads being slow in the first place then disabling it shouldn't be necessary.

It also doesn't seem to matter whether you have the client beta in use or not.

More connections at a time
There's also a second convar, which applies to all platforms:

@fDownloadRateImprovementToAddAnotherConnection 1.1

This convar makes steam connect to lots more servers (up to 10, usually connects to around 3, seems to be hard capped in code with no convars to change it) which can theoretically improve download speeds. It might also make them a lot worse. You can use the command download_sources to see various download stats.

More initial download servers
Some users report adding more download servers will also speed it up some more, this is achievable with the command:

@cMaxInitialDownloadSources 15

Saving these settings
These settings don't save automatically. You'll need to create a steam_dev.cfg file in your steam install directory:

Linux: /home/USER/.steam/steam/steam_dev.cfg
Windows (usually): C:\Program Files (x86)\Steam\steam_dev.cfg

And place the lines you used inside (one command variable per line).

Originally, I intended to post this on r/Steam and then crosspost it here, but apparently it is against "Rule 3: Download Issues."

Thus, I have retained the Windows commands here as well.
Hidden or Extra Steam Launch Options
I found these command-line options (launch parameters) on Reddit, GitHub, and various third-party sites. Please let me know in the comments if any of these command-line options are deprecated or no longer applicable.

You can find some launch options yourself by using the find command in the CONSOLE tab of the Steam client.


-tcp — Forces Steam to use TCP instead of UDP for downloads (useful if UDP is blocked or unstable)

-udp — Forces Steam to use UDP (default, but can be set explicitly if TCP is causing issues).

-noverifyfiles — Skips file verification when updating games (faster updates but risks corrupted files).

+open steam://open/minigameslist — Disables Steam's built-in Chromium browser (reduces RAM usage). Adding +open steam://open/minigameslist re-enables the library view.

-silent — Launches Steam without a window (runs in the background).

-noreactlogin — Skips the new React-based login screen (falls back to the old login UI).

-lowdisk — Runs Steam in low-disk-space mode (disables caching, reduces disk usage).

-clearbeta — Removes any active beta participation (reverts to stable Steam client).

-cef-disable-gpu — Disables GPU acceleration for Steam's Chromium UI (helps with GPU-related crashes).

-no-dwrite — Disables DirectWrite font rendering (may improve performance on older systems).

-single_core — Forces Steam to run on a single CPU core (rarely needed, but may help with stability).

-ipv6 — Forces IPv6 connections (if your network supports it).

-noerrdialogs — Suppresses error pop-ups (useful for automated setups).

-allow_third_party_login — Previously allowed third-party login methods (unclear if still works) — (deprecated?).


Warnings:
Some flags (like -noverifyfiles) can cause issues if misused. Valve may deprecate or remove some options in future updates. If you're troubleshooting, -tcp are among the most useful.
The End


You can add more information about console commands and parameters to this guide in the comments below

572 Comments
Смайл  [author] 31 Jul @ 1:14am 
Steam has hidden commands that tweak how often it checks for connectivity. Try launching Steam with:

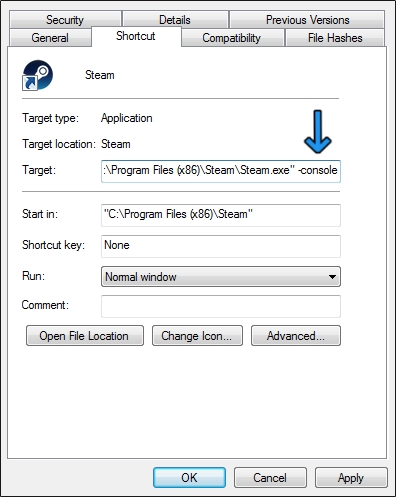
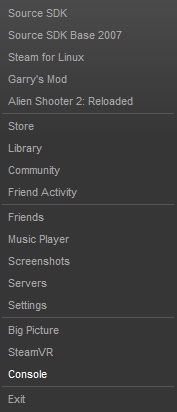
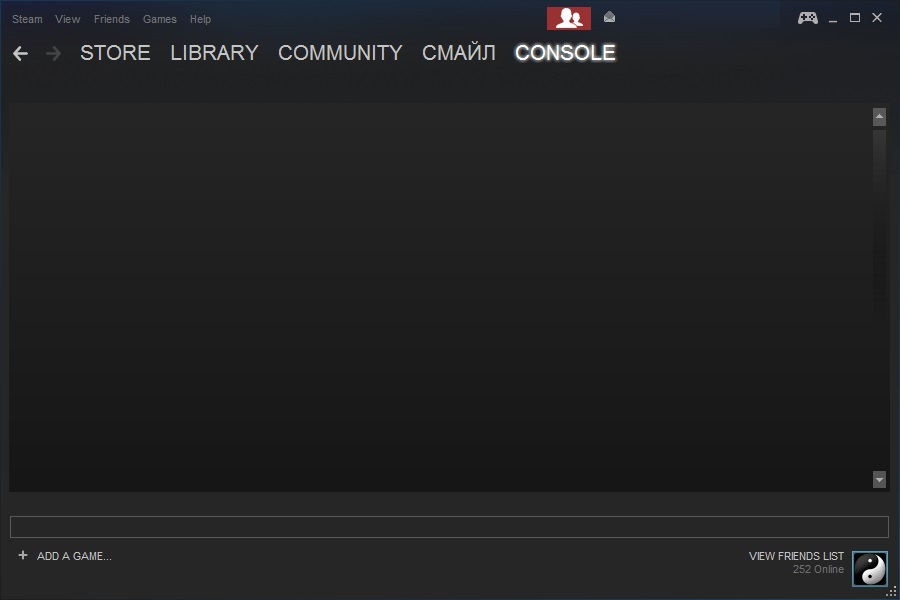
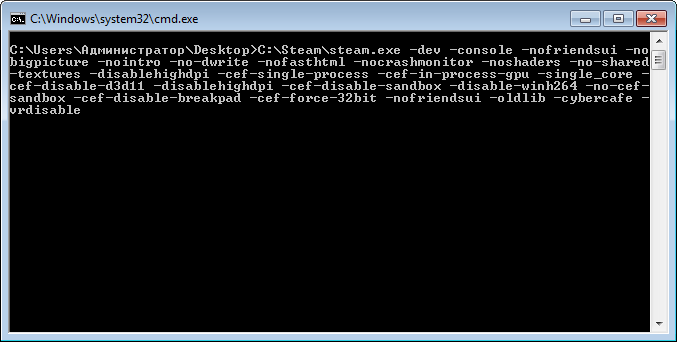
steam.exe -console -tcp

The -tcp flag forces Steam to use TCP instead of UDP, which can sometimes help with connection issues.

————————————————————————————

Prevent Connection Drops (General Fixes)

Disable IPv6 (Steam sometimes struggles with it):

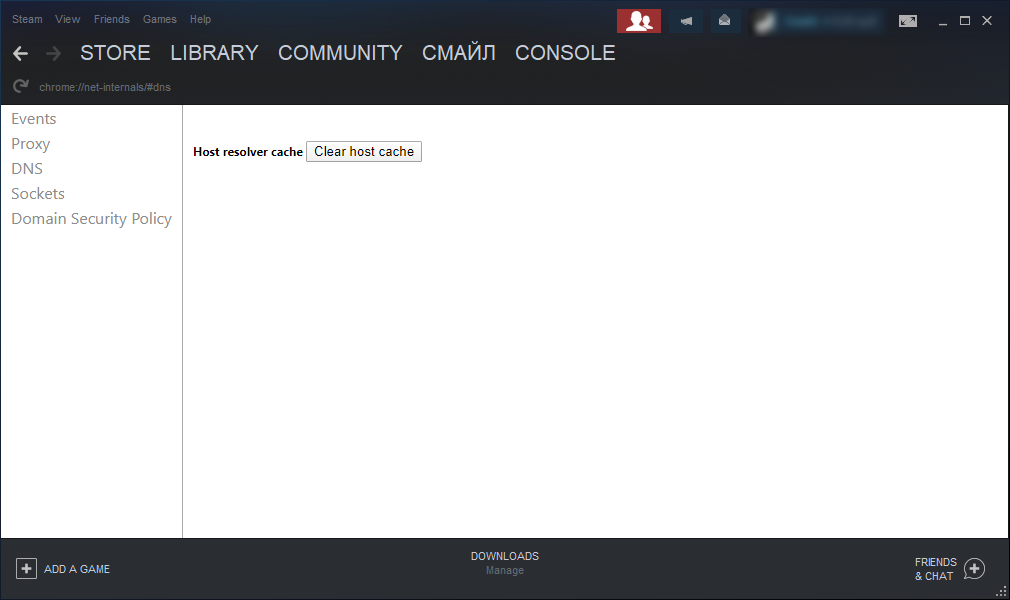
Go to Settings → Downloads → Clear Download Cache.

Use Google DNS (8.8.8.8 and 8.8.4.4) in your network settings.

Disable Steam Beta Participation (Settings → Account → Beta Participation).
Quadstrike 30 Jul @ 6:45pm 
any idea of commands that can tell steam to reconnect, when i lose connection it can take up to like 10 mins to reconnect sometimes
Смайл  [author] 4 Jul @ 1:11am 
Okay, mate!
~Master-Guy 3 Jul @ 9:23pm 
Totally forgot about Depressurizer, thanks!
Gonna use that as baseline and see if I can expand their functionality
Смайл  [author] 3 Jul @ 9:22am 
Yes you can use JavaScript in DevTools (but may need adjustments after Steam updates).

I think this tool will help you: Consider Depressurizer (a Steam library categorizer).

https://github.com/Depressurizer/Depressurizer

Correct me if I understood you wrong?
~Master-Guy 3 Jul @ 8:59am 
Would you happen to know if it is possible to manage collections this way?
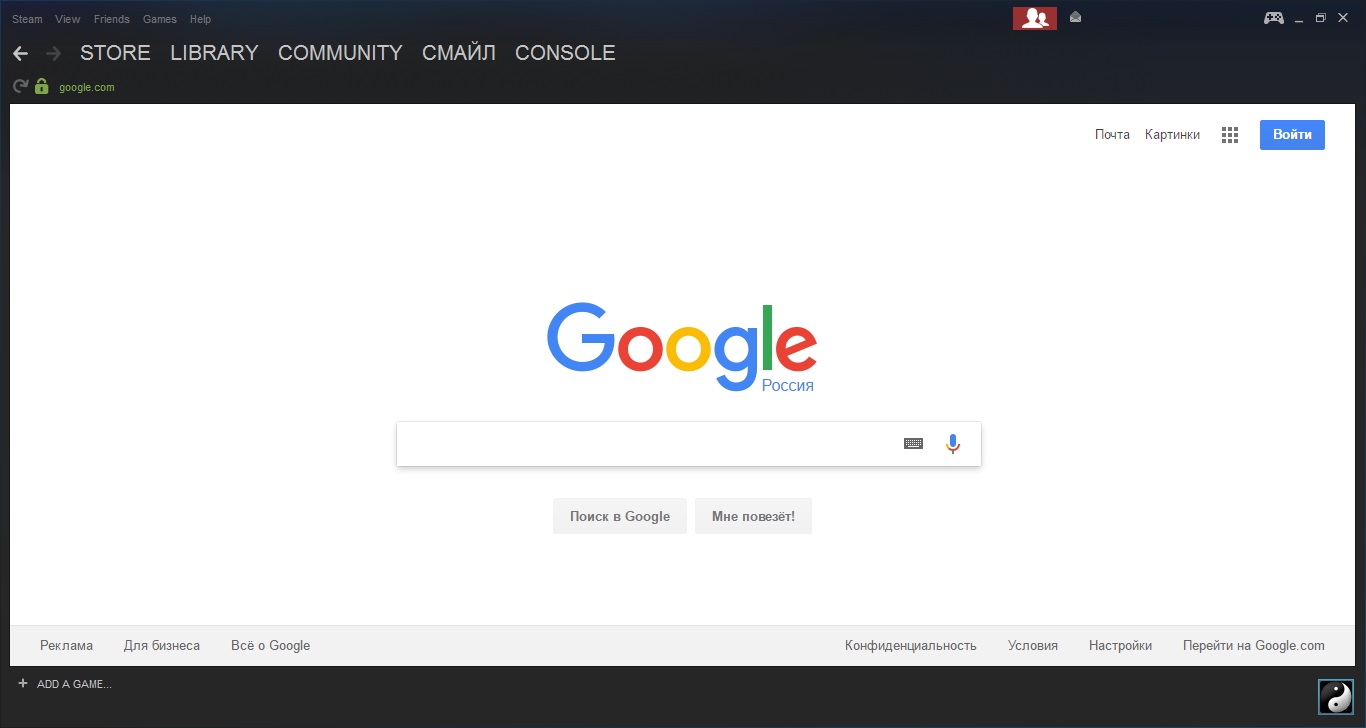
I'd like to categorize my library based on some custom criteria, and have been looking at javascript to control the page, but can't seem to scroll through the library to fetch the rest of the games, so maybe using the console it is possible?
Смайл  [author] 2 Jul @ 5:17am 
Okay, ty
lightwo 2 Jul @ 4:02am 
> Must use: ...
Yes, that's correct
Смайл  [author] 2 Jul @ 3:18am 
Well yes, you just gotta test this out. Anyway, you can ask Lightwo — he’s usin’ Linux and can help ya out.
Draconic NEO 2 Jul @ 3:14am 
Ah yeah that makes sense, it needs direct paths to the directories.