Space Engineers

Space Engineers

28 ratings
Blender: Import and display FBX from SE
By Sandflakes
This guide will teach you how to import the original FBX models from space engineers and display them with textures. It will also teach you how to clean up the model and remove all SE_Blocks Slot #xx with minimal work.

If this is your first time making models you should check out Harag's guide first. This guide will not teach you 3D modeling or how to import blocks in to Space engineers. That tutorial can be found here [harag-on-steam.github.io]
   
Award
Favorite
Favorited
Unfavorite
Downloading Space Engineers SDK
  1. Open Steam
  2. Hover your mouse over LIBRARY and select Tools. (Alt. Press the text next to the search bar and select Tools.)


  3. Find Space Engineers - Mod SDK. This contains all the sourcefiles.
  4. Wait for the download to finish and then browse to the source files, default path is: \\Steam\steamapps\common\SpaceEngineersModSDK\OriginalContent.
Importing FBX
Importing the FBX is simple but will look like a mess before you clean it up. In this guide I will use the assembler as an example but the same steps should be applicable to all of the original models.
  1. In blender, press File -> Import -> FBX (.fbx)

  2. Now browse to SpaceEngineersSDK shown in Downloading Space Engineers SDK.
  3. Go to \\OriginalContent\Models\Cubes\large\ and select Assembler.FBX
  4. Click Import FBX in the top right corner. You should end up with something like this and it is perfectly normal.
Fix Model Offset
When a model is imported it will often be offset in one dimension. The one you see as offset is the parent. The rest of the objects are the children of that part. Before these can be used their origins and scales has to be adjusted.

If no part is offset, skip to step 6.
  1. Select the parent (Part that is offset from the rest)
  2. Press "Ctrl + i" to invert the selection.
  3. Now press "g" to move all parts but the parent. Try locking axises by pressing the keys "x","y" or "z" until the selection is moving on the correct axis.
  4. When the correct axis is identified input 1.25. If it moves the opposite way, press "-". If it does not move far enough try the next multiple of 1.25. (1.25*2=2.5).
  5. When the part is in the correct location select all.
  6. Now you need to go to the object tree on the right and deselect all empties (dummys/conveyormarkers/terminals) by shift clicking. If you don't they will be moved to the center of the parent.
  7. Press "Ctrl + a" to open the apply transformation menu. Apply Location and open again to apply rotation and scale.
Removing SE_Blocks Slot #x
When the models are imported they come with a huge amount of garbage and duplicate materials (.001 etc), which in some cases causes lag. This will show you how to remove these with minimal effort.


Note that this will require you to activate an additional plugin. Only tested in Blender 2.78 Please confirm later versions in the comment section.
  1. Go to File -> User Preferences -> Add-ons.
  2. Search for Material in the community tab.
  3. Activate Material Utils Specials and press Save User settings. (You may have to restart blender for the addon to load)

  4. SAVE BEFORE CONTINUING
  5. Press A to select all objects. (if "Clean Materials" is gray then you need to select a object before selecting all)
  6. Press Shift+Q and select "Clean Slots -> Clean Material Slots". (Blender will freeze for a short time)
  7. Press Shift+Q again and select "Specials -> Merge Base Names". (This will replace all .001 etc with the base name.)
  8. In the popup leave the box empty and select Auto Rename/Replace. Press Ok.
  9. Your blender may lag now but this can be fixed by saving and reopening the scene. This happens because you have lots of unused materials. These will be removed when you reload the scene.
View SE textures in Blender
This step is very time consuming but will be worth your time. It will allow you to display the default SE textures in Blender.

TECHNICAL STUFF:
TL;DR: Blender does not support the default textures so we need to convert them.

The reason you can't see the textures right away in blender is because of the texture compression. Space engineers uses a newer format called BC7 which is not supported by Blender. What we need to do is to convert these textures in to BC3 which is supported by Blender.

Before continuing, go to this guide and follow the The "Hard" Part steps by DranKof.
How to Make and Convert DDS GUI Icons

  1. If you have not followed the guide linked above, do so now.
  2. Change the content of convertTextures.bat from step 9 to:
    texconv -f BC3_UNORM -if LINEAR -sRGB -y -o TexturesOut Textures\*_cm.dds texconv -f BC3_UNORM -if LINEAR -sRGB -y -o TexturesOut Textures\*_add.dds texconv -f BC3_UNORM -if LINEAR -sRGB -y -o TexturesOut Textures\*_ng.dds ren TexturesOut\*.DDS *.dds pause
    Splitting it up will filter out all the "_de" and "_me" used for dx9 to reduce the time it takes to process.
  3. Go to \\SpaceEngineers\Content\Textures\Models\Cubes and grab the textures you need (.DDS) files.
    *Note that this is a very time consuming process so only pick the ones you need unless you can leave your computer for 10-60min*
  4. Put the selected textures in the Texture folder you created in the other guide and then run convertTextures.bat
  5. Go grab a coffee and a potato while waiting.
  6. When the process is done go ahead and make a dummy SpaceEngineers folder structure to trick blender to use the BC3 textures but still use the BC7 textures in game. The structure should look something like this: E:\SeModding\SpaceEngineers\Content\Textures\Models\Cubes\
  7. Copy all the textures from TextureOut to the Cubes folder that you just created. Don't overwrite the original files in SpaceEngineers or you will probably run in to issues (Or do it and tell me what happens :) ).
  8. In the dummy folder create a folder named Bin64. E:\SeModding\SpaceEngineers\Bin64\
  9. Copy your SpaceEngineers.exe from \\common\SpaceEngineers\Bin64\ to the Bin64 that you just created.
  10. Go to the blender add-on and change your game directory to your dummy folder.
  11. In Blender, if you haven't already, change from Blender Render to Cycles Render.
  12. Select any part, go to materials tab and select one of the materials.
  13. Convert to Nodes Material and link the _cm, _ng and _add materials to the materials in your dummy folder. If you are unsure what material should be linked to what, you can find the Material definitions in Materials.xml Path:\\SpaceEngineersModSDK\OriginalContent\Materials.
  14. Repeat this for all the materials in the model.
*Note: Don't forget to change to material view in 3Dview*

*Note2: Some materials does not have a _add map. For these materials to show up properly you need to disable AO on those materials. Don't know why but it works.*

To Disable AO Select the material you want to change:
  1. Select Node Editor
  2. Select Material Nodes
  3. Go to DX11, we don't care about Dx9. Change Ambient Occlusion Power to 0.
Credits
I could not have done this without some help from the community. Big thanks to:
  • Digi: Helped me with textures and to correct issues in the guide.
  • Harag: His great Blender tutorial.
  • DranKof: Texcon guide.
12 Comments
Gena_Snow 26 Sep, 2020 @ 7:36am 
Using Blender 2.90.0. In the "Removing SE_Blocks Slot #x" section, I needed to go to Edit -> Preferences -> Add-ons to enable the materials add-on. Also, it is called "Material: Material Utilities" now. Furthermore, there is not a "Save User Settings" button anymore. However, the rest of the steps worked just the same.

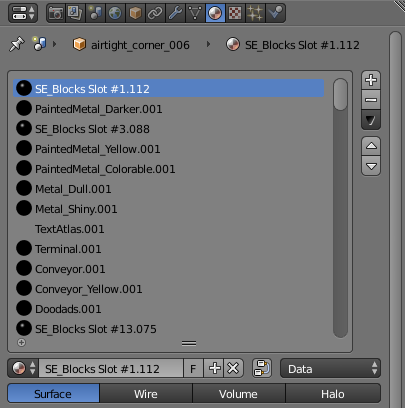
I'm stuck in the next section, "View SE textures in Blender". There is not a 'The "Hard" Part' section to this guide. Do I just follow the whole guide in either GIMP or Paint.NET for all the textures related to the .fbx I'm using?

Thanks for your guide! Very helpful so far!
Ouroborus 27 Jul, 2019 @ 5:02pm 
How long does it take the models to import? It seems like Blender just hangs when clicking the "Import FBX" button after selecting the file.
KeepGood 9 Aug, 2018 @ 3:47pm 
Thanks for the guide, it's appreciated :) I'm stuck at 'View SE textures in Blender' .... I have my coffee but, what do I do with the potato? :P
Mad 10 Jul, 2018 @ 11:23am 
I wrote this small script to speed up the selection of materials, https://pastebin.com/wiwTsam9 . You can use it in "view se textures in Blender" step 12. Just need to set two file paths, they are commented in the code.

You can run a python script in the text editor in Blender.
Sandflakes  [author] 1 May, 2018 @ 9:56am 
Thanks for the addition Digi! It is a bit of a pain with the model offsets.
Digi 1 May, 2018 @ 9:16am 
I think there's a more reliable way to fix model offset after importing.
This only works if the parent object is properly aligned.

These steps should be repeated for each position axis of the parent that is not 0:
1. Select the parent object.
2. See its position and copy the number from the axis you want to fix (e.g. X).
3. Ctrl+i to invert selection and select everything else.
4. Press G and the axis letter (e.g. X) then paste the number and press - to negate it.

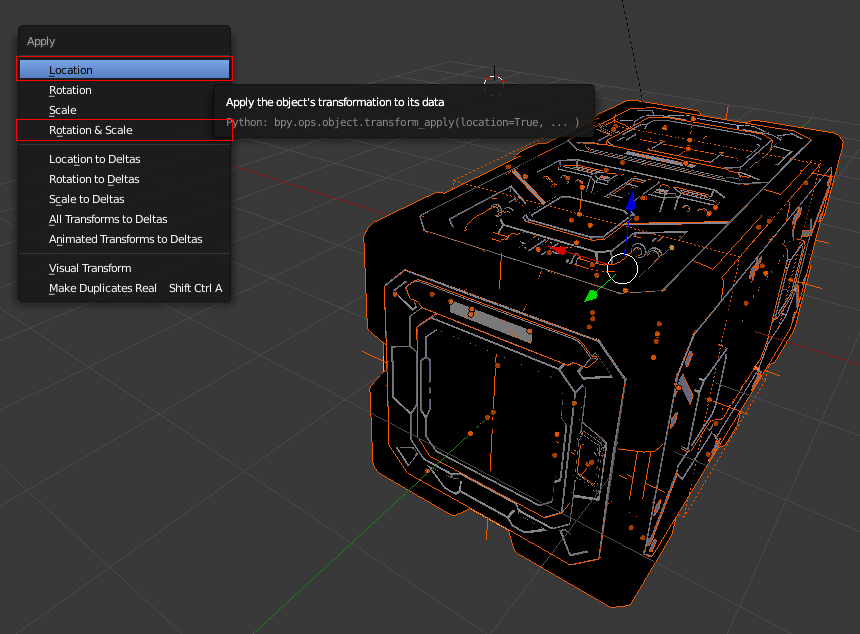
Finally, select everything and exclude empties from your selection, then Ctrl+A and apply position, rotation and scale.

If anyone finds a model that doesn't have the parent in the proper position then let me know so I can see if that has a reliable way to be fixed.
Sandflakes  [author] 21 Oct, 2017 @ 8:28am 
@Dirge, forgot a tiny step to make the dummy folder work properly. The tutorial should be updated shortly with the correct setup.
Skimt 20 Oct, 2017 @ 4:02pm 
No need to appoligize. I got farther with this guide than any other guide available. Blender works as intended now, I think. That is until I try to export. But until then, all is well.
Sandflakes  [author] 20 Oct, 2017 @ 2:43pm 
@Dirge I am sorry for being unclear, Mine is in my actual mods folder but I have two versions of my mod. One is for testing and one is for working items that I publish. The one I publish does not include that dummy directory. Not 100% a dummy directory that is not in the mods folder work so i'll test it this weekend and edit the tutorial if it does not :)
Skimt 20 Oct, 2017 @ 1:52pm 
That was a very quick response. Thank you for your help. I had indeed also forgotten to setup the textures folder in Blender's settings. :steamhappy: