Killing Floor 2

Killing Floor 2

116 ratings
Deltakai's Advanced Berzerker Guide
By Deltakai
An in-depth guide mainly focused on intermediate players who want to take already fairly good zerking to masterful zerking. While this guide focuses mainly on the highest level of play (6p HOE), beginner zerkers will still find this guide very helpful as it describes the general usefulness of all the perks and weapons and how to deal with dangerous zeds.
   
Award
Favorite
Favorited
Unfavorite
Prologue
Berzerker has always been seen as a rather easy class, both in KF1 and KF2. It has been described as having a low skill ceiling, and that anyone can play bezerker decently as long as they know how to parry.

This is mostly true, and to play a decent berzerker capable of winning HoE games, you don't actually need to be all that good. Most berzerkers I see these days just run Katana +3 and go around M1 mashing everything, not exactly skillful gameplay.

However, trust me when I say that berzerker, contrary to popular belief, actually has one of if not the highest skill ceilings in the entire game. While it doesn't take much to get to the level where you can fairly reliably win HoE games with a good team as a berzerker, there is a huge gap between a "decent" berzerker and a "masterful" berzerker. And this is why so many people say berzerker is a low-skill class, because if what you're doing is already good enough, why bother going above and beyond?

This guide however will show you how to get from being "decent" to being "masterful". Unlike most other classes, berzerker requires an immense amount of practice to get to the highest level.


Recent nerfs to the berzerker class have made it so that it is no longer possible to Katana+3 M1 mash everything to death on Sui or higher. Berzerker is now far more vulnerable to damage and you have to be very careful of how you pick your engagements if you don't want to get ground to mince meat on higher difficulties, especially HoE. Having a good ranged weapon to pick off Husks or EDARS is now quite important because you no longer have luxury of being able to tank a hit or two from them if you have to. Big zeds hit you much harder now and learning how to parry is vital for playing on Sui or above.
The Berzerker's Purpose
The berzerker acts as 3 things:

1. A wall that prevents trash and big zeds from attacking the backline,
2. A crowd control specialist on par with the likes of the firebug,
3. A backup big zed killer when everyone else is either dead or out of ammo.

That is all you need to know about what berzerkers do. They are the vanguard. They are the first ones in and the last ones out. If the berzerker needs to back up, then chances are the entire team also needs to back up.

Beginner's Section (Skills) (Part 1)
This assumes that you have never played berzerker before so you need a run down on how they play and what skills to go.

Following the last couple patches, many of berzerker's defensive skills have been nerfed quite heavily, alongside the class's base resistances. This has made berzerker a MUCH harder class to play effectively on higher difficulties.


Dreadnought vs Skirmisher

With the Dreadnaught buff giving you 200 max HP and the Skirmisher nerf giving you only 1HP/s instead of 2, Dreadnaught has become a much more enticing option than before. While Skirmisher is still better on bigger maps where kiting is more of an option, Dreadnaught is now the better option for teams with medics or at least Supports/Commandos with medguns and/or you plan on holding an area for awhile. The nerfs have made every bit of damage far more punishing and you can no longer stay in the thick of it for very long with Skirmisher. Dreadnaught allows you to stay in the fight far longer, especially with vampire and will let you do your job much easier in many cases.

Verdict:
Skirmisher if you're playing a big map and plan to kite more often.
Dreadnought for teams with good heals and planning on holding areas.

Vampire vs Butcher
The nerfs to berzerker have made it so that if you want to use Butcher, Dreadnaught and a medic practically babysitting you is almost necessary. The 1HP/s from Skirmisher, when coupled with the reduced damage reduction across the board, is simply not enough to keep you in the fight if you go Butcher and you will have to break off very often to heal up before going back in. Even though Vampire was also nerfed, giving you only 3HP instead of 4, it is still effective at keeping you in the fight for far longer than Butcher. The damage difference is negligible so long as you're using a high tier melee weapon like the Zweihander or Bonecrusher and you will still one-shot most trash units with heavy hits with Parry and Smash. The healing can also come from ranged perk weapons, not just melee weapons.

At the end of the day, even if you parry every single attack thrown at you in a game, you will still not live very long without heals due to all the nerfs to damage reduction. Butcher is simply not efficient if you play alone or with a team with few heals.

Verdict:
Butcher only if you're running Dreadnaught and a dedicated medic. Vampire in all other situations.

Resistance vs Parry
EDIT: With the nerf to Resistance and the base damage reduction to Zerker's stats in the Interstellar Insanity update, Parry is now practically mandatory for Suicidal and above if you're running Skirmisher and don't want to get 2 shot by FPs and SCs.

Running Resistance is no longer viable beyond Hard difficulty if you want to get anything done. Parry's damage reduction was nerfed from 40% to 30% and coupled with the nerf to the class's base damage reduction, your total damage reduction is at only 40% instead of the previous 55%. This barely puts you above the 35% of the pre-nerf berzerker with Resistance. Post-nerf berzerker with Resistance caps out at only 25%. Regardless, this means that it is now practically essential to run Parry if you don't want to get turned into mince meat 5 seconds into a fight on Sui or higher, even more so when fighting big zeds.

NOTE: Contrary to its description, the damage bonus affects ALL perk weapons, which include ranged weapons.

Verdict:
Resistance ONLY if you're playing on Hard or lower. Parry is essential for anything higher.

Smash vs Massacre

The Smash headshot bonus actually applies on both Light attacks AND Heavy attacks, so if you're landing headshots with light attacks, the damage difference is still only around 5 - 10% less versus Massacre depending on weapon used.

Smash wins. Every. Single. Time. There is ONE weapon that I can recommend massacre on, and that is the Katana (or the Road Redeemer, but that weapon is just a worse Katana), and that is because it is the only weapon with a light attack speed of 144 swings per minute, outclassing every other weapon in this regard (except the knife). The only way for Massacre to beat Smash is if the following criteria are met:

NOTE: Smash's headshot damage bonus affects ALL perk weapons, including ranged weapons.

1. Light attack is at least approximately 60% of that of the heavy attack's damage
2. Light attack is at least double the swings per minute of the heavy attack.

And that's not even considering animation cancelling, which can increase heavy attack rate by up 50% (More on that later) or headshots, which are 25% stronger.

There are 5 melee weapons in the entire game that fit this criteria:
Knife, Katana, Road Redeemer, Fireaxe and Crovel.

Knife:
Why would you even use this as a berzerker? You start with a Crovel silly.

Katana:
Even with massacre, the weapon's dps is still about 20% lower than all of the top tier melee weapons like Zweihander, Strikers and Bonecrusher using Smash. With animation cancelling, there isn't even a contest.

Road Redeemer:
worse than the Katana.

Fireaxe:
Most of the weapon's power comes from its heavy attack and its stun power, so using massacre on this weapon is simply not playing to the weapon's strength.

Crovel:
Massacre just barely beats out Smash in terms of DPS, but if you animation cancel your heavy attacks, Smash wins by a landslide.

Verdict:
If you aren't using the Katana or Road Redeemer (which aren't great weapons to begin with),
USE SMASH.

Berzerker Rage vs Spartan
EDIT: Berzerker Rage has been given some significant buffs and now restores 50% HP whenever Zed time activates OR refreshes (so basically you heal all your HP any time Zed time activates and you or a teammate kill a single zed during it). It also immobilizes nearby zeds instead of making them run away so it comboes extremely well with precision perks now.

If you're using Dreadnought,Berzerker Rage can be potentially life-saving in some situations, but otherwise Spartan beats it out every time.

Verdict:
Just use Spartan. If you're a Dreadnaught Zerker holding a chokepoint, Berzerker Rage is really good now especially if you have an SS or GS behind you since they can kill big zeds much easier now. Spartan however is still the best all-purpose perk and is useful in any situation.


Beginner's Section (Part 2)
What to do when starting out as a berzerker

Berzerkers get their power spikes at levels 15 and 20, when you gain access to Parry and Smash, where you get a major spike in tankiness and damage in Parry and another spike in damage with Smash. Before you are level 15 however, berzerkers will have a tough time staying alive on HoE servers due to how much damage zeds do and the fact you won't be able to kill them very quickly without Parry and Smash. As a result, it is recommended to play on Suicidal or lower if your perk level is below level 15.

While you are on lower difficulty servers, practice parrying low threat trash like clots and slashers to get a feel for the timing and identify which zeds are most dangerous to berzerkers. There are 2 zeds in the game that are extremely threatening to berzerkers and that are:

1. Bloats -
Their bile spit is extremely damaging, especially on Sui/HoE and can end a low level berzerker in a matter of seconds if you don't kill them or get out of their range quickly. Their bile also covers up your screen which, without resistance, makes it incredibly hard to see. Don't attempt to engage groups of zeds where there is a Bloat behind them; find a way to kill them first or simply get in with a quick hit and get out before they can spit on you. This will often aggro the zeds in front of it on the Bloat itself, neutralizing the threat.

When trying to kill them, rush them with heavy hits to the head. Most weapons will stumble them, stopping them from spitting and allowing you to get a follow up headshot to decapitate them. Once you get Smash, all of the top tier melee weapons are capable of a OHK on a horizontal swing. Mid tier weapons like the Fireaxe and Pulverizer will require a forward heavy to OHK.

2. Husks -
These guys are extremely risky to engage at close range. On Sui/HoE, they gain access to the flamethrower move, which deals incredible amounts of damage up close, capable of killing any perk in the game with only a couple seconds of exposure. Not only that, if they take enough damage, they will attempt to self-destruct on players. The Husk explosion has a base damage of 190, already making it instantly lethal to every perk in the game except on Normal difficulty, Max level Swats with both armor perks, or Dreadnought berzerkers with either Resistance or the Parry bonus up. On HoE, this damage jumps up 285 due to the 1.5x damage multiplier they gain, making it impossible to survive except for Dreadnought berzerkers with the Parry bonus.

It is imperative to eliminate Husks as quickly as possible, for the safety of both yourself and your team. If you must engage them alone, either rush them with a forward heavy headshot to kill them as quickly as possible, or use your melee bash to prevent them from using their flamethrower and then get in as close as possible to them; this will force them to start doing melee attacks, which are parriable and far less dangerous than its flamethrower. You can then go for a headshot to kill them quickly. It is EXTREMELY important that you go for headshots against Husks, for if you deal too much body damage they will self-destruct, which has a very short wind-up animation and practically guarantees death if you do not manage to kill them before they explode.

EDARs
While the Rocket and Laser EDARs aren't too dangerous to Zerkers since they don't hit that hard and you're quite mobile so you can dodge their attacks easily, EDAR Trappers are a true pain in the ass and can get you killed very easily. What makes matters worse is that it can be quite hard to distinguish between Laser EDARs and Trapper EDARs because their only distinguishing feature is the small laser cannons attached to the Laser EDAR. The trappers can hold you in place for 2.5 seconds, enough time to spell your death if you're caught in a bad spot at close range with Husks, Bloats, Sirens or even other EDARs. They can even trap you through other zeds so there is basically no counter to them unless you have a good ranged weapon that can kill them quickly.

Thankfully, the Vlad-1000 Nailgun is typically sufficient, and at higher upgrade levels you can use the single shot mode to pick off EDARs at range. The HRG Tesla Launcher specializes in melting EDARs due to its microwave damage (EDARs have a 3.25x weakness to microwave) so if you really hate EDARs, you can swap out the Nailgun for the HRG Tesla Launcher.

In melee, EDARs typically aren't very dangerous. Their melee attacks don't hit very hard and are easily parriable. They can be annoying to kill in melee however since getting precise melee shots on their chest core is a lot harder than just aiming for a head. EDARs don't die from decapitation so headshots are generally useless.

Scrakes and Fleshpounds
Berzerkers are able to wall these zeds for an extremely long period of time, allowing other perks to either focus on trash around them, or kill them while they are distracted. However, berzerkers should not engage scrakes and fleshpounds unless they are at risk of breaching the team's defenses. Precision perks like gunslingers and sharpshooters have a much easier time killing them when they're docile and not moving their head all over the place whilst attacking berzerkers.

Scrakes:
If you must engage a scrake at close range, simply parry their attacks to keep them in place, don't actually start hitting them unless your team starts first. If you are alone, there are 2 weapons the berzerker has access to that can brute-force a takedown without risk of retaliation, and those are the Static Strikers and the Bonecrusher. More detail on that later.

Fleshpounds:
Your job is to de-rage them by letting them hit you rather than your comparatively squishy teammates. Do not attack immediately afterwards as that can cause a chain-rage, where they start attacking immediately after a rage without a rage animation if they take enough damage immediately after hitting a player.

Berzerker is not a class than can easily kill big zeds without sufficient practice with their takedown combos, thus act in a supporting role to perks that can actually kill big zeds easily (Sharpshooter, Gunslinger, Demo, Support) rather than trying to kill them themselves.
Animation Cancelling
Almost every weapon in the game has an animation cancel that will shorten reload times. By the same token, melee attacks can be animation cancelled to shorten the forced attack duration. For weapons with magazines, people will use the bash button animation cancel. For melee weapons people will usually use either the reload button or bash to animation cancel.

What does it do for melee weapons? Well when a melee weapon swings, there is a point in time where the melee weapon actually hits, and then there is a cooldown before you can swing again. If you animation cancel just as the weapon hits, it circumvents this cooldown and allows you to swing again immediately. This mechanic is a cornerstone of good berzerker play, and any berzerker who doesn't simply play as a Katana M1 masher will know how important it is to use animation cancelling, as it effectively increases the swing rate of your heavy attacks by up to 50%.

Animation cancel is essential in both trash clearing with high-tier weapons and taking down big zeds.
Berzerker Takedown Combos (Advanced)
EDIT: If the video gets age restricted it may become unwatchable via Steam. Here is the youtube link in case that happens:
https://www.youtube.com/watch?v=nwYj-Pw8op4


Video Preface
The berzerker has without question, the hardest takedown combos in the game (Except with the Eviscerator). Most combos have a very small margin for error and it is unlikely for you to be able to perform them perfectly in every scenario. However, the berzerker is mistake tolerant, and all combos shown are self-contained. If you do not get them right in your first engagement, simply wait for the next parry to engage. These combos show you not only how to take down large zeds, but also deal the most amount of damage in a single engagement without taking damage yourself. Even if you cannot land headshots as it is very difficult to do, these combos will help significantly with killing large zeds regardless as they teach you how to prevent them from attacking you alongside how to kill them.

Most combos are doable if using vampire as well, only you may need to add in an extra bash or heavy attack to finish them off.

Important info concerning takedowns:
Melee locking:
Some melee weapons are capable of interrupting fleshpound attacks whilst they are raged with their melee attack (usually their bash/stab). During this interrupt the fleshpound is still capable of moving, but cannot attack for around a second. This is called melee locking. The effect is not well understood and the underlying mechanics of what causes it are not known. From experience, it tends to happen only if you manage to hit them in the head while they are raged at least twice depending on weapon. Most weapons can only perform a melee lock once. Some weapons cannot perform this at all. (This effect is separate from the Melee Hit effect, which all melee weapons and bashes can perform)

Classic Zweihander Fleshpound Combo
For most melee weapons, this combo is the one that will be used when dealing with fleshpounds.

2x Forward-heavy -> Right-heavy -> stab/bash (Melee lock) -> 2x Forward-heavy. Most melee weapons are capable of performing this combo against fleshpounds, with varying amounts of damage. Generally speaking, if this combo is performed correctly, the fleshpound will only need 1 more stab/bash or light attack to finish off, or a heavy attack if the weapon does not have enough damage.

Effectiveness:
Weapon effectiveness will be rated based on 3 things:
1. How fast and reliable their takedowns are for scrakes
2. How fast and reliable their takedowns are for fleshpounds
3. How well they deal with trash

1 and 2 are the most important factors here. However, a reliable scrake takedown is generally more important than a reliable fleshpound takedown - this is because fleshpound takedowns for all bezerker weapons (except the Vlad Nailgun) are quite slow (leaving you vulnerable to trash around you) compared to other classes' takedowns and can only be performed if your team does not interfere. In other words, in a team environment bezerkers should only attempt to kill fleshpounds if they are isolated with no trash around and your team does not have a better fleshpound takedown/are too busy dealing with other problems to focus on the fleshpound.

Takedowns for scrakes on the other hand can be extremely fast with certain weapons, many of the top tier weapons taking only 2 seconds to kill them if you perform them properly. Weapons like the Static Strikers and Bonecrusher have properties that also allow them to simply brute force a scrake takedown if all else fails.

Trash killing is the least important as most bezerker weapons are capable of handling trash just fine with appropriate animation cancelling. This will only affect a weapon's score if the weapon is markedly better or worse at killing trash than their competitors.

Range Tiers
Melee weapons have different attack ranges. These ranges will be separated into tiers.

Tier-1 (1.25m) : Knife
Tier-2 (1.45m-1.5m): Bonecrusher-Shield, Static Strikers, Crovel
Tier-3 (1.65m-1.7m): Bonecrusher-Mace, Pulverizer
Tier-4 (1.8m): Eviscerator stab
Tier-5 (1.9m): Katana, Zweihander, Road Redeemer, Battleaxe, Fireaxe

Tier-6 (2.3m - 2.4m): Hemoclobber, Ion Thruster (DLC)
Weapon Overview (Part 1) (Melee)
(Watch the takedown video before reading this, as much of the information will reference the video)

Crovel
A very solid melee weapon. Fully upgraded, it is able to takedown both scrakes and fleshpounds effectively without taking damage. It is also one of the weapons that are able to melee lock fleshpounds more than once, sometimes even 3 times if you manage to time it properly. This gives the weapon the ability to kill fleshpounds in a single combo quite easily with a forgiving margin for error.

The drawbacks of the Crovel is that it has a very low attack range of only 1.5m, making it difficult to use against trash like crawlers at times. It also cannot parry stumble large zeds.

Effectiveness against scrakes: High
Effectiveness against fleshpounds: Very-High
Effectiveness against trash: Medium
Overall Effectiveness: High

Katana
A below average melee weapon. Good for beginners but otherwise doesn't do anything other weapons can't do just as well or better, even in trash clearing. The Crovel is generally better after being upgraded just once, and is 150$ cheaper.

The Katana has extremely poor melee hit and stumble power, the second lowest in the game, just above the knife. This means the Katana has NO effective takedown combo for scrakes, which require stumble power in order to kill in one go. It also means that some medium zeds like the husk and bloat can resist the Katana's poor incap power, making the weapon extremely risky to use against them.

Surprisingly, the Katana is actually one of the few weapons that can melee lock fleshpounds multiple times, and thus is also one of the few weapons that can kill them in a single combo. However, the second melee lock seems have an incredibly tight window and requires near perfect animation cancels beforehand to pull off. The combo also takes longer than other similar combos due the katana's low damage, leaving you more vulnerable to trash around you.

The Katana has an interesting quirk where its forced animation time for blocking is very short, making it possible to be almost constantly parrying if timed correctly.

Effectiveness against scrakes: None
Effectiveness against fleshpounds: High
Effectiveness against trash: Medium-High
Overall Effectiveness: Medium-Low

Road Redeemer
Pretty much a worse Katana. Has the same damage but swings slower in every regard. The only difference is that its bash actually has stumble power which gives the weapon a viable scrake takedown.

The weapon has a very slow heavy attack relative to its damage and its bash/slow has an incredibly slow start up animation compared to the katana. While the weapon can do the classic Zweihander combo for fleshpounds, it is much more difficult to perform than the Zweihander, and the weapon's low damage means fleshpounds will require another 2 headshots to finish off even if its combo is performed perfectly.

Its takedown against the scrake is incredibly unreliable, with a large hitbox on its swings, it makes it very difficult to hit them in head. The hit register sound for headshots is also indistinguishable from normal hits, making it impossible to tell whether or not you've succeeded in a headshot and to gauge how many more hits you need to kill.

The weapon does have a Zweihander-style combo against fleshpounds, however due to its very low damage it requires another 2 forward-heavy headshots to kill them.

Effectiveness against scrakes: Medium-low
Effectiveness against fleshpounds : Medium-low
Effectiveness against trash: Medium
Overall effectiveness: Low

Fireaxe
EDIT: The Fireaxe was given a buff to its stun power a few patches ago, bumping it up from 50 to 100, allowing for a single headshot to stun scrakes as well as stunning gorefiends/gorefasts anywhere on the body. This has made the Fireaxe an even stronger scrake killer (maybe even the best scrake killer) and has also improved its trash-clearing ability by quite a bit.

A very interesting albeit not great weapon and fairly decent weapon now, it is the only melee weapon with stun power on its heavy attack and can therefore stun scrakes in 2 well timed 1 headshot or simply with repeated hits. This gives the weapon probably the easiest takedowns against scrakes, on par with the battleaxe.

The weapon can take down fleshpounds quite well, however its combo is difficult to pull off as your animation cancels have to be almost perfectly timed due to the weapon's very slow start up on its heavy attacks. Its ability to melee lock fleshpounds multiple times with its light attack however means it is capable of killing them in a single combo, without even needing to be perfect.

The weapon has an incredibly slow light attack swing speed relative to its damage, making it perhaps one the hardest weapons to use against trash. It is probably the only weapon where it is worth trying to animation cancel its light attacks. Because of this, it lowers the weapon's versatility.

Effectiveness against scrakes: Very-High Extremely-High
Effectiveness against fleshpounds: Very-High
Effectiveness against trash: Low Medium
Overall effectiveness: High

Hemoclobber
A very solid weapon both on-perk and off-perk. The weapon allows bezerkers to heal their team very quickly without needing to switch to a medic gun. Coupled with a panic button in the form of the medic explosion which heals, deals heavy damage and almost instantly toxic-panics any zed, you've got a formidable sidearm to your primary melee weapon.

Fully upgraded, the weapon is capable of taking on scrakes fairly decently, though its damage isn't quite enough to kill in 3 headshots, so you need at least 1 bash to hit its head in order for you to kill it in one go. It has however a very poor takedown combo against fleshpounds. The weapon cannot melee lock fleshpounds due to its poison power, which means it takes 2 perfect combinations and one more light attack in order to kill them. Because of the weapon's rather strange hitbox, headshotting fleshpounds in their rage animation is very difficult. Overall, the Hemoclobber isn't recommended for big zeds.

An interesting quirk about the Hemoclobber is that it has the highest attack range of any melee weapon, at a whopping 2.3m, the only one in its class. This allows the Hemoclobber to actually outrange scrakes that have an attack range of 2m and makes it an incredible trash-clearer, able to clear out entire swathes of zeds in just a single swing.

All melee weapons have a slight variance of 1-2 damage on each of their swings. This doesn't affect takedowns, however occasionally the Hemoclobber will fail to kill Bloats in a single horizontal swing if you do not have the parry bonus.

Effectiveness against scrakes: Medium
Effectiveness against fleshpounds: Low
Effectiveness against trash: Very-high
Overall effectiveness: High (this score is buffed by the weapon's great utility as well)

Weapon Overview (Part 2) (Melee)
Zweihander
The bread-and-butter, the deagles of the berzerker class. This weapon can do everything and do it well. This is the weapon that all berzerkers should practice with first as its combos are what many of the other zerker combos are based on.

With the second highest heavy hit damage, second highest range tier, an intuitive melee hitbox and a relatively fast swing speed, this weapon is capable of easily taking down scrakes, fleshpounds and anything else the game has to throw at you.

What makes this weapon great is that its combos for both scrakes and fleshpounds are not incredibly difficult and can be done reliably given enough practice, particularly the scrake combo. It can kill scrakes in about 2 seconds and can also kill fleshpounds in a single combo without taking damage. It is able to melee lock fleshpounds more than once with its stab as well, meaning you have a much larger margin for error if you miss some headshots.

While its light attack is slow compared to other melee weapons, its stab attack is very quick and can be used in conjunction with light attacks to repel swarms of crawlers easily. Against groups of anything else, a wide swing of the heavy hit will kill pretty much anything in 1 or 2 hits.

Effectiveness against scrakes: Very-high
Effectiveness against fleshpounds: Very-high
Effectiveness against trash: Very-High
Overall effectiveness: Extremely-high

Pulverizer
A rather unremarkable weapon by all accounts, but its not bad. It is slightly stronger than the Hemoclobber with an identical move set, only slower.

The weapon has a decent takedown combo against scrakes if a little hard but where it shines the most are against fleshpounds. Like the Crovel, Katana, Fireaxe, Strikers and Zweihander, the Pulverizer is capable of melee locking fleshpounds multiple times, giving it the ability to take them down in a single combo. It has also has a very high stumble power on its bash (200) given its speed, giving it the ability to actually stumble raged fleshpounds if you hit them enough times during your combination and hit the bash on the chest core.

Otherwise, the weapon's decent swing speed, solid damage, decent range and good incap power lets it take on groups of trash and medium zeds just fine.

Did I mention the alt-fire explosion? No, because it's not worth mentioning. Just don't use it.

Effectiveness against scrakes: Medium-high
Effectiveness against fleshpounds: Very-high
Effectiveness against trash: Medium-high
Overall-effectiveness: High

Static Strikers
A unique weapon with unique properties. Quite good as well. The weapon gives you essentially infinite EMPs and what this means is that it can be used as a solid support weapon to setup either scrakes or fleshpounds for precision perks to take them down without risk of retaliation. On its own, the Strikers are more than capable at taking down scrakes through brute-force due to the EMP and the weapon's high knockdown power. In fact because of this, the strikers are one of only 2 weapons that can take down scrakes through sheer DPS without risk of retaliation, the other being the Bonecrusher.

If not being used in a supportive role however, the EMP is more of a detriment to taking down fleshpounds than it is helpful. As the EMP prevents the fleshpound from raging, you do not gain the safety of the long rage animation to hit its head. The combo for fleshpounds thus requires you to prep the fleshpound to rage with your bash and light attacks before attacking with your heavy hits. This requires precise timing and is not easy to do. However, if you manage to pull it off, the Strikers is a weapon that can melee lock fleshpounds multiple times, thus able to kill them in a single combo. The weapon's high damage and the fleshpound's slight weakness to bludgeon damage compared to slashing means you will only need 4 forward-heavy headshots and 2 more light attacks to kill.

The Strikers are also a very good weapon against Patty, Hans and KFP(King Fleshpound). With its very quick back-heavy, it has perhaps the highest DPS against bosses, but that's not the main reason why the weapon is good against those bosses. The reason is the EMP; it won't apply in a single hit, but because of how quick the back-heavy is, you can apply EMP in about 4 - 5 hits without much trouble. EMP prevents those bosses from doing their special attacks if they aren't already doing one and prevents KFP from raging. This gives your team more time to deal damage to them without needing to retreat due to them using a special attack.

The main drawback of the strikers is their very low attack range of 1.5m, tied with the Crovel. The weapon thus has a hard time dealing with crawlers and large groups of zeds.

Effectiveness against scrakes: Extremely-high
Effectiveness against fleshpounds: High
Effectiveness against trash: Medium
Overall effectiveness: Very-high (Score is buffed by its utility against bosses)

Bonecrusher
The only weapon that has a 70% block rate from both normal blocking and parries. The Bonecrusher is a really strong weapon in almost all circumstances.

Like the Strikers, the Bonecrusher has a very easy matchup against scrakes, having an easy takedown combo against them as well as simply being able to brute force a takedown through knockdown and sheer damage. The Bonecrusher has a high enough knockdown power on its bash attack that it is capable of knocking down both scrakes and fleshpounds with a single bash to the legs. It can also knock down scrakes in just 2 shield bashes anywhere on the body. Not particularly useful when fighting them yourself, but might save a teammate's life from a raged scrake if you manage to hit them in the legs with your bash.

The Bonecrusher has a very effective combo against fleshpounds, however it requires you to first stumble the fleshpound before you engage. This is because if a fleshpound is stumbled, take enough damage to enrage and is in range of a melee attack at the same time, there is a very high chance they will attack immediately, rather than play their rage animation. This can also happen if the fleshpound is already attacking and takes enough damage to be raged if they are not stumbled during the attack animation. This mechanic is not well understood and seems inconsistent across some weapons.

Regardless, once you stumble them, the combo is the same as the Zweihander. The only issue is the bash attack is comparatively slow, making timing the melee lock difficult and requiring precise animation cancels beforehand to pull off. Otherwise, the Bonecrusher is capable of killing a fleshpound in only 4 headshots and a light attack.

The weapon's trash clearing ability is also incredibly good. Its huge knockdown and stumble power makes it one of the best weapons for pushing through a horde of zeds on a kite route or reclaiming a lost hold point, as even if you do not kill them in a single hit, you will most likely knock them down, letting either a teammate to finish them off or for you to kill them with another hit. Its ability to block husk fire is also very handy if you're suddenly caught at close range with them and cannot risk engaging them without dying.

Effectiveness against scrakes: Extremely-high
Effectiveness against fleshpounds: High
Effectiveness against trash: Extremely-high
Overall effectiveness: Extremely-high


Weapon Overview (Part 3) (Melee)
Battleaxe
The most expensive piece in the bezerker's arsenal alongside the Ion Thruster, this weapon isn't really worth the price, but it isn't a bad weapon.
Its main draw is its absolutely massive heavy hit damage, so high that it can kill scrakes in just 2 headshots and kill most lesser zeds with a single horizontal swing to the body. However it doesn't really have a combo for fleshpounds due to how slow it is. A Zweihander style combo seemed possible after further testing, but the timing is so incredibly tight that there is no conceivable way one could perform it reliably. Like the Bonecrusher, the Battleaxe needs to stumble the fleshpound first before attacking and only needs 4 headshots + a light attack to kill a fleshpound.

Its light attacks are also strong enough to one hit kill all low level trash so its trash clearing capability isn't bad either. If you do use this weapon, I would recommend going with Butcher instead of Vampire as that will let you one shot kill gorefiends with a single horizontal strike, whereas with Vampire you're short about 40 points of damage. The weapon however has a very slow draw/undraw animation, which makes healing yourself in the middle of a fight very risky. The stab attack also has pushback momentum so it can be used in a pinch to push back big zeds to give you some breathing room, otherwise not particularly useful. All in all, a decent weapon.

Effectiveness against scrakes: Very-high
Effectiveness against fleshpounds: Medium
Effectiveness against trash: Medium-high
Overall effectiveness: Medium-high
Weapon Overview (Part 4) (Ranged)
VLAD-1000 Nailgun
After the buff this weapon received in the Grim Treatments update, where it got a damage buff as well as compatibility with Skirmisher's movement speed, this weapon has become a much more compelling choice for berzerkers than before.

With the new buff, the weapon unupgraded can kill scrakes in 4 headshots (All damage buffs) and fleshpounds in 5. Here is the list for headshots with upgrades:

+1
SC: 3
FP: 4

+2
SC: 3
FP: 4

+3
SC: 3
FP: 4

So the only upgrade that really matters is the first one, though further upgrades will increase your margin of error by decreasing the number of nails you must hit to kill. With only 3-4 headshots needed to kill big zeds, a +1 Vlad is a very solid and reliable method for taking down big zeds as a berzerker, and is also much faster than using melee weapons. It also gives berzerkers a very formidable ranged weapon against trash or medium zeds when they can't risk engaging at close range for whatever reason. As vampire also works with ranged weapons, this could be a very safe method of regaining lost hp against trash zeds.

Effectiveness against scrakes: Very-high
Effectiveness against fleshpound: Very-high
Effectiveness against trash: High
Overall effectiveness: Very-high

Eviscerator
A bit a of lazy weapon in my opinion. Sure, it can kill scrakes in 3 headshots with all damage buffs and is extremely easy to perform, but it cannot kill fleshpounds before they finish their rage animation and you can't melee lock them with the weapon either. Its trash clearing capabilities are also incredibly sub-par; the saw deals low damage, is limited in ammo and only effective against the target in front of you. You could carry a Hemoclobber or Pulverizer to help with trash,
But on its own it's just not that great of a weapon.

Basically the only use for the Eviscerator is to kill scrakes quickly and easily. If you're playing as a bezerker who is holding a choke, you should never use this weapon as it requires you to back up from your position in order to use it. It can only kill fleshpounds safely if you are sufficiently distanced from them, which only happens if your team is kiting.

The one good thing I can say about it is that it has the highest parry damage reduction at 70%, tied with the Bonecrusher. However, the animation is horrendously wooden and not nice to use at all.

Effectiveness against scrakes: Very-high
Effectiveness against fleshpounds: Very-low
Effectiveness against trash: Very-low
Overall effectiveness: Low

HRG Tesla Launcher
This weapon used to be busted as hell on release, until they shadow nerfed it to oblivion by giving every zed worth using this on a huge resistance to it. SCs take only 60% damage from it and FPs (and QPs) take only 50% damage from it. Even with the massive damage bonuses from the Zerker class, it still takes them down way too slowly compared to other options like the Vlad Nailgun. Not to mention, its burn power is so high that it fire panics them in only 3 or 4 shots, making subsequent headshots practically impossible. Every boss in the game also has a massive resistance of 40% - 50% against the HRG Tesla Launcher so its dps against them is unimpressive at best, and thats all taking into account every damage bonus available as well as its projectiles being quite slow, making you miss more often.

So its DPS against big zeds and bosses is trash. But what about against medium zeds, trash and its EMP launcher? Well, all low-tier trash (Clots, Slashers, Crawlers, Stalkers) naturally have very high resistance (75%) to microwave damage (the damage type which the HRG Tesla Launcher uses) so they all take very little damage from it. Of course, any Zerker worth their salt would never have trouble which such zeds.

Its real strength comes from its ability to kill and EMP medium zeds like Gorefiends, Bloats, Sirens, Husks and EDARs, especially EDARs. The zeds just listed all are either near neutral to microwave damage or have a crippling weakness to it. In this case, EDARs have a crippling x3.25 weakness to microwave damage, thus dropping to the HRG Tesla Launcher in only 4-5 shots, without even needing to hit the chest core. The HRG Tesla Launcher, when coupled with the very high damage bonuses from the Zerker class, will drop most medium zeds in only a couple shots. It is worth noting that just a single shot from this gun will fire panic every non-big zed. This is situationally useful but also a detriment sometimes as it makes landing subsequent headshots a lot harder.

The EMP can also occasionally come in handy if you're in a tight spot and need to CC a lot of zeds quickly, and of course if you need to calm down a raging scrake for a moment. However, due to its very long reload time, you should really only use the EMP when you really need it.

Overall, its a niche option for solo zerkers who need something that can deal with EDARs, Husks Sirens and Bloats from a distance and quickly. However, it wouldn't be my first option for a sidearm in a team game.

Effectiveness against scrakes: very-low
Effectiveness against fleshpounds: very-low
Effectiveness against trash: Extremely-high (only for medium zeds)
Overall effectiveness: Medium


Weapon Overview (DLC Weapons)
Ion Thruster (DLC)
I have tested this weapon a bit and it seems rather lackluster. The weapon just feels like a bigger, buffer version of the Katana, that is to say, better than the Katana but not even close to the true top tiers like the Zweihander and Bonecrusher. The weapon lacks the damage needed to kill scrakes in 3 forward-heavy headshots, requiring either another stab or light attack to finish them off. Its light attacks also lacks any stumble power, meaning it is unable to pull off a Zweihander style combo on scrakes that would be much more reliable than what it has to do at the moment. The burn also doesn't help with the takedown, as if you hit them too much they flail around fire-panicking, making subsequent headshots almost impossible to hit. You can finish them off after the second headshot if you have the special charged attack ready to go, but that takes a while to charge so you won't have it up every time.

The weapon is also terrible against fleshpounds. It requires 7 headshots to kill fleshpounds with all possible damage buffs and like the Hemoclobber, the weapon's burn damage makes it almost impossible to get a reliable melee lock. Not to mention, you can't even rage fleshpounds in a single hit like the Katana, so you need to prep them before hand by jabbing them with a poke or a light attack before attacking. Unlike the Katana, it doesn't have a fast enough attack speed to be able to do this in one go. This means the weapon requires 3 perfect engagements to kill a fleshpound, the worst of any melee weapon currently on offer.

The one redeeming factor about this weapon is that it is really good against trash, about on par with the Bonecrusher, though the BC is still better in most circumstances. Its extremely long hit range of 2.4m means it is able to outrange any melee zed you come across, and its burn power will lockdown any zed that isn't a Husk, allowing you to kill them without fear of retaliation. However, it is just barely missing the damage needed to kill Husks without the parry bonus in a single horizontal heavy attack headshot, though this isn't too big of a deal as a forward/back heavy will do the trick just fine.

Effectiveness against scrakes: Medium
Effectiveness against fleshpounds: Very-low
Effectiveness against trash: Extremely-high
Overall Effectiveness: Medium


Frost Fang (DLC)
The new ice shotgun-axe is... OK. Despite its flashy looking characteristics of being both a ranged and melee weapon for the berzerker which can freeze enemies AND parry all in a single package, it's actual effectiveness in combat is mediocre. That's not saying that it's bad - the weapon is usable, but at the end of the day the Vlad Nailgun does what this weapon can do much better for the same price-point. Its trash-killing abilities are worse than the Nailgun due to its lower damage and lower penetration, and it is much slower at killing big zeds than the Nailgun due to its far lower DPS, being unable to takedown FPs unless fully upgraded or using an EMP grenade and needing to get a freeze on SCs to take them down.

The fact of the matter is that the other utilities the Frost Fang provides over the Nailgun are not as useful as they seem initially. Let's take a look at them:

1. Freeze Power:
The Frost Fang's shotgun pellets each have 11 freeze power, so in order to freeze an SC, you must hit at least 10 pellets between your two shots (each shell has 7 pellets). The problem arises from the way incapacitation effects are prioritized.

Freezes are always LOWER priority than stumbles, and since the Frost Fang has much higher stumble power than freeze power, you will always stumble an SC before you can freeze them. That's not all however. While an incap effect like stumble is in-progress, it cannot be interrupted by any other incap effect and you cannot build the meter on any other incap meter beyond what they were at before the SC was stumbled. This means that whilst stumbling, you cannot freeze an SC and you cannot build their freeze meter, meaning that sometimes you have to fire more than two shots to freeze because freeze built up beforehand decays during stumble.

This means in order to get a reliable freeze on an SC, you must first allow for their stumble animation to finish with your first shot whilst also hitting as many pellets as you can so the freeze built up doesn't decay too much before firing your next shot. After you freeze them you can wail on them with forward headshots with the melee attack since the Frost Fang's melee attacks get a massive damage buff (185 base) on frozen targets.

Now that was a lot of information for what is admittedly a small thing that isn't the most difficult to thing to work around, but it just means that panic firing at a Scrake when ♥♥♥♥ hits the fan will not always freeze them immediately. Aside from that, the freeze power on the Frost Fang isn't powerful enough nor has the AoE to be used against anything else aside from SCs (FPs will get raged before the freeze kicks in so its useless against them UNLESS you EMP them beforehand).

2. Melee Attack and Parry:
Since the melee attack is bound to the bash button on the Frost Fang, using it can be rather clunky on some control schemes (I bind my bash button to L-ALT). The parry is the same button as all the parries in the game. But here's the thing - When you want to be meleeing regular zeds, there is no point to using the melee attack on the Frost Fang if you have any other melee weapon because not only are the Frost Fang's melee attacks weak (75 base), you only have light attacks, and thus it is too weak to use on anything aside from crawlers and clots. You can't use the shotgun all the time for trash-clearing because it has low ammo and a slow reload, leaving you vulnerable for most of the time.

The ONLY use for the melee attack is if you for some reason sold your crovel and didn't buy another melee weapon, or to kill frozen SCs with the damage buff from frozen targets.

The parry is fine, but not that useful for the same reasons I described above. You realistically only use it if you mess up an SC/FP takedown and it starts attacking you before you can freeze it.

In all honesty, this weapon is a better fit for the support than for zerker, where it is comparable to the M4 Shotgun and you can actually get some use out of the parry, but it is still way, way worse at killing big zeds and in general use than the M4 Shotgun due to its lower damage, lower firerate and lower magazine capacity. It does however make for a good backup weapon with its parry when you have raged FPs charging you as a support.

Effectiveness against scrakes: High
Effectiveness against fleshpounds: None (Medium if used in conjunction with an EMP)
Effectiveness against trash: Low
Overall effectiveness: Medium-low


Weapon Overview (DLC Weapons) Part 2
Piranha Pistols

Literally just a better Eviscerator. If you have the DLC for these weapons, there is literally no reason to go the Eviscerator ever again. These pistols completely make the Eviscerator obsolete. Look at the stats:

Piranha Pistols:
Weight: 6
Cost: $1200
Total Damage for Given Ammo: 8970 (115 damage x 78 shots)
DPS: 604 (315/60 RPS (Rounds per second) x 115)

Eviscerator:
Weight: 9
Cost: $1500
Total Damage for Given Ammo: 9000 ( 300 damage x 30 shots)
DPS: 300 (1 RPS x 300)

For $300 cheaper, and a fraction of the weight, you get a weapon that not only has virtually identical amount of total damage, but also has double the Eviscerator's DPS. With just a single upgrade, it surpasses the Eviscerator in every way and is STILL 2 weight less.

This weapon is the ultimate Scrake killer for Zerker. You literally ONLY need Smash and you can decap a Scrake with minimal effort. At +2 you can even use it to kill FPs in a single clip as long as you have at least Parry + Smash and STILL 1 weight less. However, you do need to headshot 12/12 of your shots if you want to decap an FP or 11/12 if you have Butcher + Parry + Smash.

Not to mention, these things are also pretty good for trash in a pinch and will 1 shot or 2 shot medium zeds in the head depending on your upgrade level or if you have the parry bonus up. However, it's best to reserve these things for big zeds since its ammo reserve isn't super high (you likely won't reclaim that many saws considering how far they bounce) and its reload is painfully slow.

Overall, the Piranha Pistols are literally one the best ranged weapons for Zerker if not the best. I would even rank it above the Vlad-Nailgun in most cases. Out of all the DLC weapons in the game, the Pirahna Pistols are about as close as you'll get to Pay to Win.

Effectiveness against Scrakes: Extremely-high
Effectiveness against FPs: Extremely-high (only at +2)
Effectiveness against Trash: High
Overall effectiveness: Extremely-high
Recommended Loadouts
The All-Rounder
Weapons:
Zweihander
Vlad-1000 Nailgun

Total Cost: $2050
Leftover Weight: 3

This is your classic all-rounder Skirmisher loadout that can be used in almost any situation. The Zweihander is a solid weapon across the board, is relatively cheap and requires no upgrades to be effective even in the late game. The Nailgun is a potent ranged weapon that you can either use to burst down big zeds or quickly kill lots of trash zeds safely to regain HP with vampire. The total cost of this loadout is also very low and you can use it all the way up until the boss. You can even buy a Med-SMG with the leftover weight if you want to help heal your team (or you can upgrade your Nailgun if you want better big zed killing). All in all, you can't really go wrong with this loadout.

The Support Zerker
Weapons:
Static Strikers/Bonecrusher (SS/BC)
Freezethrower

Total Cost: $2600
Leftover Weight: 0

I like to use this loadout if I am playing a Dreadnaught Zerker holding a chokepoint, though you can still run Skirmisher with this loadout on bigger maps. Both the SS and BC have impressive utility - the SS has EMP which you can use to trivialize Scrakes or CC dangerous medium zeds like Husks or EDARs while the BC is better at killing trash and can be used to knockdown big zeds when bashing at their legs. Either option is pretty good and it depends on what you want more.

The Freezethrower is just a great CC weapon all around for any class that can hold it, and the Zerker is one of those classes. You can use this to freeze big zeds so your teammates can easily kill them and if you run Dreadnaught, you're tanky enough that you can just run up to them to freeze them and not fear the damage you take too much.

The Ranged Berzerker?
Weapons:
Vlad-1000 Nailgun +2
HRG Tesla Launcher
Med-Pistol (Optional)

Total Cost: 3750 (Med-Pistol included)
Leftover Weight: 0

Skills:
RRLLR (Skirmisher, Butcher, Resistance, Smash, Spartan)

So this loadout is mostly a meme but it kinda works simply because Zerker has such high damage bonuses that you can actually use the Nailgun's single shot mode as your main weapon. With Butcher, Smash and a +2 Nailgun you will 1 shot headshot anything up to a gorefast while still being usable against big zeds due to its insane DPS with shotgun mode. However you need to be aware that using shotgun mode eats through ammo extremely quickly so you had better make those shots count when fighting big zeds.

The HRG Tesla Launcher is useful for quickly taking out medium zeds like Husks, Sirens, Bloats and EDARs and is mainly here to relieve some ammo pressure off the Nailgun, since it will be your primary trash killing weapon and big zed killing weapon. You can either use your last weight to buy a Med-pistol or upgrade your Nailgun to +3. Upgrading to +3 won't actually change that many damage thresholds, you still need the same number of headshots to kill SCs and FPs (3 and 4) but it does increase your margin for error a little bit since you can miss a couple nails and still kill them.

The best way to kill FPs with this setup is to make them rage with 5 single shots from the Nailgun. Once they start raging, immediately get in there and unload as many shotgun blasts into their head as you can. If you hit all your nails, you will decap them in 4 shotgun blasts. If you go Nailgun+3, you will decap them in 3 shotgun blasts.

Honestly, this loadout plays kind of like a worse gunslinger where you're really fast and run around popping heads with the Nailgun. Really the only advantage this has over just playing Gunslinger is that you're a fair bit tankier and have natural health-regen. Use this loadout for a bit of fun, but it won't be quite as useful as a normal Zerker loadout.
83 Comments
Uranium 17 Mar @ 12:46pm 
Wouldn't say its the best guide since its outdated a lot, katana deal way less damage that what i just try, and i also spoted mistakes

In gameplay with crovel against FP, the fact you stay close to him would in reality, make the FP hit before rage, so doing this close is a big mistake, also bash usually cancel a incoming FP, not always, mean if you base your gameplay by doing those takedown, you need to be 1vs1, next you need to have luck so the FP don't hit you when you are too close, then the bash actually work, AND the team doesn't trouble you. so its 100% random

Those takedown are basicly the dream and perfect thing you would never have in 10wave OR online

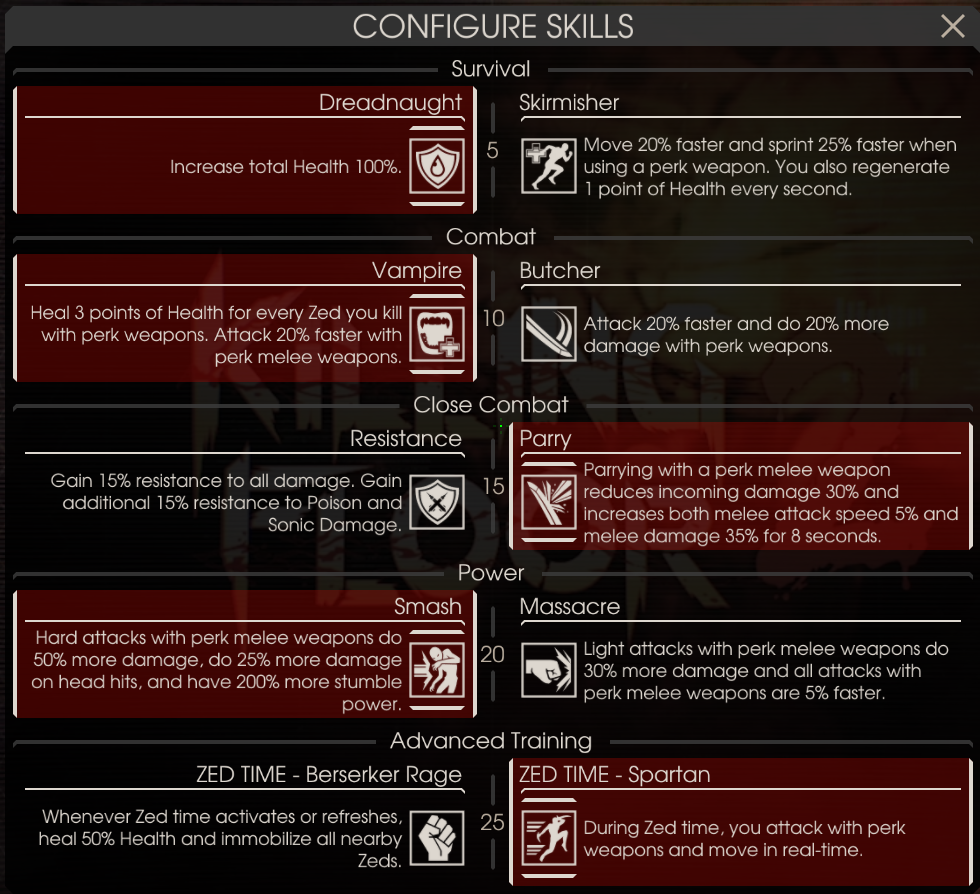
Just to say to anyone, the guide is not bad, even full i guess, but i stop at takedown after seen the mistakes made, and to be honest, almost all Berserker weapon kill SC in 3 headshot and FP in 5-6-7

PS : Someone send me this, so i can argue if its was a good guide or not, so as i say, outdated, and i spot lots of mistakes.
Dvayne | Rose on Noelle 6 Mar @ 5:22am 
Blood Sickle update? One of DLC weapons for Berserker.
Deltakai  [author] 20 Dec, 2021 @ 8:37pm 
Zed targeting AI in this game is a bit of a mystery but in general it seems like zeds have a set target that they path towards as soon as they spawn. It's not known the conditions for choosing a player to target on spawn so I'd wager it's probably random. Zeds may or may not change its current target depending on certain conditions like not having line of sight or the current target being too far etc. but it's all quite random and practically impossible to predict.

Knowing this, there's not much you can really do to change the aggro on a raged Fleshpound aggroed on someone behind you aside from try to stand in their way as much as you can and deal some damage to them. Eventually the Fleshpound will aggro on to you once they've been blocked for long enough.

You can find more info here:
https://wiki.killingfloor2.com/index.php?title=Mechanics_(Killing_Floor_2)#ZEDs_-_Aggro
Dvayne | Rose on Noelle 20 Dec, 2021 @ 1:40am 
What to do so zeds especially bigs won't avoid me? I play usually as trank dreadnaught berserker with Medic healing me and sometimes a fleshpound slips throw.
Deltakai  [author] 11 Oct, 2021 @ 2:33am 
Listen man, this is not the place for you to talk about whatever the hell you want to. I will answer questions Berzerker related, but I will not respond to irrelevant statements or issues with bugs. Take that up with TWI, not with me. If you want to discuss random KF2 stuff, go to it's subreddit, not here.

The way you use the Piranha Pistols is aim at the head and fire until their head is gone. If you've ever used any other gun before, it shouldn't be too different.
Dvayne | Rose on Noelle 11 Oct, 2021 @ 2:23am 
Maybe some people need help with piranhas. Did they fix it not shooting? They need to disable alt dual aim
Dvayne | Rose on Noelle 10 Oct, 2021 @ 2:41pm 
Sorry but i ve seen takedowns with trench gun
Deltakai  [author] 10 Oct, 2021 @ 11:23am 
I just told you you should never be using fire to kill big zeds. If you want to kill big zeds as a Firebug then use the Helios Rifle. There is no better alternative. If you want to deal with any Zed just go Flamethrower + Helios Rifle. Firebug is not a complicated class. Otherwise, please keep your questions Berzerker related.
Dvayne | Rose on Noelle 10 Oct, 2021 @ 11:00am 
Well that is the problem. To kill bigs i need barbeque, to kill trash i need ground fire. Aslo the problem. Firebug has limited range.
Ground fire works only on a few weapons.
How to use those flareguns at all?
I want long range alternatives to this hrg incendiary cause I don't like hrgs
Deltakai  [author] 9 Oct, 2021 @ 11:32am 
To answer your question about the Flamer and Caulk - The Flamer is a significant upgrade if you use it properly like I just said. The rate of fire is significantly higher which means you can put down way more ground fires than the Caulk. The extra fire rate also helps in CCing zeds in general due its stumble power ticking more often, leaving you less vulnerable to damage. However, the Caulk is sufficient on it's own if you know what you're doing so it isn't always strictly necessary.