This War of Mine

This War of Mine

41 ratings
Modding Tools Guide (WIP)
By Kierk
A compilation of all the most important information to mod the game with both basic tweaks, easily reproducible, and more advanced stuff for experienced modders that can be used to make your own scenario.
   
Award
Favorite
Favorited
Unfavorite
Introduction

The modding tools can be quite daunting to use at first glance. This guide will cover every aspect of modding in This War of Mine and provide some tips and insight to make modding much easier.

--------------------------------------------------------------------------------------------
Progress
The scenario and item sections will be re-written early next year, after the holidays. The guide will be finished then.
--------------------------------------------------------------------------------------------


About this guide
This guide will heavily use the Modding Instructions written by the developers themselves to explain how they've made their Cold Crisis mod. This file is available as pdf in the game folder and focus mostly on how to make a scenario from scratch.

I take no credits in writing those parts, just in giving more info based on my own modding experience. I've playing this game for a very long time, as this is a game I often go back to. I've started modding back in 2016, first with some simple character swap, then by making new scenarios.

Basics
To start, you need to find and open Storyteller.exe located in your game folder. This is the modding tool used to edit the game files and textures. Click on the “Create New Mod” button, and choose a name for your mod. The description and mod picture can be added later. If you want to edit the textures as well, make sure that you check “extract textures”.

The modding tool will then extract all the files needed. Once it’s done, your mod will be located in the Mods folder and given a random id to identify it. There is two ways of editing the game files. First by using the modding tools, or by directly editing the .xml files with a text editor.

I highly recommend you use a text editor powerful enough to decrypt .xml like Notepad++, and Winmerge to compare files between multiple folders and thus more easily see any changes done.

Whatever method you use, the mod files will need to be repacked by using the modding tools' blue arrow icon ("Pack Files"). Remember to repack the mod often as not to lose your progress. In that same toolbar, there is also the option to edit the mod description and picture ("Edit Settings") and to open the mod folder ("Local files Folder").

Directory Tree
Now on to the main part. Inside the modding tools you can see different config files. Each of them focus on one aspect of the game and correspond to a different .xml file inside the mod folder.
Note that a single file can only be modified by one mod at a time, meaning that two mods modifying the same file won't work together. This is especially important when modding new scenarios as it requires you to change many files (more on that later).

Here's a tree of the different config files and what they are primarily used for:
Items -- crafting recipes Emotion config -- depression modifiers Localization strings -- Names -- characters name   -- DailyLog -- scenario intros   -- CharacterBios -- bio/endings Loot generators config -- loot generation (including shelter) Main config --important settings Radio config -- radio events setup Scavenge locations config -- locations sets (map packs) Sick and heat config -- sickness probability and heater efficiency Scenarios config -- Scenarios -- classic scenarios   -- Timelines -- scenarios main setup   -- DwellerSets -- starting characters   -- ShelterSetups -- starting conditions   -- MajorEventConfig -- game flow   -- ShelterAttackConfig -- attacks setup Trading config -- traders inventory Visits config -- VisitGroups -- visits setup -- Visit Types -- visits priority/probability Winter config -- weather conditions
Not all the config files are represented above, because only about half of them are important. The next sections of this guide will focus on each of them separately and try to explain their use.
1. Basic Tweaks
Following are various tweaks changing one or two config files and should be easily reproducible. Once you've made the changes you like, simply repack the mod and you're done.

Change the maximum number of dwellers to six
  • In Main config -- Misc, change the DwellerCap to 6 (from 4)
  • In Visits config -- Visit Types -- Dweller join info, edit DailyPointsGainsWithDwellers like this:
    0:0; 1:1.5; 2:0.75; 3:0.6 //4th dweller after 8 days instead of 16
    4:0.5; 5:0.4 //5th and 6th dweller respectively 10/12 days after the 4/5th one joins
    6:0; 7:0 //to prevent from getting more dwellers after the 6th.

    Note: Each day you gain "points", once you reach a certain threshold, a new dweller join.
    The formula is: DailyPointsVisitTreshold (5 points) / X days between each dweller (10 days) = DailyPointsGainsWithDwellers (0.5 points/day) = one new dweller every 10 days or so.

Visitors come earlier to the shelter
  • In Visits config, change SpawnHourMin to 7:00AM (from 8)
    and SpawnHourMax to 9:00AM (from 10).

    Visitors now come to the shelter between 7 and 9 in the morning.

Dwellers recover less easily from fatigue
  • In Main config -- NightJobs, change Sleep to -1 (from -2) and SleepInBed to -2 (from -3)
  • In Items -- Bed -- ParamModifiers, change Tired to -1.5 (from -2). Do the same ShelterSleepingFloor / SleepingFloor and Ws2_ComfortBed / WS3_PitaBed.

    Dwellers will now need about 25% more time to recover from fatigue.

Dwellers stay sad/depressed longer
  • In Comfort config -- ComfortEntries , edit DepressionLoss by subtracting 2 like this: 0, 1, 2, …, 7 (instead of 2, 3, 4, ..., 9).

    Each day, less morale (-2) will be recovered based on the comfort of the shelter (beds, chairs, …).

Scarcer resources in any scenario
  • In Scenarios config -- Timelines -- <Timeline name> (cf. Scenarios) -- VanishItems, edit every entry like this: From = 1 (0), To = 3 (0)

    In the first three days, some loot will disappear from all locations. You can match the days to the outbreak instead for more realism (check the Bandits Attack Start value in MajorEventConfig).

Disable loot percentage/types on the city map
  • In Main config -- Misc, change DrawPercentageOnScavengeScreen to False (from true)
  • In Scavenge locations config -- Misc -- DescriptionConfig -- QuantityTags, delete all three values (instead of "LocationDescriptions/XXX").

Disable health bars in combat
  • In Archetypes config -- HP component config, change VisibleInUI to False (instead of True)

    Note: Only works for some characters, but all enemies seems to be affected.

Texture Tweaks (requires the textures to be extracted):

Disable sound visualization
  • Noise riddles: In Graphics config, delete the value for SoundVisualizationTemplateName
  • Red circles (enemy positions): Edit "textures\vfxk\blood\ring2.dds" by selecting and erasing everything (but keep image transparency).

Disable the “old photo” effect on portraits in-game
  • Edit “\textures\ui\characters\character_blink_01.dds” by selecting and erasing everything (keep image transparency).

    Note: It makes the portraits much brighter, to prevent that you need to use the “Heal” tool in GIMP to remove all cracks instead of the eraser, but it’s a bit more complicated to do.

Both texture tweaks above are part of my mods so if for whatever reason you don't want to edit the textures yourself, you can grab those files at www.mediafireDOTcom/folder/fq1barpa58b5h/Mods
You will need to copy the whole "textures" folder inside your mod folder and then delete any modified textures you don't need (keep config.bin, it's very important in order to repack the textures).

Modified textures includes: cleaner character portraits, removed "old photo" effect on portraits, good old AK-47 icon (changed to Thompson in a game update), and new scenario pictures.
2. Characters
(Localization Strings, Scenario Config -- DwellerSets)

In Scenarios config -- DwellerSets, you can find the group of survivors for each scenario. The scenarios are easily identifiable, some characters a bit less. Each of them use a template name. By changing that template with another, you basically change what survivor(s) you start that particular scenario with.
 
Template List
 Base game (/13):
Name Psyche Template Emilia Egoist Characters/Player_characters/Dweller_Lawyer Bruno Egoist/Insensitive Characters/Player_characters/Dweller_Cook Marin Survivalist/Insensitive Characters/Player_characters/Dweller_Crafter Anton Survivalist Characters/Player_characters/Dweller_Mathematician Boris Altruistic Characters/Player_characters/Dweller_Misiek Marko Homie Characters/Player_characters/Dweller_Scavenger Pavle Homie Characters/Player_characters/Dweller_Star Zlata Altruistic Characters/Player_characters/Dweller_Student Cveta Altruistic Characters/Player_characters/Dweller_Teacher Arica Survivalist Characters/Player_characters/Dweller_Female_Thief Katia Homie Characters/Player_characters/Dweller_Trader Roman Egoist/Aggressive Characters/Player_characters/Dweller_Warrior Livia Altruistic Characters/Player_characters/Dweller_Pregnant
 The Littles Ones (/9):
Iskra Kid Characters/Player_characters/Children/Iskra Christo Homie Characters/Player_characters/ChildrenProtectors/Dweller_Christo Ivano Kid Characters/Player_characters/Children/Ivano Henrik Homie Characters/Player_characters/ChildrenProtectors/Dweller_Henrik Lydia Kid Characters/Player_characters/Children/Lydia Irina Survivalist Characters/Player_characters/ChildrenProtectors/Dweller_Irina Kalina Kid Characters/Player_characters/Children/Kalina Misha Kid Characters/Player_characters/Children/Misha Sergei Kid Characters/Player_characters/Children/Sergei
 Stories (/8):
Father's Promise Adam Survivalist Characters/Player_characters/WarStories/Dweller_Adam Amelia Kid Characters/Player_characters/Children/Lydia The Last Broadcast Malik Homie Characters/Player_characters/WarStories/Story2/Dweller_Malik Esma Altruistic Characters/Player_characters/WarStories/Story2/Dweller_Esma Adem Egoist Characters/Player_characters/WarStories/Story2/Dweller_Son Fading Embers Anja Altruistic Characters/Player_characters/WarStories/Story3/Dweller_Anja Ruben Survivalist Characters/Player_characters/WarStories/Story3/Dweller_SickPita Zoran Homie Characters/Player_characters/WarStories/Story3/Dweller_Caretaker
 Debug Characters(/?):
Dragoslav (hoodie) Default Characters/DwellerWithActions Dragoslav (soldier) Default Characters/DwellerWithActions-SOLDIER

Adding a new character
While you cannot add a completely new character, you can replace one of the already existing characters. The new character will share the same appearance and ability of the character it replaces, but a different name and portrait.

Here is the list of strings in Localization strings that you can use to describe a character:
  • Names/Roman – name,
  • CharacterSkills/Warrior – description of skills,
  • CharacterBios/Roman/DeathNote – note shown after death,
  • CharacterBios/Roman/Endlog – endings,
  • CharacterBios/Roman/Bio – bio.
Usually changing the character name in the Names list is good enough for a quick character swap. Otherwise you'd need to replace that name everywhere it appears, including the scenario intros (Localization strings -- DailyLog).

Additionally you can change the character's portrait.
-- Portraits
(<mod id>\textures\ui\characters\)

Make sure you've extracted the textures first. If you didn't, create a new mod and move the Textures folder to your own mod.

All the character's portraits can be found in texture\ui\characters\. Each of them is stored as a 512 by 512 pixel tile in a .dds file. Paint .net handle that natively, other image editors like GIMP need a plugin.

To replace a portrait, all you have to do is copy a new 512x512 portrait and paste it over the one you want to replace in both versions (eyes open/closed). In GIMP, you can configure a 512x512 grid to make the process much faster (Image > Configure grid, then View > check "Snap to Grid").

You can also open each image as layer to more easily replace multiple portraits, or if you want to use one of the many unused portraits (see the chart below).

The "eyes closed" version is only there for the characters to blink in-game. You don't need to make a different portrait, just be sure to replace both versions accordingly.

Character Portraits
characters_01 //unused characters_02 //playable characters part 1 characters_02_blinked //unused characters_02_closed //playable characters part 1 (eyes closed) characters_03dirty_close //playable characters part 2 (eyes closed) characters_03dirty_open //playable characters part 2 characters_04 //traders characters_05_close //TLO characters (eyes closed) characters_05_open //TLO characters characters_06_close //custom characters part 1 (eyes closed) characters_06_open //custom character part 1 characters_07_close //custom characters part 2 (eyes closed) characters_07_open //custom characters part 2 characters_08_close //custom characters part 3 (eyes closed) characters_08_open //custom characters part 3 characters_09_open //character pairs and Daniel (TLO npc) characters_ws_closed //stories dlc characters and alternate portraits (eyes closed) characters_ws //story dlc character and alternate portraits
Note: Alternate portraits were removed with Fading Embers' release

Portrait Chart
A lot of portraits in the game files are not seen anywhere in the game and can be used to replace one of the playable characters (characters_02 and 03) or custom characters (characters_05 to 08).

This chart shows all the portrait files put together. In light/dark green are the playable/custom portraits, in purple the npcs and traders' portraits, and in white all the unused portraits.

Some characters like Katia, Arica and Pavle have two different portraits, as most custom characters, but about a dozen of portraits don't look like any character in-game (??? name on the chart).
-- DLC Characters
1- Adding dlc characters to a scenario
*Scenarios config -- DwellerSets

Each set is tied to a different scenario, check the guide for a list of all the scenarios and what the character are called in the tools. For example, if you want to change the "Pavle, Zlata, Anton, Cveta" (OrdinaryPeople), you just have to go to Scenario config -- DwellerSets -- OrdinaryPeople and replace any character you want. It's possible to add as many characters at once, but if you just want to replace Anton and Cveta by Esma and Malik, all you have to do is replace the two entries:

Characters/Player_characters/Dweller_Mathematician (Anton) and Characters/Player_characters/Dweller_Teacher (Cveta) by
Characters/Player_characters/WarStories/Story2/Dweller_Malik (Malik) and
Characters/Player_characters/WarStories/Story2/Dweller_Esma (Esma)

Simple as that! It's also possible to make the dlc characters recruitable like the others.

2- Making the dlc characters recruitable
*Visits config -- Visits / VisitsGroups

For that you need to make a new visit for each character you want to be able to recruit like the others. Under Visits, you can right-clik on a "DwellerVisit..." and duplicate it. Then you will want to change the name of the new visit e.g. DwellerVisitWS1Adam for Adam, and TemplatesToSpawn to "Characters/Player_characters/WarStories/Dweller_Adam". Again you can more than one recruit at a time, then change NeededFreeDwellersSlots accordingly.

When asking to join the shelter, each character has his own request, called VisitDescription. Dlc characters don't have one, but you can either use an existing one, or write their own in Localization strings -- CharacterBios --DwellerCandidate.

Now for the fun part, giving the dlc character their own personality

3- Changing the dlc characters personality
*Emotion config -- Events data / Trauma Effects

Each character has his own personality or psyche which determine how they react to different actions on your part. For example, killing someone will always incur a mood penalty, making them more depressed. But if your character is more egotistical-minded (Egoist) or just hardened (Survivalist), the penalty will be much smaller than if he was Altruistic or a rationalist (Homie).

While the default characters all have a pre-determined psyche, dlc characters on the other end only react to certain events, the ones happening in their story. Other events just give the default depression penalty. To remedy that, I added new entries for every single event in the game to all the dlc characters based on their intended personality. I won't ask you to do the same of course, so you can simply download my own modded file[drive.google.com] and drop it inside your mod folder, overwriting the original EmotionalInfluenceConfig.xml file.

Changes includes: - fixed ending requirements for some characters (e.g. Roman had a lower good ending treshold making it almost impossible to get his good ending)
- and gave all 7 dlc characters their own psyche: Adam and Ruben (Survivalist), Malik (Homie), Zoran (Homie/Apathetic), Esma and Anja (Altruistic), and Adem (Egoist)

In my Last Stand mod, I go even further by giving them generic endings (the ones they have only makes sense when playing their story), more difference in personality (Ruben for ex. survived a massacre and thus is more deeply affected when someone dies) and all traumas like addiction and infighting happens more easily. You can grab that file instead by downloading my mod. I will post it here and on the mod page when I'm done with the update.
3. Locations
(Scavenge Locations Config)

In Scavenge Locations config, you can customize your own set of locations (called map pack) that will be available in either all scenarios or only your own. Each location have a template name, most of them can be seen in CustomScenarioPack.
 
Template List
Shelters:
!CURRENT/0_home_shelter_nu3 = City Shelter !CURRENT/0_home_shelter_B = Countryside Shelter !CURRENT/WAR_STORY_1/0_home_shelter_tenement_house = Tenement Shelter !CURRENT/0_home_shelter_radiostation = Radio Station Shelter (WS2) !CURRENT/WAR_STORY_3/00a_shelter_anja_house = Anja's House / Atelier Shelter !CURRENT/WAR_STORY_3/00b_shelter_museum = Museum Shelter
Classic locations:
!CURRENT/001_scav_cpn = Looted Gas Station !CURRENT/001_scav_domekA_2_nu = Shelled Cottage !CURRENT/001_scav_domekA_nu = Abandoned Cottage !CURRENT/001_scav_ghost_house = Ghost house !CURRENT/001_scav_ruined_block = Ruined Block of Flats !CURRENT/002_scav_domek_petrolstation = Garage !CURRENT/003_scav_domekM_nu = Small Apartment Building !CURRENT/004_scav_domek_coward_nu = Decrepit Squat !CURRENT/005_scav_domek_kidnapers = Brothel !CURRENT/006_school = Shelled School !CURRENT/007_scav_domek_warehouse = Warehouse !CURRENT/009_scav_domekR_nu = Ruined Villa !CURRENT/010_scav_domek_twin = Semi-Detached House !CURRENT/011_scav_domek_armybase = Military Outpost !CURRENT/012_scav_domek_hotel = Hotel !CURRENT/013_construction_site = Construction Site !CURRENT/014_old_couple = Quiet House !CURRENT/015_violator = Supermarket !CURRENT/016_sniper = Sniper Junction/Central Square !CURRENT/017_scav_domek_church = St.Mary's Church !CURRENT/018_hospital = City Hospital !CURRENT/019_old_town = Old Town !CURRENT/020_port = Port !CURRENT/021_airport = Airport
Father's Promise:
!CURRENT/WAR_STORY_1/001_brothershouse = Brother's House !CURRENT/022_pharmacy = Pharmacy !CURRENT/023_toystore = Ruined Toy Store !CURRENT/WAR_STORY_1/003_cemetary = Old Church
The Last Broadcast:
!CURRENT/024_park = Park !CURRENT/025_bakery = Bakery !CURRENT/026_brewery = Shelled Brewery !CURRENT/029_music_club = Music Club
Fading Embers:
!CURRENT/027_congregation_house = The Samuel Institute !CURRENT/028_railway_station = Railway Station !CURRENT/WAR_STORY_3/012_convoy = Truck Convoy
 Note: Ghost House, Port and Airport were added with Anniversary Edition. Stories locations were  added with the Final Cut update (new versions with their own quests/npcs).
-- Map Packs
Map packs are chosen randomly at the start of a game (MapPack_01-06). Enabling one of the two modes (Anniversary or Final Cut) will force the game to select the ones with Anniversary locations (MapPack04-05) or the one with the Final Cut locations (MapPack_06) respectively.
MapPack_01-03, {MapPack_04, MapPack_05}, {MapPack_06}, {WS_Story1-3} Anniversary Final Cut Stories
  • ComplicationTier: determines how many playthroughs are required to enable the set to be randomly picked. 0 means available from the start, 1000000 not available unless a scenario use it (scenarios can have their own set of locations).
Each location have another set of options:
  • BlockingAvailable: block the location during the crime event (or any event for that matter)
  • DisabledInWinter: block the location during winter (anytime temperature goes below 0°C)
  • Group: defines when the location will be available. Group A is for starting locations, groups B to E are unlocked after exploring a certain number of locations. Z group can be used to make the location hidden (can be shown after an event set by the scenario; Stories use this a lot).
  • ForcedThreatLevel: defines if npcs are hostile or not to the player by default (2 = hostile)
  • LocationVersionName: defines the location version (or variant) that should be used. In CustomScenarioPack you can see the variants of all the locations. It's very important to write the version name if there is one, otherwise the location will be empty
Remastered locations from Stories dlcs (WS_Story1-3) are not included in the list above. A lot of them can be used as a new location variant. But unlike the other variants, they use a different template name and therefore count as a different location entirely.

Making a new map pack
To make your own set of locations, simply:
- Duplicate CustomScenarioPack
- Remove unwanted locations, making sure not to have the same location twice
- Rename the map pack and change its complication tier to 0 (if you want it to be selected randomly)
- (Optional) Change each location group, and if they should be blocked during conflict/winter or not.

Once you're done, you can test the new map pack by going to Scenarios config -- Scenarios. Choose one of the scenarios and set LocationPackName with the name of your map pack.
Go back to Scavenge Locations config and check AllUnlocked in the right panel to show all locations. You can then repack the mod and select that scenario in-game to see the new map.

Changing the map layout
Each location has his own position on the scavenge map. In Storyteller, entries are sorted alphabetically, but their actual order is different. By opening ScavengeLocationsConfig.xml with a text editor like Notepad++ and searching for your map pack, you will see the real order.

Each entry in the file correspond to a position on the map. You can change where each location is by swapping them with each other. In Notepad++, clone the .xml file to the other view (right-click on file name) to make things simpler (search for location A in left panel, cut the entry, paste it next to location B in right panel, cut and paste location B where location A was).

As you can see on the map, three locations have fixed positions: Railway Station, Music Club and Port. Their entry will be skipped when populating the map. That's why it's better to put their entry last so there is no confusion.

There also can only be 34 locations maximum displayed on the map (if you ever reach that), and each entry must have a different name. Meaning that you cannot have two variants of a same location, except for the Stories locations since they already use a different name.

If needed, you can add fake locations by putting them in the Z group (25). They still use a slot which allows you to make more organic maps with locations furthest from the shelter blocked during winter for example.

Custom Scenario Map
The city map displayed when making a custom scenario in-game is slightly different from the one displayed when scavenging in any scenario:
  • the 11th and 12th slots are inverted (11 ↔ 12)
  • the 19th slot is moved last (29th), shifting the
    20-28th slots by 1 (20 → 19, 21 → 20, etc...)
Both images shows the same map pack (CustomScenarioPack) after changing the slots so that each location appears at about the same position on the map.

Note the two missing slots on the right side of the map. The custom map only show 32 locations max. including the 3 fixed locations (Railway Station, Music Club and Port).
-- Loot
(Loot Generators Config)

In Loot Generators config, you can customize the type and amount of items in each location.
Each entry correspond to different location/variant. The locations they affect are numbered the same so I won't post all of them here again. Just check the location list above and compare both.

!CURRENT/001_scav_cpn = Looted Gas Station → LootGen_Map01_D !CURRENT/001_scav_domekA_2_nu = Shelled Cottage → LootGen_Map01_B !CURRENT/001_scav_domekA_nu = Abandoned Cottage → LootGen_Map01_A !CURRENT/001_scav_ghost_house = Ghost house → LootGen_Map01_E !CURRENT/001_scav_ruined_block = Ruined Block of Flats → LootGen_Map01_C
"Starting" locations have a different naming scheme. The above list is not 100% confirmed.

Then you have the Stories locations. Their names are even more straightforward. By default these locations are only available in their respective scenarios so you should only edit them if you plan to add them to a new set of locations.

Concluding the list, you have the loot generated in shelters (LootGen_Home_XXXXX). Unlike the other locations, what shelter is chosen doesn't matter, it only depends on the scenario shelter setup (Scenario config -- Scenarios / ShelterSetups).

Editing the loot generated in a location
All locations have a FixedPool of items generated at the start of the game. Loot can either be generated by adding different items manually or by adding a whole type of items at once that will randomly add items of that type (or group) based on their value.

 
Each item has a value which determines the worth of that item both when trading and generating loot. As a rule of thumb, low value items will always be more abundant across all locations while the highest value items may not even appear in a location unless it is added manually.

MinQuantity and MaxQuantity define the minimum and maximum number of items generated; UseValueInsteadOfQuantity should always be checked when adding group of items.

Below are the different type of items defined in Items config. New tags can be added and will work the same way:
Timeline_Materials = Components Timeline_Wood = Wood Timeline_Parts = Gears LootGenerator_Survival = Raw Food / Vegetables / Fertilizer / Broken Toy LootGenerator_Med = Bandages / Herbal Meds / Meds LootGenerator_Trader = Homegrown Tobbacco / Plants LootGenerator_TraderBasic = Tobacco / Med Ingredients / Sugar LootGenerator_Ammo = Ammo / Gunpowder / Shells LootGenerator_Skarby = Alcohol / Cigarettes / Coffee / Books / Weapons / Jewelry
Note: Search for those tags in Items to quickly go though all items of that group.

And this is the same list with their value in parenthesis and the total value of each group:
Timeline_Materials → Materials(2) = 2 Timeline_Wood → Wood(3) = 3 Timeline_Parts → Parts(5) = 5 //ElectricParts(10), WeaponParts(5) LootGenerator_Survival → RawFood(18) + Vegetables(18) + StaleFood(9) + BrokenToy(10) = 55 LootGenerator_Med → Bandages(55) + HerbalMeds(42) + Meds(64) = 161 LootGenerator_Trader → HomeGrownTobbacco(5) + Plants(4) = 9 LootGenerator_TraderBasic → Tobacco(10) + MedIngredients(15) + Sugar(3) = 28 LootGenerator_Ammo → Ammo(7) + GunPowder(2) + PistolShells(2)*3 = 15 LootGenerator_Skarby → Alcohol(23) + Hooch(27) + Coffee(3) + Book(3) + TradingItem(25) = 81 + Joint(2) + Cigarette(4) + QualityJoint(6) = 12 + Weapons: Pistol(43) + Shotgun(54) + Machinegun(74) = 171 + Broken: BrokenToy(10) + Guitar_broken(20) + Helmet_broken(15) + Vest_broken(20) + Pistol_broken(10) + Shotgun_broken(15) + Machinegun_broken(20) = 110 = 374 in total

More items in a group = more randomness as not every item will spawn in each location.

For example, if you set LootGenerator_Med to 80. Only one item of that group will spawn since adding more than one would exceed the maximum value of 80. But if you set it to 120, then any combination of two items will have a chance to spawn (55+42=97, 42+64=106 and 55+64=119). The game uses multiples of 110 instead to prevent Bandages and Meds from spawning too often together.

Another thing of note is the MinLootLocationGroup defined in Items config. It prevent certain from spawning in early locations (A and B groups). Remember that you can see the setting for all items at once by clicking on Items and expanding that setting in the right panel.
WORK IN PROGRESS
--------------------------------------------------------------------------------------------

The next sections of this guide still need to be re-written.

--------------------------------------------------------------------------------------------
4. Scenarios
(Scenarios Config)

Starting Characters Scenario Timeline Upper Row Katia, Bruno and Pavle Traders Early1/Early2 Pavle, Bruno and Marko Survivalists Early1/Early2 Iskra and Christo ChildWithProtector_0 ChildWithProtector Pavle, Zlata, Anton and Cveta OrdinaryPeople Early1/Early2 Bruno, Roman and Arica Bandits Early1/Early2 Boris, Emilia and Marin Winter_Builders Winter1 Bottom Row Roman and Emilia BadBandits Early1/Early2 Marin, Arica, Katia and Misha Thiefs2 Hardcore Roman and Katia Couple_02 Hardcore Marko Loner_01 LonerOrCouple Zlata, Emilia and Kalina Couple_03 LonerOrCouple Anton and Cveta Couple_01 LonerOrCouple Arica, Ivano and Henrik ChildWithProtector_02 Winter1 Arica, Marin and Katia Winter_Thiefs Winter1 Livia, Zlata and Marko Pregnant HardcoreLong Stories dlcs Adam and Amelia Father's Promise (WS_Story1) Malik, Esma and Adem The Last Broadcast (WS_Story2) Anja, Ruben and Zoran Fading Embers (WS_Story3)

(Check the Modding Instructions pdf in the game folder for more detailed infos on how to make a new scenario)

To edit a scenario, editing the corresponding timeline in Scenarios config is not the only thing to take into account. Each timeline also has his own temperature settings (Winter config), radio messages (Radio config), and visits settings (Visits config).

Furthermore, the three Stories scenarios added new features that can be implemented into your scenario (cf. Added features above), like bombings preventing from scavenging and/or visits on certain days. You also have the option to link a scenario to a specific set of locations (or map pack), which is very useful to make a more unique scenario.

The three Stories scenarios use those options so you can check the WS_StoryX timelines to give you an idea on how to implement them in your own scenario.

In short, here's schema of the most important settings that can be edited:
Scenario -- DwellerSetName (dweller set)  -- HomeSceneName (shelter) -- ShelterSetupName -- Loot generators config  -- LocationPackName (map pack) -- ScavengeLocations config  -- TimelineName(s) (scenario setup) -- Timelines --> Timeline -- MajorEventConfig (looters/winter setup)    -- ShelterAttackRuleSetName -- ShelterAttackConfig (shelter attacks)    -- WinterConfigEntryName -- Winter config (temperature)    -- Radio config (radio messages)    -- WardurationInDays (scenario duration)  -- VanishItems (item scarcity) -- ItemPriceDefs (price hikes)  -- VisitsGroupsName (visits) -- Visits config
-- Weather conditions
(Winter Config)

Temperature: min = -10°C / max = +22°C
Generated Heat: +2.2°C/fuel (simple heater) - 3.6°C/fuel (improved); +14-22°C max (x6 fuel) //(Heat Coefficient) / (Heat Curvature) = (Heat generated per fuel)
-- Visits
(Visit Config)

Dweller: 1: 1.5//+3d// 2:0.75 //+6d// 3:0.3 //+16d// 4:0 5:0
Helper: 2d (3); Quest: 5d (1); Trader: 5-10d (1;2)
Helper > Trader > Dweller > Quest //priority order
//DailyPointsVisitTreshold(5) / (10) = (0.5), with (10) = min. days between each visit
-- Radio
(Radio Config)
5. Items
(Item Config)
6. Misc
-- Useful Info
Day 6:00AM-8:00PM (14 hours); Night 9:00PM-5:00AM (8 hours) //real time = 6x2 min
-- Added Features
With each Story dlc the modding tools were given new features. Following is a non-exhaustive list of everything new I noticed each time:

Father's Promise (4.0.2) – November 14, 2017
- make item upgrades (Items -- ItemToDeactivate)
- trigger events using the radio (Radio -- Event after listen)
- unlock location using the radio (Radio -- Location to unlock)
- link scenario to a map pack (Scenarios -- LocationPackName)
- trigger events on day start (Timeline -- EventsOnDayBegin)
- add memory hole for diverse effects (Timelines -- MemoryHoles)
- unlock location on event or item use (Timelines -- UnlockLocations...)
- disable guarding/scavenging on specific days (Timelines -- VariousOptions)
- prevent robbers from stealing certain items (ShelterAttacks -- NoStealableItems)
- change depression when joining (Visits -- DefaultDepression)

The Last Broadcast (5.1.0) – November 14, 2018
- add schemes to make character tired/wounded/etc (Timelines -- VariousOptions)
- trigger ending on event (Timelines -- CustomEndings)
- trigger trauma on dweller death (Timelines -- CustomTraumaOnDwellerDeath)
- remove dweller on event (Timelines -- DwellerDisappears)
- disable visit on event (Visits -- DisabledFromEventName)
- give priority to certain visit events (Visits -- Priority)

Fading Embers (6.0.5) – August 6, 2019
- move to another shelter (Timelines -- AdditionalShelters)
- add end day events (Timelines -- End day sequences)
- block/hide specific locations (Timelines -- SelectiveLocationsBlockingEntries)
- prevent visitors on certain days (Timelines -- SelectiveLocationsBlockingEntries)
- prevent scavenging of specific items (Timelines -- BannedItemsFromScavenge)
- trigger trauma/death on event (Timelines -- CustomTraumaOnDwellerDeath -- ReqEvent)
- trigger shelter attack on event (ShelterAttacks -- Enabled after event)
- prevent robbers from stealing more than a certain number of items (ShelterAttacks -- MaxStealableItemCount)

Final Cut (6.0.7) – November 14, 2019
- (NEW) force npcs to be hostile (ScavengeLocations -- ForcedThreatLevel)
- (NEW) change the heater efficiency in a specific timeline (Winter -- TimelineOverride)
-- Tools Limitations
What you cannot do with the current tools: change night duration, change characters ability and model, respawn NPCs or items in explored locations, add inventory slots (removed with TLO), and more...
Final Notes
Please post in this thread if you have questions regarding the modding tools. I cannot and won't answer any technical questions in the comments section.
16 Comments
taimat715 30 Aug, 2024 @ 6:40am 
Thank you so much! This saved me a lot of time. Excellent job!
SepuhAjarinDong 25 Jul, 2024 @ 8:20pm 
What map LootGen_Map08_A and 08_B? Please help i try making hardcore mode for my self :steamhappy:
♪ ♫ ℙ℮ℙ℮ ♪ ♫ 29 Nov, 2022 @ 9:13am 
123
ANASTASIA 26 Jun, 2021 @ 11:15am 
Simple question here, how do I change scenarios/custom game total game days to 100+ or even infinite days?
NDMO 13 Jun, 2021 @ 1:23pm 
Any way to rip the models of characters themselves?
toomanynights 8 Jun, 2021 @ 12:48pm 
@Klerk The one to the right from Esma is in fact beardless Marin. :6face:
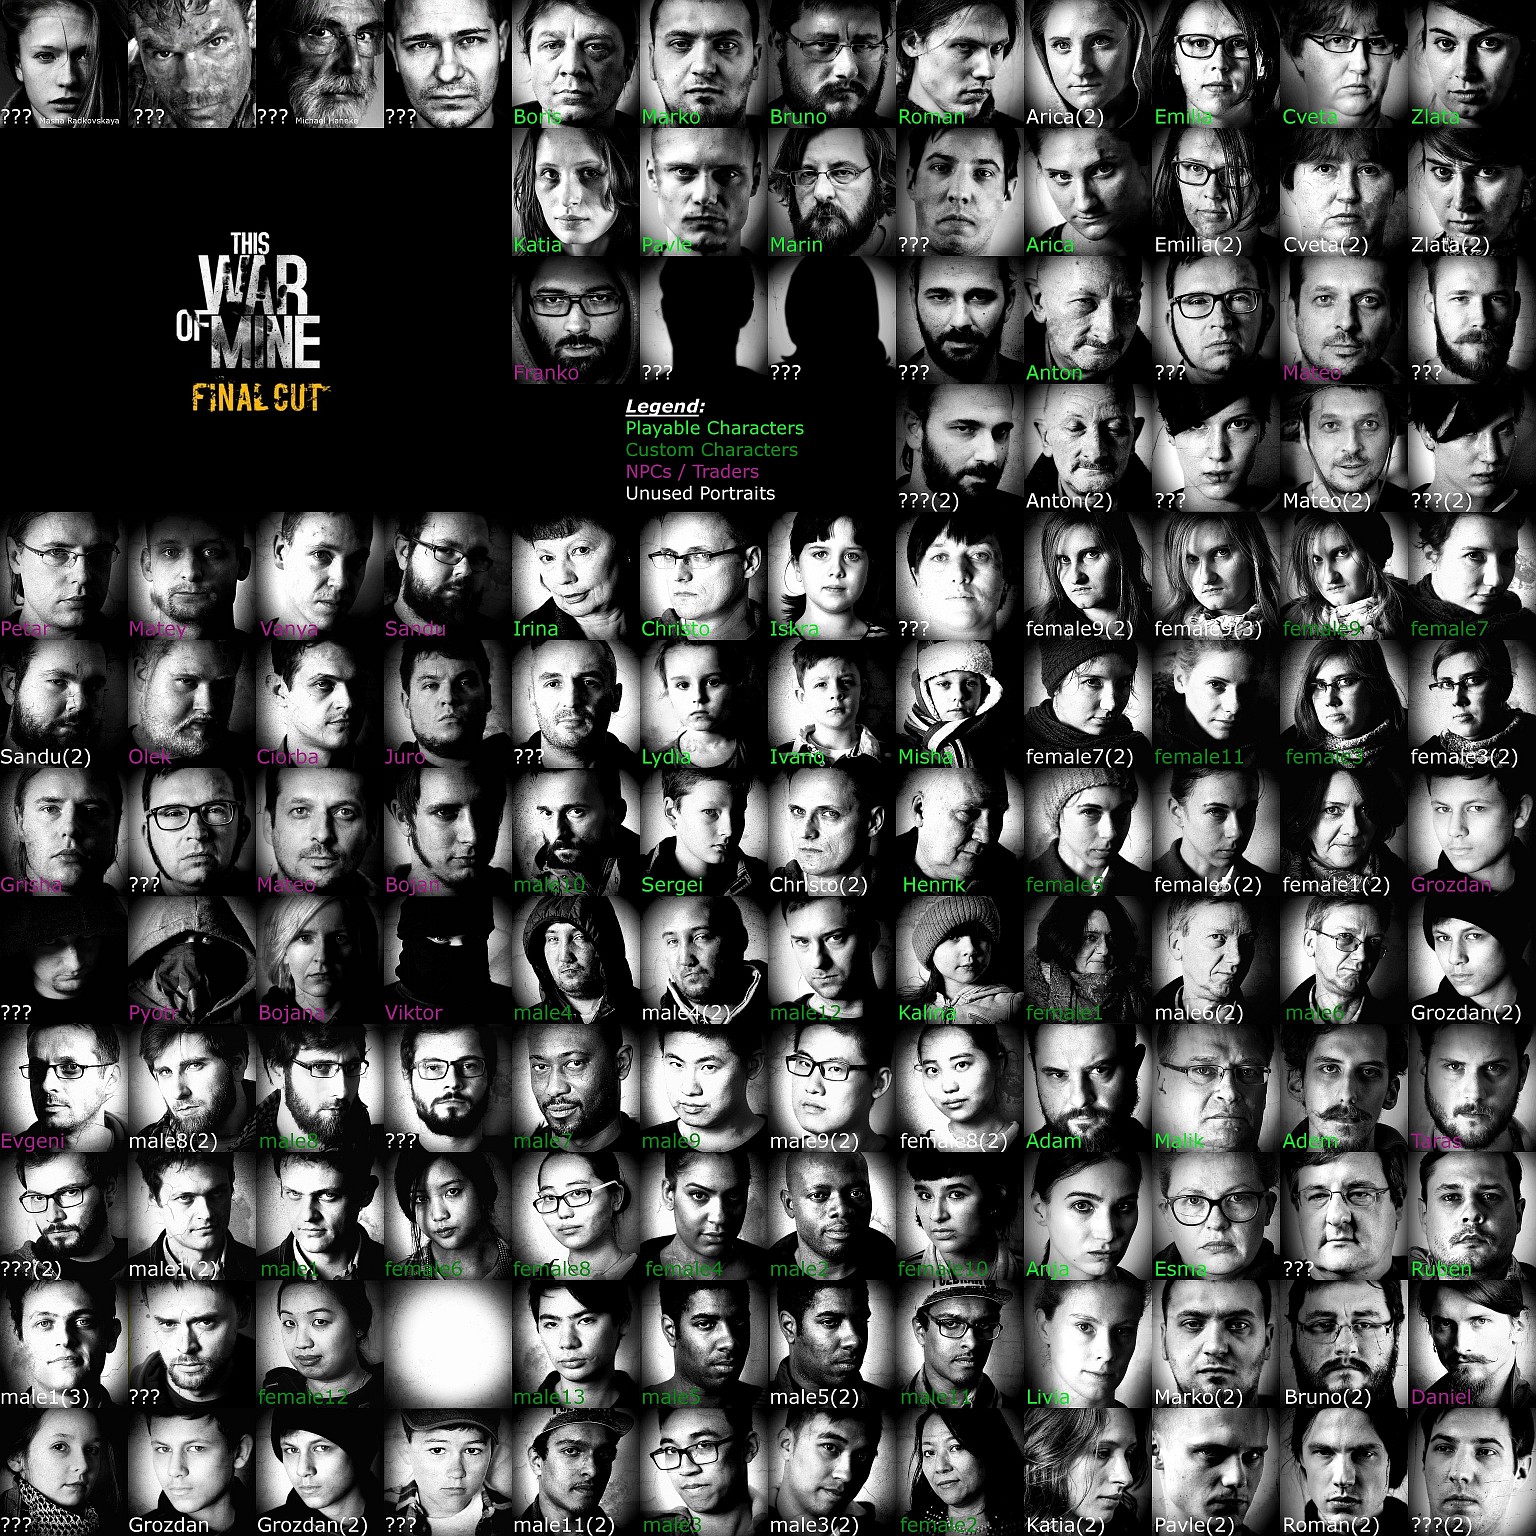
Could you please check if you still have alternative photos of Pavle, Katia and Bruno? They seem to have those photos removed in the latest update - I can't see those on that sheet... Maybe you have those photos stored in some of the older mod's folder? I'd be very glad to add those to my "Alternative character photos" mod!
Vaine 9 Feb, 2021 @ 9:02pm 
Thanks @Klerk ill try it out. Np mate, appreciate ur time, ur guide helped me a lot!!
Runertje550 9 Feb, 2021 @ 6:34am 
bruhh, im gonna give up modding if I have to do that stuff XD
Kierk  [author] 9 Feb, 2021 @ 6:04am 
@Runertje550 I just thought you had found the answer by now xD
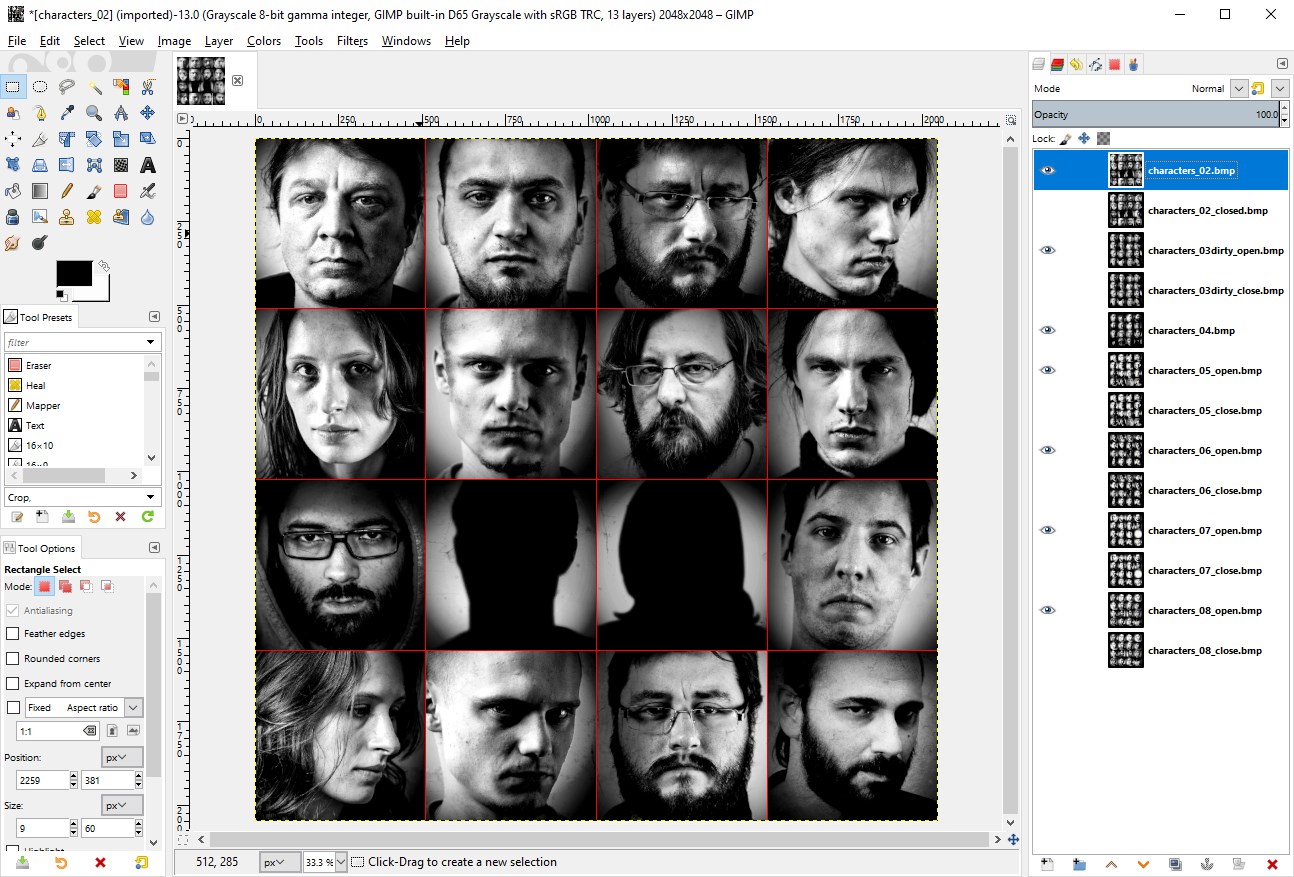
To answer your question, yes you need to repack the mod to test whatever you did in Storyteller. Then in-game you can re-upload the new version of your mod (the description will be deleted) if that's what you meant by updating.

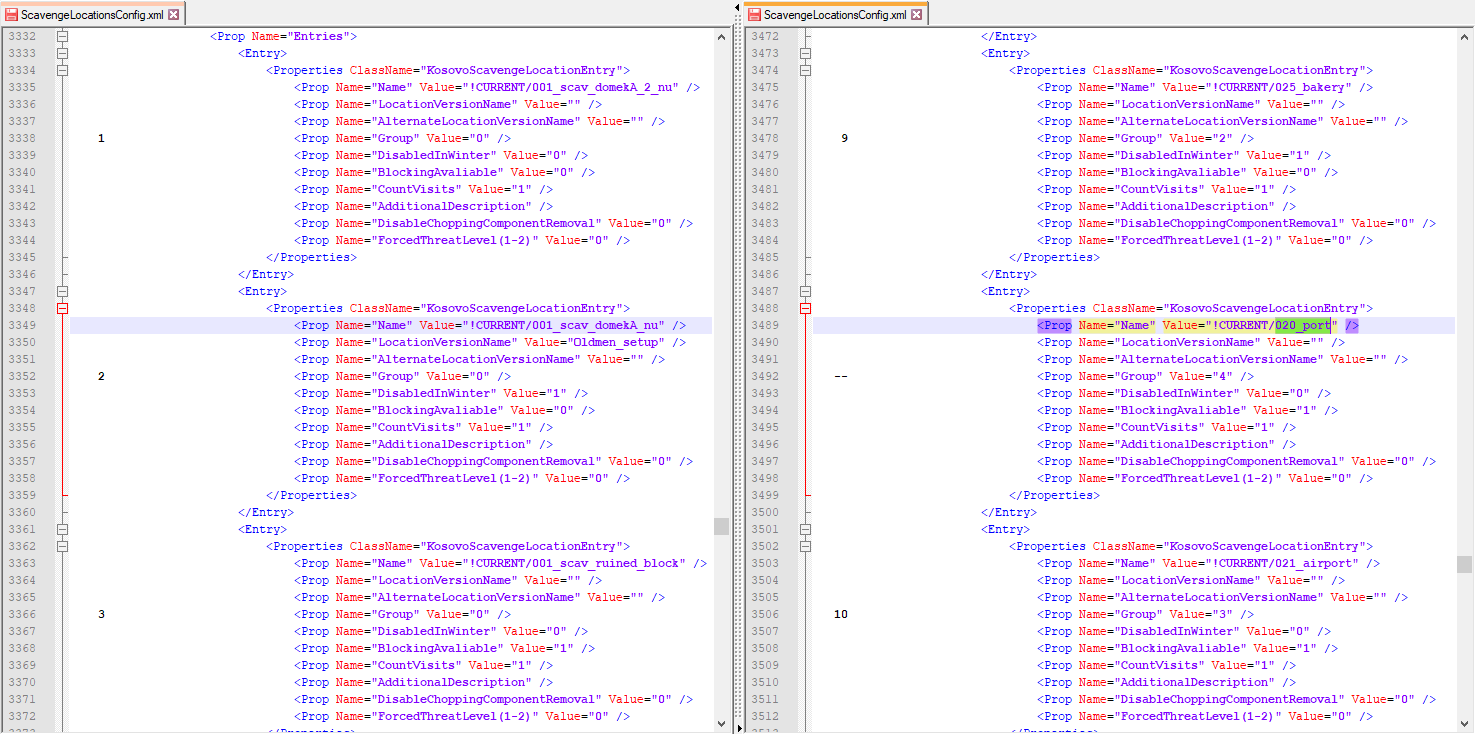
If you're talking about updating a mod after a game update, that's another story entirely and involves using WinMerge to see what changed and reciprocate those changes in your mod.
Runertje550 9 Feb, 2021 @ 2:19am 
but why didn't reply to mine lol