Terra Nil

Terra Nil

77 ratings
Complete 100% Achievement Guide
By LeeThePhoenix
Guide to earn all 37 Achievements for Terra Nil
Updated with Heatwave release!
2
   
Award
Favorite
Favorited
Unfavorite
Introduction
Thank you for reading this guide! I hope this helps a lot, and please let me know if there’s anything I can improve within this guide! When creating this guide, there were less than five other guides for Terra Nil. So thus, I decided to compile an achievement guide since I personally go for 100% achievement completion in games.

The entire guide will be in order that you can easily complete, with most achievements being earned by completing a milestone within the game. Harder achievements that require some work or certain map design will be at the end of the list. Some achievements require finding all the animals and will be noted with an asterisk ( * ) at the start of the achievement name. If you need help with those, here’s my guide Every Region’s Animal Collection List .

Some achievements will be easier or harder depending on the map generation, so you may have to restart the region a few times to get a good map. Or, like myself, you might mess up something and can’t undo the action, so you may need to restart the phase. Frustrating, but easier than having to restart the entire region multiple times.

And onto the achievements! I hope this helps!
Restoration Achievements
Each of the achievements' descriptions state which region it is to complete (Unless noted otherwise). In game, when selecting a region to play, it will have the name listed at the top of the location information window.

Global RejuvenationCompletely restore the planet
- Complete all 8 maps from the four regions. This will fill the bar at the bottom of the world view to 100% and earn you this achievement.
- To Note: I do not know if this has changed after the Vita Nova update from June 24,2024

Temperate
Valley of the WindRestore the River Valley
– Complete the first map. This is the first map you’ll be able to do with a new profile.

Greenleaf ValeRestore the Hill and Dale
- Complete and restore the map.

Open-cast ReclamationRestore the Abandoned Quarry
- Complete and restore the map.

Riverside RestorationRestore the Polluted Bay
- Complete and restore the map.


Tropical
Flooded IslesRestore the Archipelago
- Complete and restore the map.

Coral RenewalRestore the Desolate Island
- Complete and restore the map.

Nature Finds a WayRestore the Scorched Caldera
- Complete and restore the map.


Polar
Northern GlaciationRestore the Polluted Fjord
- Complete and restore the map.

Feeling FrostyRestore the Volcanic Glacier
- Complete and restore the map.

Rock and StoneRestore the Subpolar River
- Complete and restore the map.


Continental
Urban RenewalRestore the Irradiated Sprawl
- Complete and restore the map.
- Note: The game has this area named "Flooded City" and not "Irradiated Spawl"

Reduce Reuse RecycleRestore the Continental Outskirts
- Complete and restore the map.

Arid
Okavango DeltaRestore the Parched Dones
- Complete and restore the map.


Grand CanyonRestore the Canyon Peaks
- Complete and restore the map.


Green EnergyRestore the Fracked Floodplain
- Complete and restore the map.
*Complete Biome Achievements
*Perfectly PleasantIn the temperate region, fully restore all biomes and climate conditions and have 3 gold photos per mission
*Abundant LifeIn the tropical region, fully restore all biomes and climate conditions and have 3 gold photos per mission
*Beneath the SnowIn the polar region, fully restore all biomes and climate conditions and have 3 gold photos per mission
*Oryx and CrakeIn the continental region, fully restore all biomes and climate conditions and have 3 gold photos per mission
*Everything the Light TouchesIn the arid region, fully restore all biomes and climate conditions and have 3 gold photos per mission

- These four achievement descriptions explain them pretty well. You might need to restart the region a few times to earn this, but it’s mostly trial and error to learn what every animal needs. The biomes are automatically met through completing the maps. The climate conditions are shown in the top right corner when you build the research station and explain which statuses need to be met to fill the climate condition.

NOTE: Photos are new and I will type up how to take gold photos once I have figured that out myself.
Photography Mode & How to Take Gold Photos
Photography has been added!
The photography mode takes a little bit of getting used to, but it quickly became fairly easy to see how the points are calculated to 'grade' the photos taken.

At the start of the 3rd stage, you should be able to take photos. There will be a small camera icon next to what will be the 'launch' button, which lets you enter photography mode.

Entering photography mode, the game will show you a list of 10 'stars' to complete. These can be captured in any order, and once a star is earned in a photo, you do not have to repeat the star to earn it again.

The only other things that really matter in this view is the two buttons on the right of the view window - the shutter button (the white camera), and the exit button (the bottom button with the X).

I also discovered on accident that you can middle click / click with the scroll wheel to zoom out. This was extremely helpful for getting 5,000+ scoring photo.
I messed around a bit with this, and it seemed to be a little troublesome to activate. I did not find this listed in the controls, either. The key point I think to activating the wider shot, is to keep the view completely still and click once, repeating as necessary until it opens.

The shutter button allows you to take a photo, which will promptly bring up the photo, and give it a ribbon based on the points the photo has earned. Hovering your mouse over the ribbon will bring up the "Photo Rating" screen, as shown in the image on the right. After only one map messing with the photo mode, I don't understand the scoring and ribbons past Silver ribbons are 2,000-2,999 points, and Gold ribbons are minimum 3,000 points.

I think the easiest way to sum up a good scoring on the photo mode, is the more stuff you can fit into the photo, the better your score will be. Happy animals and diversity of animals/plants will earn you more points, which will help to earn the achievement below.

Better than 4kTake a photo worth 5,000 or more
- I earned this after realizing the photo I took for the Wildlife Safari was less than 100 points away from earning 5,000 points, and tweaked how the rover was sitting, the nearby animals, and making sure there wasn't any negative points from depleted tiles. I also learned how to get a wider shot photo by middle mouse clicking, and instantly earned the achievement.


Wildlife SafariTake a photo of ERW1N and at least 3 different animal species.
- I earned this while working on the Canyon Peaks map (the first map with ERW1N). I moved the lil rover in the middle of some groups, and when I saw it had two but not three, I just relocated a third animal to the area, snapped a photo, and the achievement popped up saying I earned it.


Caught in the ActTake an action shot of an animal
- This can be earned by waiting for an animation of an animal doing something, like a lion stretching. This was a pain for me to earn, as I found you have to time the photo-taking just right to earn the achievement. For myself, it took about 2-4 minutes of just watching a few lions through the camera, with the mouse over the shutter button, and clicking right went one started to stretch. This took a few tries, as I wouldn't notice right away and click to snap the photo towards the end of the animation.

Some Easier Achievements
Well. At least they were easier for me than some of the other achievements. Here they are, listed below!

Aerial View - Use screenshot mode to take a full map screenshot
This you can do at any point in the game. Open the “Options” (pause) menu either with the “options” button in the top left corner or hitting the escape button on your keyboard. Screenshot mode is the third option in the menu, and is like camera mode for most major games, letting you choose what on the screen you want a screenshot of, or if you want the entire map in the screenshot. Click on the camera icon, or “Screenshot Whole Map”, and you’ll unlock this achievement.

(Note: as of June 2024, this will create a file on your desktop with the screenshots in it. This is not a shortcut folder; it lives on your desktop unless you move it or delete it.)

Screensaver - Appreciate the beauty of nature for at least 60 seconds
When you complete the map and your recycle ship picks up the little recycle boat, it will have “wasteland reclaimed” in the top left corner and give you the option to either “Continue” or “Appreciate”. Click “Appreciate” and let the game run for about a minute, and it will automatically give you the achievement. Once you have the achievement, you can click anywhere on the screen to bring the choices back and hit “Continue” to move on.

Antarctic Oasis - Restore the Volcanic Glacier while still having at least 15 lava tiles
While I could have earned this on my first run for the Volcanic Glacier map, I didn’t realize this until I had to go back for this achievement. The trick is to not let the map get below 0°C – anything below freezing will cause the lava tiles to turn to stone. Because of this, either you earn this achievement first then do the map a second time for Beneath the Snow, or vice versa since from what I’ve learned you cannot complete all the climate conditions and earn this achievement.

Minecraft Rocks! - Create rock by causing lava and river to meet
I earned this with the Volcanic Glacier map in the polar region, which is the third map in the progression. There are steaming fissures throughout the map. Use a Seismic Detonator on one near the coastline, and it should automatically earn you the achievement. If not, you can also earn it with the Abandoned Quarry map that unlocks after you complete the Continental map Flooded City. On the Abandoned Quarry map, you’ll create a river with the Water Pump, then use the Seismic Detonator on a nearby steaming fissure.

Marine Haven - Restore the tropical region with at least 40% of the map being underwater
I earned this one with by using the Archipelago map. When using the Undersea Dredger, you can control how much of the map is covered by land vs water. Once you think the map is about 50% covered with land, do not use the Undersea Dredger at all and finish the map through each phase.

I would drive 500 Tiles - Drive 500 tiles with ERW1N
I earned this achievement on the Canyon Peaks map, which is the first map you use ERW1N. By the time I finished collecting most of the things to recycle, this achievement had been unlocked. If you have not unlocked it yet, just keep driving the lil guy around the map until it unlocks.
Wildfire
Burn down 25 buildings with a single fire
I was able to earn this on the first map unintentionally so I’ll be using the River Valley for this guide, but you can also do this on any map with the Solar Amplifier and fuel source to create a wild fire. You’ll want the region to have a nice medium to large area that is on the same level, all connected, and preferably with a Dead Forest tile already nearby. Progress through the region, using the Toxin Scrubbers to get fertile soil and then the Irrigators to create greenery.

This should get you to the point to unlock the second phase, and unlock the Solar Amplifier, the Beehive, and the Arboretum (if needed). If you have a Dead Forest tile that was revived into a Forest tile, use the Beehive to create Fynbos into the land space you want to burn. Count how many buildings you have already in the area, and build the remaining you need to get to 25. (Note: any building will burn unless it is on rocks.)

Use the Solar Amplifier to light a Fynbos tile on fire, and it will cause the entire area to burn, stopping only at the map edge, a cliff face, a River tile, or a Wetland tile. As long as there are enough buildings, they should all burn and earn you the achievement.
Goldilocks
Have 3 bears living on 3 different hills at least 10 tiles apart in the River Valley
As the achievement description states, you need three bears, on their own hills, 10 tiles apart from each other. I found having a hill in each corner space and making sure the hills had the Forest tiles nearby was enough to appease the bears in this achievement. It didn’t matter if the Beehives created the Fynbos Field or not.
Call of the Void
Use a rock hopper to fire a rock over the canyon.
I forgot about this achievement before I finished the Canyon Peaks map the first time, so I loaded a second map with the purpose of earning this achievement.

The Canyon Peaks map has rocks on the bottom half of the map, and after unlocking the second stage of the map, you have access to the Rock Hopper tool. As I was lining up a rock with the edge of the canyon to yeet it across the void, I ended up having the rock go over this small gap. Which ended up counting for the achievement.


Color guide for the image on the right:
-The Orange line is the edge of the canyon that the rock actually went over.
-The Green line is the path of the rock that earned the achievement.
-The purple line is the path I was planning to attempt before the achievement was earned.
Great Migration
This one was a bit tedious (but easy enough) to earn. I don't know if you can get this on an earlier map, but I wasn't able to until the Arid region's Fracked Floodplain.


During the first stage, I used several of the Seismic Detonators to expand the ponds of Water Hyacinth tiles to the furthest points in the left and right corners of the map, as you can see in the image on the left. Then, I completed stage one, and moved on to stage two.


With stage two, I connected all the ponds together, using the Biofuel Extractor. At this point, I activated the Biofuel Extractors, changing the tiles to the Mudflats tile, and quickly using Hydroponiums on nearby Irrigators to change the tiles to Reed Bed tiles.

Once the left and right corners were converted to Reed Bed tiles, I was able to use the Bird Sanctuary tool as far left and as far right as I could place them on the map. Once the two Bird Sanctuaries connected, the achievement popped up and this achievement was done.
Perfect Location (Pre Vita Nova Update)
NOTE: This section is from pre Vita Nova update. I'm keeping this section for 'historical purposes'. Skip if you are not playing from before said update.
Construct an Animal Observatory at the intersection of 4 different tier 2 biomes
This achievement was the hardest of them all to earn. I ended up referencing this guide to figure out how this works. I’ve seen users say that either the Tropical Region maps are easier, but I earned mine with the Volcanic Glacier map. With the Volcanic Glacier map, there’s a small hill in the bottom corner of the map, that will have at least one Fissure on the top of the hill. If you have the hill and easy access to the ocean, it’s easier to earn this achievement. If done correctly, you should earn the achievement shortly after you place the Animal Observatory. If it doesn’t, hover your mouse over the tile for a moment to check which type of tiles are nearby, and make sure that the tiles state “Boreal Forest”, “Lichen”, “Tundra”, and “Kelp Forest”. I don’t know if the tiles in the corners next to the Animal Observatory count, as I counted the ones that were sharing a full side.

Complete phase 1 as normal for the map. For myself, I left this corner of the map alone after using the Seismic Detonator to create the lava ‘lake’ around the fissure on the hill, placed a Geothermal Plant on the hill, then left that corner well alone so I would have more room to work during phase 2 to earn the achievement.


Once in phase 2, it’s time to start the work to get the achievement. To start, I used the Radial Excavator to both create a lava lake and get dirt from elsewhere on the map. Once the Radial Excavator is used, it is full of dirt and you can move that dirt elsewhere with the Monorail Nodes. Click on the Monorail Node near the Radial Excavator, and then place the Radial Excavator near the ocean. The goal of this is to have the land move to be a sheer cliff into the Kelp forest tiles that you created on the ocean floor nearby. This is the first phase 2 biome requirement met.


Next, you’ll want to start by creating Greenery tiles on the top of the hill and in the dirt of the newly formed land. Depending on where you place the buildings on the hill, will change the Building Husk piles that are used for the Arboretum to create the Boreal Forest. It doesn’t matter too much, as long as there’s one close enough to spread the forest onto the level where the Animal Observatory will sit.


Before you create the Boreal Forest tiles, use the Irrigator to create Greenery tiles. This is to plan where you will have the floral-colored Tundra tiles sit adjacent to the Animal Observatory. If not, the Boreal Forest Tiles will take up the majority of the tiles and make it harder to complete the achievement. Now you can create both the floral-colored Tundra and the Boreal Forest tiles next to the Animal Observatory. This covers the 2nd and 3rd phase 2 biomes. Finish with phase 2 to get the phase 3 tools.


For the final biome, phase 3 will make it easy to complete. Make sure you can see the divide between the Tundra and the Boreal Forest tiles to keep track where the rocks need to be for the Lichen. With my favorite tool, the Rock Hopper (aka Rock Yeet-er), you can throw a rock over next to where you want the Animal Observatory to be. Place another Irrigator nearby, so you can use the Algae Greenhouse on the Irrigator to create the Lichen. At this point, all four biomes should be ready for you to place the Animal Observatory down.
Perfect Location (Post Vita Nova Update)
Construct an Animal Observatory at the intersection of 4 different tier 2 biomes
To be honest, I somehow forgot to type this section up when the update first dropped and only realized a long while afterwards. There were comments asked on this guide about it that I never had the time to follow through with (until over a year post update drop), but This guide by Fytayn answers it nicely.

Compared to the pre- Vita Nova update, which needed the glacial or the tropical map to complete, this achievement can be done with the first biome, River Valley. It may take a couple attempts to get a good map generation for the achievement, but is do-able.

I may re-visit this achievement at a later date to type up a way to earn this achievement, but in the meantime Fytayn did a wonderful job with theirs, and I recommend you check out their guide.
Fauna Utopia (Vita Nova Update)
Complete a mission with at least 20 fully satisfied animal groups
With the Vita Nova update, the animal system got an overhaul. This made animal needs a bit easier to understand from before. Using my Scan Collection List, I was able to make each of the animals happy before finishing the map. Using the little paw print icon in the top left corner, you can see which animal groups are unhappy and with the red or yellow icons next to the group names. Clicking on the group name, it will show what is needed to satisfy the group.

This will take some fiddling around to make each group happy, and the sonic pulse and relocate button were very useful to have groups move to better suited areas.
23 Comments
Tartempion 12 hours ago 
I also discovered on accident that you can middle click / click with the scroll wheel to zoom out. This was extremely helpful for getting 5,000+ scoring photo.
That is the piece of advice I was missing to get the achievement. First photo zoomed out on Canyon Peaks was the one. Thanks for the guide!
Petrichor 16 hours ago 
I was able to pretty easily get the 5k photo on the canyon peaks map: a lot of animals spawn into the city area and have similar needs, if you can squeeze some hyenas and boars next to eachother, hope for a rattle snake spawn, and then just wait for a vulture or an eagle to fly overhead, and take the shot

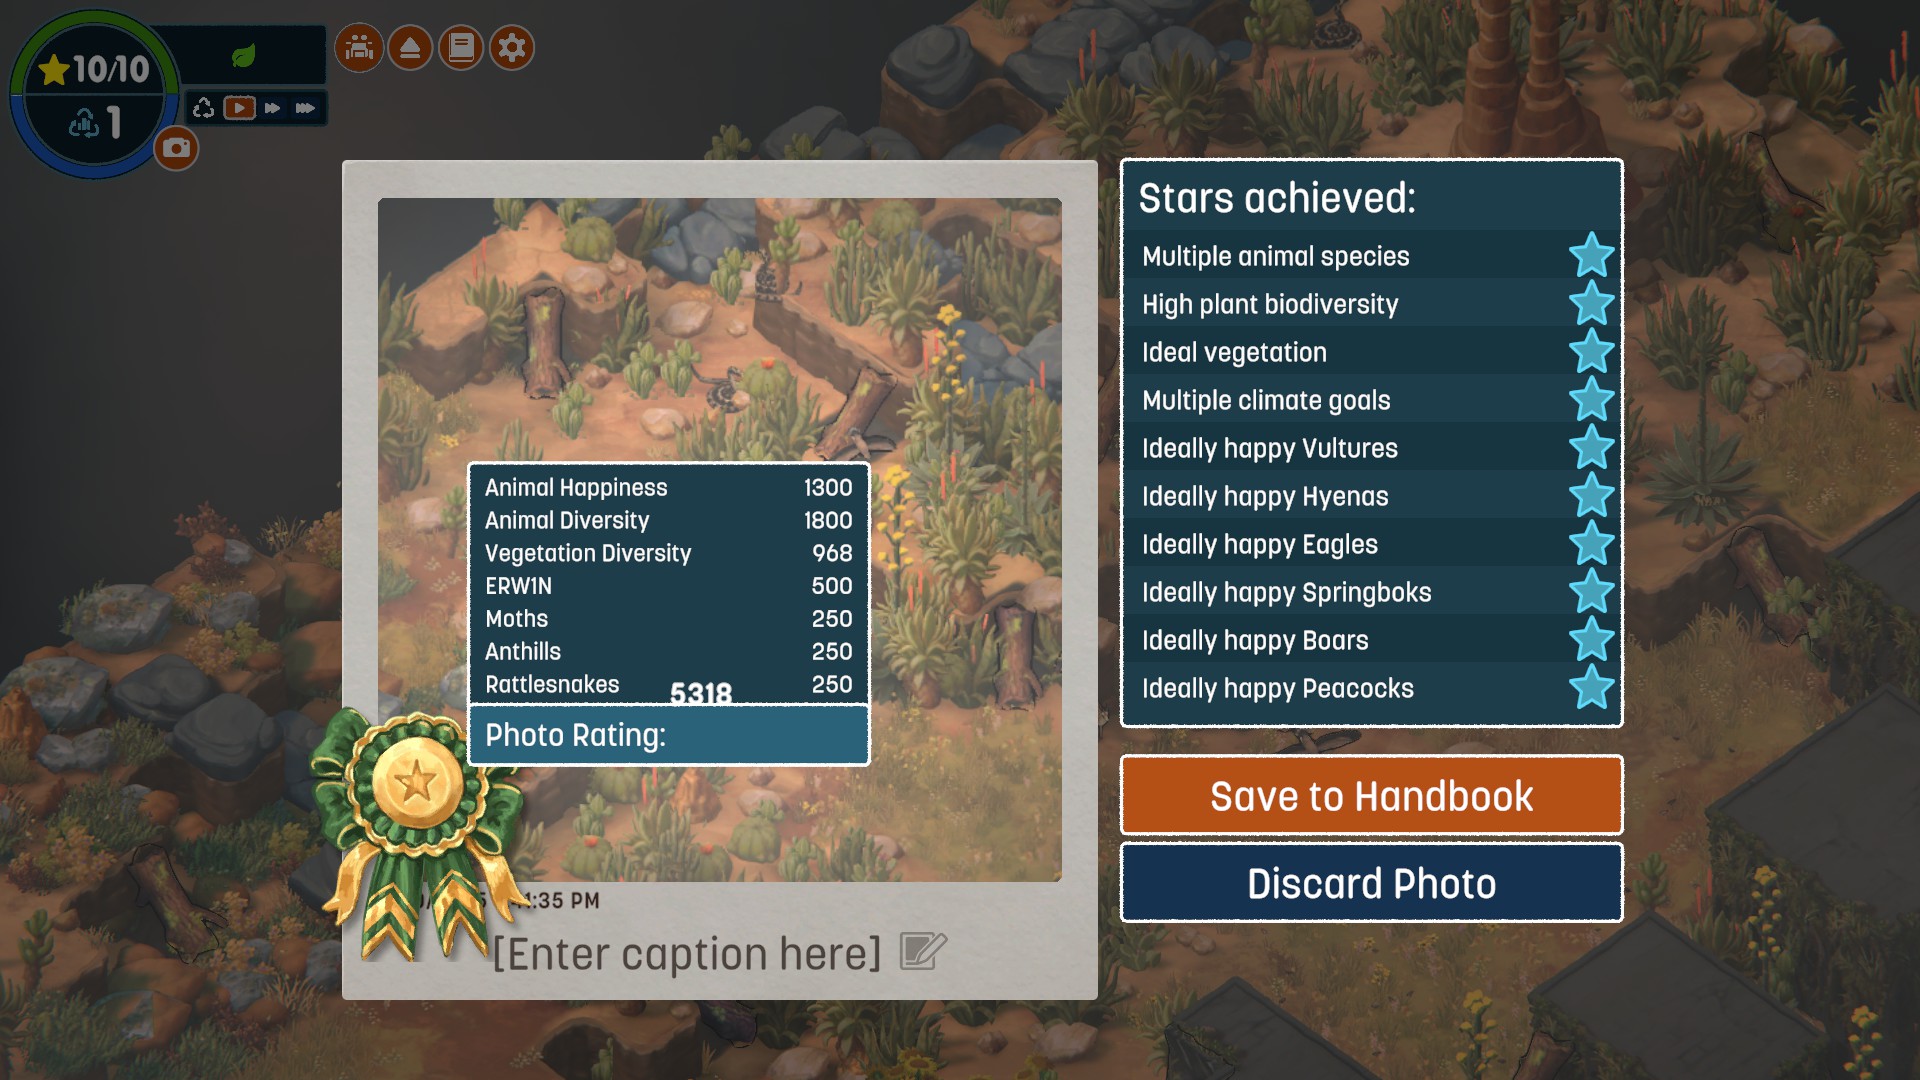
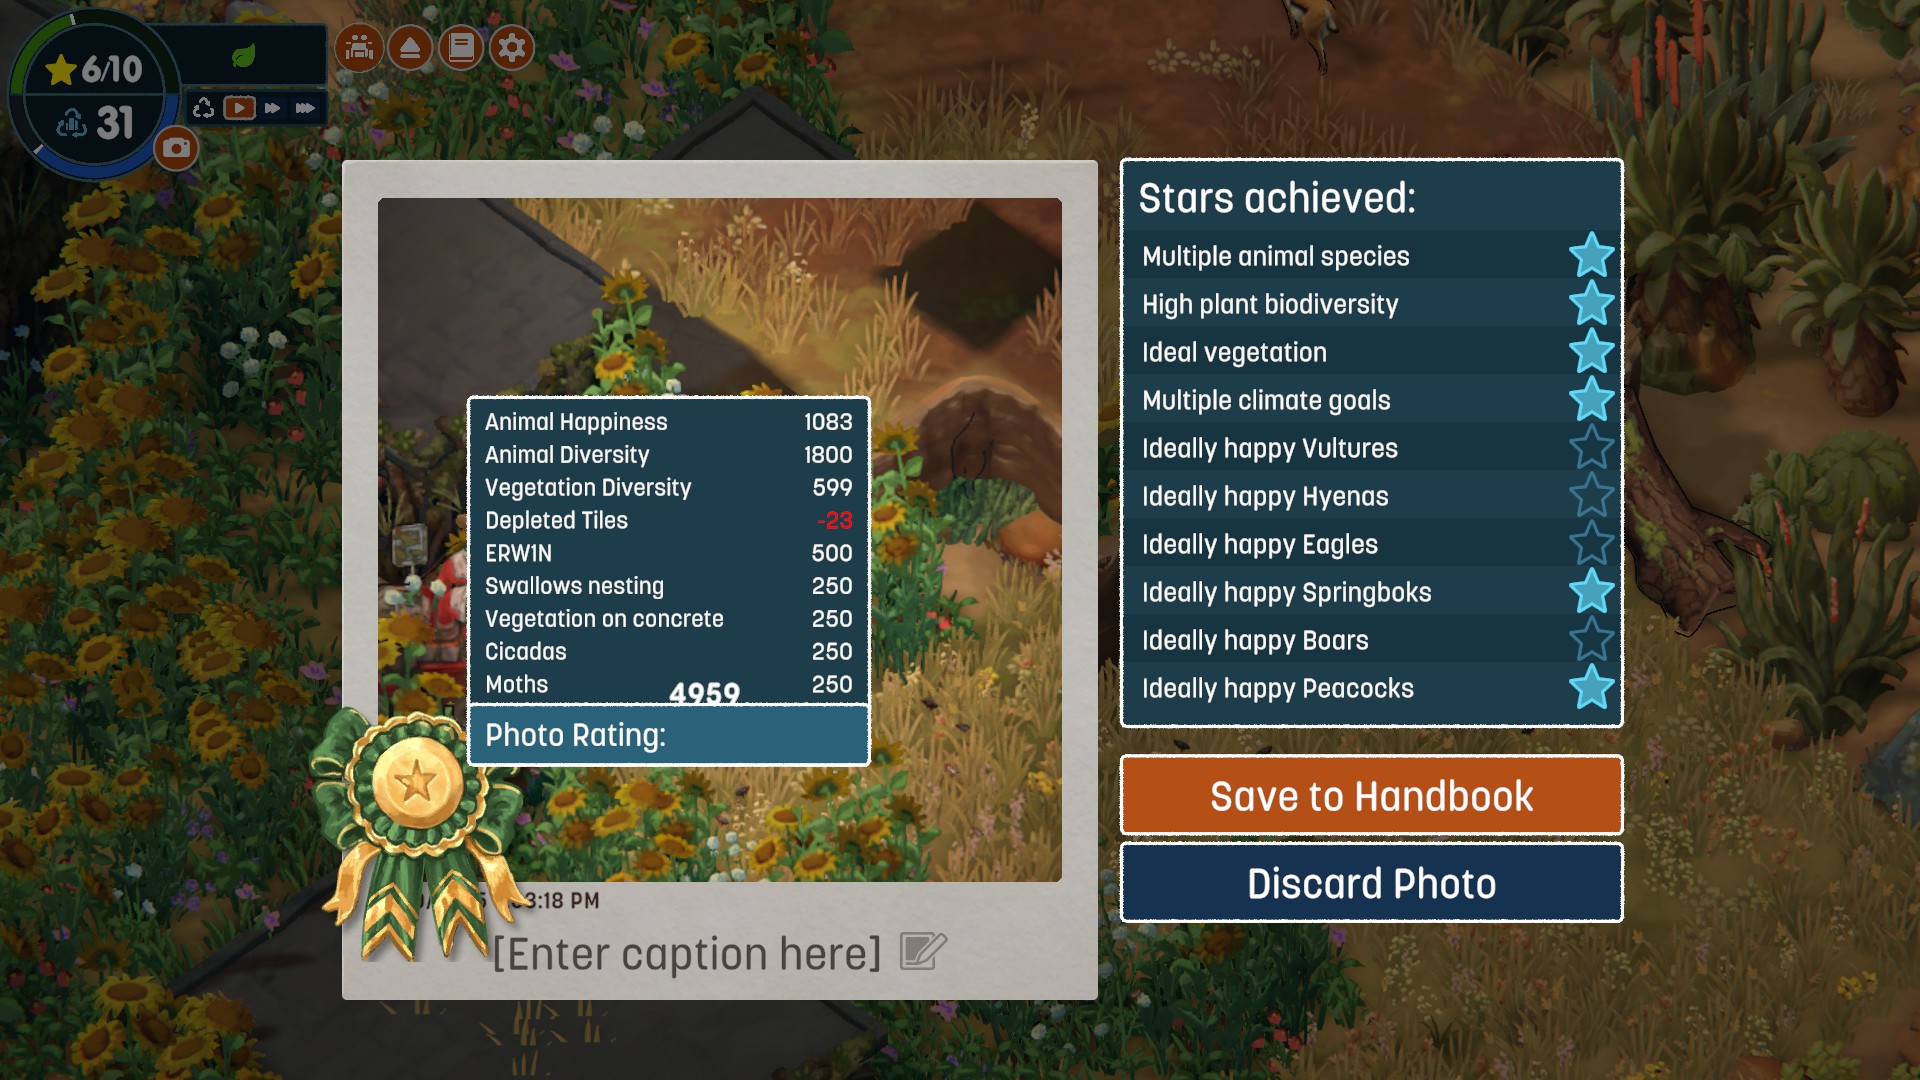
it's also a bit easier because ERWIN adds 500 points if you can get him in a picture
Goku_Saiyan3 13 Aug @ 12:26am 
Excellent guide, managed to get all new achievements easily.
Lune 12 Aug @ 5:11pm 
For the 4k photo achievement you can click on photos in the book to see the score breakdown. I got mine in the polluted fjord but 3 biomes, 3 species and then something like migratory birds got me able to do it repeatedly.

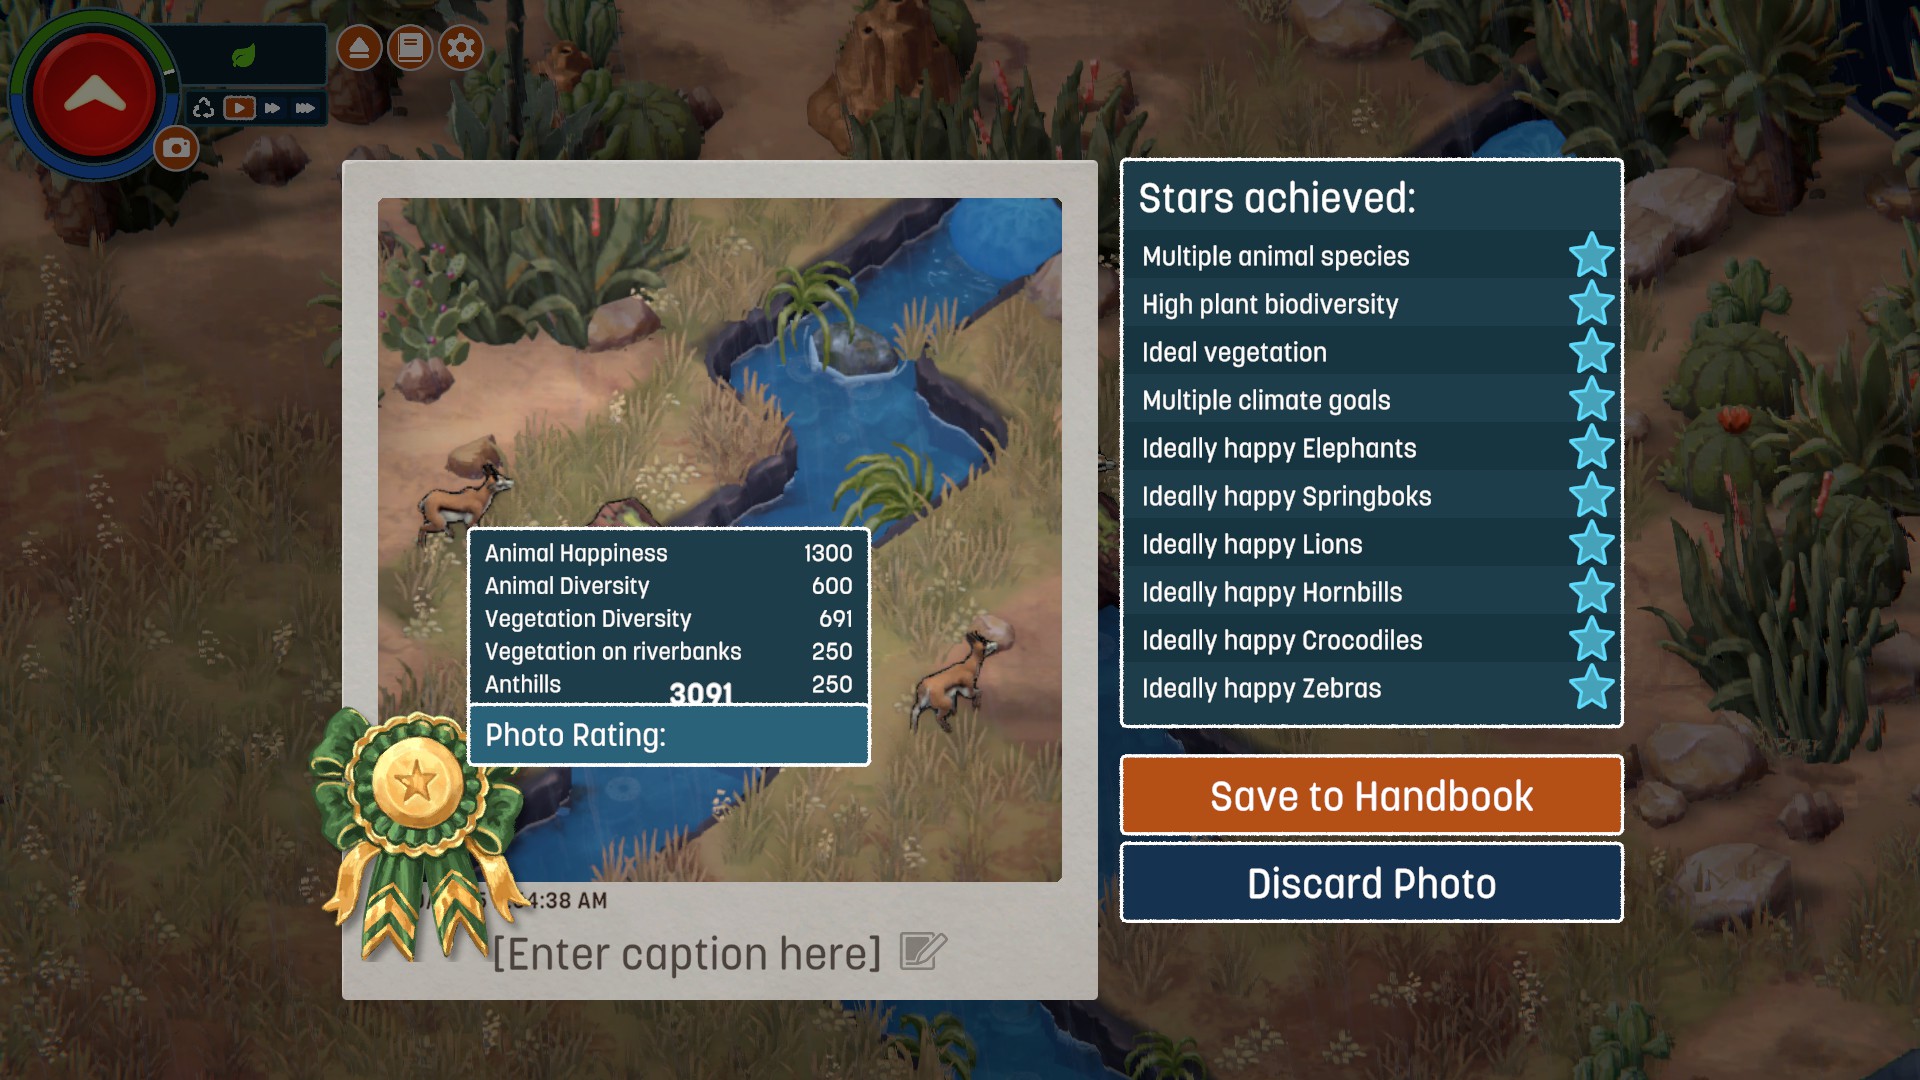
For actual scores it seems all happy animals gets you 1.3k, each unique animal gets you 600 points as long as they are completely in frame. Biomes seem to be able to get you 500 each but I'm not sure how it scores full biomes vs partials. Finally almost every climate goal gets you 250 each. I never got points for aurora but otherwise they all seem to do it.
Airish N'aan 11 Aug @ 1:18pm 
Got "Caught in the Act" for photo of a lioness stretching.
https://steamhost.cn/steamcommunity_com/sharedfiles/filedetails/?id=3547080231
LeeThePhoenix  [author] 9 Aug @ 2:26pm 
Thank you for bringing the update to my attention! I had not seen there were more achievements added, but will work on adding those soon!
EPeG_is_Nekto 9 Aug @ 1:23pm 
Will you update this guide for new 10 achievements ?
MeikoGriffe 15 Jan @ 10:18am 
the perfect location guide soluce isn't working post terra nova update
Doc 12 Sep, 2024 @ 9:54am 
I also got the perfect location achievement with the first level. Therefore is less to worry about the rest. you have more options there to focus on animals.
Fytayn 27 Aug, 2024 @ 6:49pm 
@helzilla I put up a guide. A bit long-winded but I think it explains it all.