Space Engineers

Space Engineers

Not enough ratings
Large Print in Survival
By Survival Ready
Automating the printing of large grid ships in survival mode
   
Award
Favorite
Favorited
Unfavorite
Large ships printing
Those familiar with basic printing techniques can safely skip this section.

To print, you will need a powered projector, a blueprint of the ship from the Steam workshop, and a hand welder. To start printing, you need to load the blueprint into the projector via the Terminal and connect the grid on which the projector is installed to the projection using light armor blocks. As soon as one or more projection blocks become brighter than the others, you can start printing, having previously loaded the necessary components for printing the next block into your space backpack.

This is the simplest and often the most effective way to print most small grid ships or small large grid ships. The main advantages of this method are minimal preparation time and full control over the printing of all blocks of the blueprint. However, if you need something larger than 30 meters in size or more complex than a set of several basic blocks, then this may take too much time.

Therefore, if you want to speed up the printing process and ensure its repeatability during the game, for example for drones, then semi-automatic printing using a welding wall consisting of several welding blocks connected by fans and an auxiliary ship on which a projector is installed is preferable.


In order to print a bluepint in this way, it is enough to orient the projection of the bluepint in front of the bow of the auxiliary ship. Then connect the ship to the projection using several armor plates. After that, you need to fly the nose close to the center of the welding wall and carefully, using the rear thrusters, slowly "pull" the ship out of the welding wall, making sure that all the blocks of the next horizontal cut (level) have time to weld. In order not to deviate from the vertical and not to skew the projection during the printing process, you can intercept control of the gyroscopes.
https://steamhost.cn/steamcommunity_com/sharedfiles/filedetails/?id=2809045096
This is the most common method for printing large grid structures, in which you will also fully control the process and automatically weld all or almost all blocks of the bluepint. However, if you want to control the printing only using the rear thrusters, you will either need a welding wall whose width and height are equal to the corresponding dimensions of the ship being printed. Or you can limit yourself to a welding ruler of one (or several) welding blocks, but then you will also have to manage the vertical thrust thrusters so that all the blocks of the next print projection level pass over the welders and can be welded.

All this can be tedious, and the time spent on building a welding stack and an auxiliary ship can be large. Therefore, fully automatic printing seems to be the most attractive way to solve this problem. One click of a button and you are the owner of an attack frigate equipped with everything necessary for survival.

Let's go!
Automatic printer
In the Steam workshop you can find ready-made and impressive solutions for automatic printing.

For example, this one
https://www.youtube.com/watch?v=GcxOfI1zNQI
or this one
https://www.youtube.com/watch?v=XdFcM6vMGB0
However, they all have one drawback — their construction and programming takes more time than what you usually need to print with them. If you are attracted to large-scale construction, then this is your way. I will try to offer you a simple and compact printer that solves the problem of automatic printing well and can be built manually in 15-20 minutes.
https://steamhost.cn/steamcommunity_com/sharedfiles/filedetails/?id=3444492545
Assembling printer
The printer consists of two unconnected grids. One of which is the printer itself, with a welding line for 8 welders installed on it, which allows printing ships 17 blocks wide. The other is a sliding ramp with two projectors, one of which is loaded with a blueprint of the ship to be printed, and the second - a blueprint of a ramp measuring 1x1xL blocks of light armor, where L is the length of the ship to be printed in large blocks. Printing is possible in space conditions.

Step 1
Place the Battery, Conveyor, Piston and Rotor and add two unwelded large armor blocks as shown in the image on the left. Cut down the large head of the rotor and add the small head via the Terminal menu. Rename the piston to Piston Ramp and set its values ​​in the Terminal menu as shown in the image on the right. Make sure the grid is static via the Terminal. If it is not, convert it to a station. Attention! Maximum distance = 3.05 m, not 3.1 m


Step 2
Add a small grid armor block to the small rotor head, around which install 4 event controllers and one timer, and attach 6 small magnetic plates to them from below (left picture). In the Terminal menu, rename the controllers and the timer, and also combine the magnetic plates into the Magnet Small group (right picture).


Step 3
Weld a battery to the first unwelded block of the large grid and remove both unwelded blocks. Now the battery is not connected to the main grid and is held in place only by magnetic plates. This is the ramp battery. Enter the Terminal through its panel and convert the grid into a ship (right picture). Extend the piston to the end and weld two projectors in front and behind the battery. The first one is for the ship blueprint, the second one is for the ramp blueprint (left picture). Weld a magnetic plate to the second battery (the printer battery). Rename it Magnet Large.


Step 4
In the Terminal, reset the rotor parameters and lock it as shown in the picture on the left (except Rotor displacement = -0.11). Also enable Share inertia tensor. Now add half-blocks of light armor to the bottom of the printer battery and install limiters from seamless armor plates on both sides as shown in the picture on the right. On the side of the printer, add a ramp welder through a curved conveyor pipe.


Step 5
Now you need to assemble the welding line (or wall, if your ship is more than 5 blocks high) To do this, install another piston on top of the conveyor and rename it to Piston Wall. Attach a line of welders installed through the conveyor to it (left picture). The number of welders installed should be enough to weld your ship across its entire width. You will also need a blueprint of a ramp equal to the length of the ship. To do this, simply weld the required number of light armor blocks + 1 block in one line and save the blueprint using Ctrl+B (right picture).


Step 6
Retract the Piston Ramp and load the previously saved blueprint into the ramp projector so that it starts from the ramp projector without gaps towards the printer battery and beyond (left picture). Load the ship blueprint into the printer projector, center it relative to the Piston Wall and lift it so that the bottom border of the blueprint is above the Piston Ramp strip. The blueprint should extend one block beyond the welding line (right picture).


Step 7
It remains to connect the ship projector to the blueprint. To do this, weld the required number of vertical light armor plates to the level of the block protruding beyond the boundaries of the welding ruler and then attach 4 horizontal plates to them to activate the contact block to begin welding the blueprint.

Printer programming
The printer works only on events of the controllers related to the final positions of the pistons. The timer is used to wait for the attenuation of vertical oscillations related to the movement of the ramp. If you are printing a very "heavy" ship, you can increase the waiting time.

Before you start programming the event controllers, rename them as shown in the picture below. The Terminal menu also contains two groups: (Magnet Small) — small grid magnetic plates, (Welder Wall) — wall welders. All these blocks, as well as 2 corner lamps in the welding wall structure, are hidden in the menu for ease of setting up the main blocks.


Below in the table in the captions to the pictures are the types of events and the setting of 1 slot related to the event by the Set action button. Bwd in the block name means an event related to the piston reaching the minimum limit, and Fwd — the maximum limit.

Lock (Magnet Small), Piston Wall Reverse
Timer Ramp Start
Unlock Magnet Large, Piston Ramp Reverse
Unlock (Magnet Small), Piston Ramp Reverse

Timer Ramp: 1 slot =Unlock (Magnet Small), 2 slot = Piston Ramp Reverse
Start printing
Before starting printing, double-check the settings of the main modules:
  • Piston Ramp: Min/Max Distance = 0.5/3.05 m, Velocity = -1 m
  • Piston Wall: Min/Max Distance = 0/10 m, Velocity = -0.5 m (for creative mode)
  • Rotor: All values ​​= 0, Displacement = -0.02, Rotor Lock = On, Share Inertia Tensor = On
  • Magent Large: Unlocked, Autolock = On
  • (Magnet Small): Locked, Autolock = Off

In survival mode, pre-connect the printer to the base and produce enough components to fully print the ship and another 1000 steel plates to print the ramp.
https://steamhost.cn/steamcommunity_com/sharedfiles/filedetails/?id=1500259551
To start printing, turn on all welders and Reverse the Piston Wall. To stop printing, turn off the Piston Wall, to resume printing, turn it back on.

Set Velocity = 0.1 m for the Piston Wall and during printing, select the optimal value depending on the Welding Speed ​​settings in the world settings.
1 Comments
Odium 5 Jul @ 2:28am 
FYI:

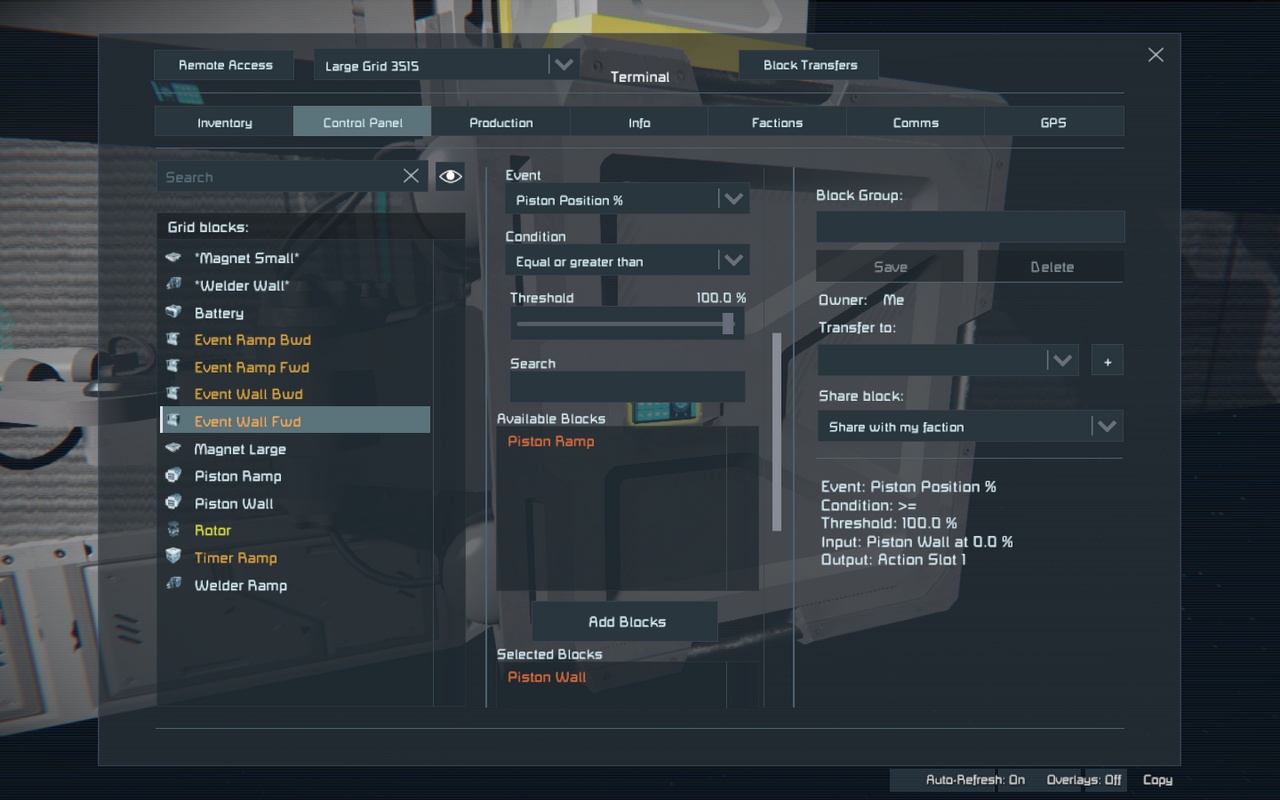
In the bottom right setup for Event Wall FWD, the authoer states...

"Unlock (Magnet Small), Piston Ramp Reverse" in the caption.
He actually means
"Unlock (MAGNET LARGE)"

NOT Magnet Small.