Assassin's Creed III Remastered

Assassin's Creed III Remastered

49 ratings
100% Achievement Guide: Assassin's Creed 3: Remastered
By Cynic 0055
This is a comprehensive 100% Achievement guide detailing a step-by-step walkthrough to take you from 0 all the way to 100%. If you are looking for a particular Achievement or Collectible, use Ctrl+F & type it into the search bar for more direct help.

I run support & debug help on all my guides. If you have any questions, problems, or find errors in the guide itself, do not hesitate to leave me a comment & I will get back to you as soon as I am able to. Happy Hunting!
2
2
3
2
3
2
2
2
2
2
   
Award
Favorite
Favorited
Unfavorite
Introduction:


Achievement Breakdown: (44)
Story Related: (17)
Secondary Objectives: (10)
Character: (3)
Collectibles: (5)
Slay: (6)
Miscellaneous: (3)

Achievements for the Tyranny of King Washington DLC & Assassin’s Creed – Liberation: Remastered will be listed in the Sequences they are covered in*.

For 100% in Assassin’s Creed 3: Remastered, we will literally have to 100% everything available to us in the game for the Completionist Achievement. This will take us quite a while, but it should also be a lot of fun! Similarly to other Assassin’s Creed games, we also have to complete every Optional Objective for all Memories & Side Missions to earn the Perfectionist Achievement. If you ever fail an Optional Objective, you can typically reload your Last Checkpoint to attempt them again without having to replay the whole Memory.

Fortunately for us, all Online Achievements have been removed from the game, so we do not have to worry about them! There are no missable Achievements either, & we can replay Memories to earn any you might have missed.

In the Remastered Edition of the game, the Tyranny of King Washington DLC as well as the entire Assassin’s Creed – Liberation: Remastered game are included & we will need to 100% them as well; Assassin’s Creed – Liberation: Remastered’s Achievements are identical to its standalone counterpart, Assassin’s Creed – Liberation: HD.

The Tyranny of King Washington takes place post the events of the AC3 Base Game & has three Episodes we need to complete & earn 100% Synchronization in. It is very important that you start a brand new Save File for the DLC & not use your Base Game import that appears in the third Save Slot called “Player”. If you use your import Save, all progress towards Collectibles or Side Missions will not Save when you quit the game & you essentially are forced to beat each Episode in one sitting… which is a good chunk of hours. Starting a brand new Save File for each Episode will make your progress Save normally. Nothing actually imports from your Base Game Save File & you get no extra Weapons or alternate dialogue…

As for Assassin’s Creed – Liberation: Remastered, there is not a lot to say. A pretty short & easy 100%, with Optional Objectives (or “Constraints” as the game calls them) to complete as well. One thing to note however is that unlike most AC games, the in game Collectibles will only appear on your Map/Mini-Map when you get within a certain radius of them. There is no way to permanently mark them unfortunately. Fortunately for you though, I will be including Collectible Maps in the guide so it will be quite painless finding them all…

For those interested, here is an organized list of all the Achievements/Secret Achievements. This is how I derive my Achievement Breakdowns & the first reference I create before I begin my 100% journeys.
https://steamhost.cn/steamcommunity_com/sharedfiles/filedetails/?id=3469363389
Before You Play!: Before you are able to play this game, you will have to make a Ubisoft Connect Account (if you do not already have one). As well, you will also be asked to use the CD Key given to you (you will be shown it when you first boot up the game) copy & paste it somewhere on your PC or write it down, as they actually make us enter the codes in to activate our game!

If your copy of Assassin’s Creed 3: Remastered came with your purchase of Assassin’s Creed – Odyssey’s Gold Edition, you must install & run Odyssey to obtain your AC3: Remastered CD Key! Yes, you must install the 108gb game just so that you can grab the CD Key… wonderful. Start up Odyssey & get to the Main Menu then quit. Load up AC3, & it will have synced with your Ubisoft Connect account & your CD Key will automatically be entered in.

Guide contains major spoilers*.
Sequence 1: Brave New World
1. Locations: Present Day, London, Atlantic Ocean, Boston
2. Sequence #1 Memories: 1, 2, 3
3. Sequence #2 Memories: 1, 2, 3
4. Discovery Missions: Central Boston Letters
5. Optional Objectives: 8/130
6. Achievements: 1/84
-----------------------------------------------------------------------------------------------------

Sequence #1:

Present Day – Temple:

Memory #1 – Refresher Course: As Desmond, we will be entering into an ancient temple of the First Civilization using Ezio’s Apple of Eden. When we get set up, we will be put back into the Animus & have to complete a short gameplay Tutorial.

Optional Objective #1 – Perform An Air Assassination: Navigate through a few obstacle courses & we will reach the Tutorial about Assassinations, & two enemies will appear. To earn 100% Synchronization in this Memory, take out the first enemy, then swing over to the beam above the second. Up here, we will get a prompt to perform an Air Assassination; this “Optional Objective” is technically mandatory.


Achievement #1 – Rude Awakening: Re-enter the Animus.
Story Related. Finish the rest of the Tutorial inside the Animus, & when we reach the end, we will unlock this Achievement.

London – Theatre Royal:

Memory #2 – A Deadly Performance: After the Animus Tutorial, we will begin playing as our new main character, Haytham Kenway – the man who wears two capes. For this first while, we will be locked into completing some Memories…

Enter into the Theatre Royal, & meet with our contact, Reginald Birch. Once we spot our Target, do your best not to make a scene… & begin scaling the interior of the opera house in plain sight to reach them. Deal with your Target & leave the theater; there is no Optional Objective for this Memory.

Atlantic Ocean – The Providence:

Memory #3 – Journey to the New World: During this Memory, we will be onboard the Providence destined for America.

Optional Objective #1 – Limit Health Loss to 10%: Head up to the top deck of the ship, & we will find ourselves in a Fist Fight with a group of sailors. Follow along with the Combat Tutorial, & do your best not to take any damage; we can take the odd hit though.

Fight off the sailors three times, then one will pull out a knife; Counter their attack then Disarm the knife from them to complete the Optional Objective. Getting hit by the knife will most certainly make us fail.

Memory #3 – Journey to the New World: With our Optional Objective out of the way, help the captain stop a mutiny from happening. There will be more combat during the Memory, but it will not affect the previous Optional Objective at all.

Optional Objective #2 – Rescue James Within the Given 40s: Later on, the Providence will be caught in a storm & we will have to secure sections of broken rope. After we climb up to deploy one of the sails, lightning will destroy the main mast & one of the sailors will be dangling from a rope. Quickly rush over & rescue him before the time runs out; this can be easily done in under 10s.

Memory #3 – Journey to the New World: After we escape the storm, we will have a brief bit left on the ship; climb the foremast, & we will finish the Memory & Sequence #1… que the title card.

Sequence #2:

Boston:

Memory #1 – Welcome to Boston: When we arrive in Boston, we will meet up with our new world contact, Charles Lee, who will show us around the city.

Courier Mission – Central Boston Letters: After we meet Benjamin Franklin, we will be tasked with entering into a General Store. To the right of the store, we can see a man with a white envelope marker over his head. Interact with him, & we will unlock 4 Courier Missions.

Take a break from Memory #1, & quicky go around & deliver them; ignore the Viewpoints & Almanac Pages for now, though you can go around & collect them if you encounter them. We will get both permanently marked on our Maps later on in the game…

Memory #1 – Welcome to Boston: Return back to Charles Lee, & enter into the General Store now & purchase the Normal Sword & Flintlock Pistol… wouldn’t a “normal” sword just be called a sword? With that done, ride with Charles Lee to the Green Dragon Tavern & we will complete the Memory; there are no Optional Objectives.

Memory #2 – Johnson’s Errand: In the Green Dragon, we will meet William Johnson who will task us with retrieving his stolen documents from some local criminals. Link up with Thomas Hickey, & we will prepare to attack them.

Optional Objective #1 – Kill 10 Mercenaries Using Firearms: For our attack, we will want to focus on killing the enemies with our Flintlock Pistol or looted Muskets. We will start with 9 Cartridges, & will have to loot more so we can kill 10 of them.

Reloading can take a while, so if you engage Mercenaries holding Muskets, Disarm them for a free shot with it, drop the Musket, then Disarm the next Mercenary... You should be able to get 4-6 firearm kills while in the Fort, & the rest during the next Optional Objective…

Optional Objective #2 – Do Not Let Hickey Or Lee Lose More Than Half Their Health: Retrieve Johnson’s Documents, & we will then have to escort Lee & Hickey back to the Green Dragon Tavern where ambushes of Mercenaries will attack us. There will be three separate ambushes of Mercenaries in increasing numbers. Fortunately, our friend’s health bars are quite large, & this is a forgiving Optional Objective.

Memory #3 – The Surgeon: For our next person on the local contacts list, we need to find Benjamin Church… who won’t be home. After performing an Eavesdrop, we will then need to use a Viewpoint; this will mark the other 11 Viewpoints in Boston on our Map.

Optional Objective #1 – Eavesdrop On A Moving Group of Guards: From where we land after performing our Leap of Faith from the church Viewpoint, we can find an Eavesdrop event off to the immediate North & East. Head to the North event & it will be… mobile. Catch up to it, & it will be two Guards; simply tail them, but not too close, & finish the Eavesdrop to complete the Optional Objective.

Optional Objective #2 – 100% of Success In All Eavesdrops Performed: With the first Eavesdrop complete, we need to find another one. Choose any you come across & be sure you Blend in to not be detected; before entering any Eavesdrop event, scan the inner circle to see where you can Blend or be out of sight.

Successfully complete any 3 Eavesdrop events without failing to complete the Optional Objective.

Optional Objective #3 – Remain Undetected: After we are done Eavesdropping, we will link up with Charles Lee & from here on we cannot be detected /enter combat with any Guards. When we reach the Restricted Area, walk around to the far Northern side before entering it for the easiest way in; you can then walk straight to the warehouse without any issues.

We will need to steal the Warehouse Key from one of the marked Guards; the one patrolling on the roof is easy to do, just pay attention to his patrol path & how long he stays still for.

Once you have the Warehouse Key, & you haven’t been spotted, we will complete this Optional Objective when we unlock the warehouse.

Memory #3 – The Surgeon: Once inside the warehouse, rescue Ben Church from his captors while also still being undetected, & we will complete the Memory…
Sequence 2: Assembling the Team
1. Locations: Boston, Frontier
2. Sequence #2 Memories: 4, 5
3. Sequence #3 Memories: 1
4. Discovery Missions: N/A
5. Optional Objectives: 16/130
6. Achievements: 4/84
-----------------------------------------------------------------------------------------------------

Boston:

Memory #4 – The Soldier: For our final local contact, we need to find John Pitcairn who will have been deemed a traitor to the British army.

Optional Objective #1 – Limit Detection Time to Under 15s: As we tail the Guards taking Pitcairn away, we cannot let General Braddock spot us. If he does, we need to quickly Blend or hide before we waste 15s. Just keep a good distance away from the patrol & you should not have any issues.

Optional Objective #2 – Perform Sequential Kills (Kill Streak of 3): These next two Optional Objectives will happen simultaneously so pay attention to both. When we go to finally engage the patrol, the drummer Guard who is wearing a funky hat will go to run away & call for reinforcements; quickly Assassinate them or kill them with your Pistol.

Next is for the actual fight where we need to perform a Kill Streak of 3. This can be a bit tricky to do as there are only 9 Guards total. Use your Sword to perform an Execution, then keep moving towards the Guards around you to Execute them. If they go to attack you, immediately Counter/Execute them to keep the Kill Streak going.

If you are struck, or break the Kill Streak, you will have to start over. If all Guards are dead before you can achieve a Kill Streak of 3, you will have to reload your Last Checkpoint.

Optional Objective #3 – Prevent Snitches From Calling Reinforcements: See above.

Memory #5 – Infiltrating Southgate: Now it will be time to go after Silas Thatcher & free all the slaves he has captive at Southgate Fort. Take over the British Convoy, & we will use it as a disguise to enter the Fort. How did all our guys get Hidden Blades… or the skills to use them? I have no idea…

Optional Objective #1 – Find & Kill the General: The General can be found in the Southwest corner of the Fort grounds patrolling around just past where the Horses are tethered.

Optional Objective #2 – Perform Stealth Assassinations From A Corner Spot 3 Times: When we go to free the slaves, there will be typically a Guard or two nearby keeping on eye on them. Find an object we can lean against, & use Whistle to draw the Guard(s) over to us so we can Assassinate them. Do this 3 times to complete the Optional Objective. Be careful as you may not lure over the Guard you intended…

Close to the ship (& on it) are good opportunities for corner Assassinations.

Optional Objective #3 – Avoid Firing Line Damage: Once all the slaves are free, we will spring the trap to go kill Silas. To reach him, we have to fight through his men, & we will be introduced to using Human Shields.

Whenever we are notified there is a firing line aiming at us, abate the damage with a Human Shield. Unfortunately, we can still be shot by one WITHOUT being notified if they are too far away, so be sure to keep good situational awareness at all times!


Achievement #2 – Whit’s Fur Ye’ll No Go By Ye!: Block a firing line 5 times by using a Human Shield.
We will have plenty of opportunities of unlocking this Achievement naturally over the course of the game, but if you have to reload your Last Checkpoint enough times for Optional Objective #3 (or if you just do it deliberately), you will be guaranteed to unlock this Achievement straight away.


Achievement #3 – Mystery Guest: Complete Sequence #1 & #2.
Story Related. Assassinate Silas Thatcher, & we will complete Memory #5 as well as Sequence #2, unlocking this Achievement.

Sequence #3:

Boston:

Memory #1 – Unconvinced: Return to the Green Dragon to speak with Charles Lee, & we will then set out for a town called Lexington out in the Frontier…


Achievement #4 – Split Roast: Perform a Double Assassination using a Musket.
This can be easily done at any point during the game, & you can unlock it right away if you want. First you need to obtain a Musket – make sure it is loaded. Next you need to find two Guards who are in a row, they can be patrolling or just standing.

For the Achievement, sprint at the back or front of one of the Guards & impale them with the Musket bayonet. Immediately after impaling the Guard, you need to then use Reflex Shot & fire through them to kill the second Guard; if you impale the Guard at a bad angle, you won’t be able to shoot the other one…

Frontier:

Memory #1 – Unconvinced: At long last we can finally leave Boston; once again, there really isn’t much point exploring the Frontier at the moment because very little is available for us to do yet. Ride to Lexington, & meet up with Charles Lee to locate Kaniehtí:io. When we reach her camp, follow the trail through the snow to find her.

Once you find her, chase after her & quickly step along logs or rocks to get you out of the snow to move faster.

Optional Objective #1 – Limit Health Loss to Under 50%: When we reach a second camp, we will be attacked by Wolves; we cannot have our health drop below 50% as we fight them off. Follow the Quick Time Events (QTEs) as the Wolves jump at us or shoot them from afar with our Pistol.

This Optional Objective will stay with us for the entirety of the Memory.

Memory #1 – Unconvinced: Once the first set of three Wolves is dealt with, continue to pursue Kaniehtí:io through the trees so we can finally speak with her.

For the next half of the Memory, we will enter to the town of Concord with Kaniehtí:io, & we will be tasked with locating General Braddock… to kill him.

Enter the Wright Tavern, & Eavesdrop on some Guards to find out Braddock’s location.

Optional Objective #2 – Use 2 Breakable Objects During A Fight: With Optional Objective #1 still active, we will enter into a Fist Fight with some Guards as we go to leave the Wright Tavern. To use Breakable Objects, kite the Guards towards tables in the bar & when you Counter them, use Counter/Throw to throw them into the tables & break them. Do this at least twice.
Sequence 3: Father of Understanding
1. Locations: Frontier, Boston, Present Day
2. Sequence #3 Memories: 2, 3
3. Sequence #4 Memories: 1, 2
4. Discovery Missions: N/A
5. Optional Objectives: 24/130
6. Achievements: 5/84
-----------------------------------------------------------------------------------------------------

Frontier:

Memory #2 – Execution Is Everything: Travel over to where General Braddock’s camp is located South of Concord & Lexington & meet up with Kaniehtí:io.

Optional Objective #1 – Do Not Kill Any Guards Using A Weapon: This Optional Objective will que on as we go to infiltrate Braddock’s encampment; this is very specific, as Bare Fists do not count as a Weapon. That being said, we still cannot be detected… If you need to, knock out Guards stealthily with your Bare Fists, & hide their bodies in Bushes.

Memory #2 – Execution Is Everything: Use the stopped Convoy at the encampment gates to sneak inside, & we will be hit with multiple things to do such as Eavesdropping on two Guards – one of which being a young George Washington. Exit the Convoy when it is safe & use the Bushes to stay hidden as we listen to them. Follow the two Guards up, & we will be able to collect a Tactical Map from a nearby tent.

Optional Objective #2 – Sabotage 2 Cannons: As we followed the two Guards while Eavesdropping, we will be led up to where one of the Cannons is located; sneak up to it, & sabotage it. The second Cannon is found lower down where the two Guards walked down. Sneak past them, & carefully knock out the Guard patrolling near the Cannon before sabotaging it; we need to take out both Cannons before we leave the Fort!

Memory #2 – Execution Is Everything: With the Tactical Map in hand, escape the encampment undetected & return back to Kaniehtí:io.

Memory #3 – The Braddock Expedition: Head to Concord to link up with our friends, & there will be an unexpected time jump. When the time is right, ride with them to meet up with Kaniehtí:io to disrupt Braddock’s army.

Optional Objective #1 – Kill 2 Militia Without Triggering Open Conflict: Braddock’s army will set up a brief campsite where we will be able to move in to Assassinate one of the Captains. Before we do this, we first must carefully pick off two Guards. Move through the Bushes, & we should find one Guard already standing in them making him an easy target.

Nearby will also be a pile of branches we can use to Whistle Guards over towards as well.

Memory #3 – The Braddock Expedition: With Optional Objective #1 completed, we can now go to clear out the camp however we see fit. Once we have our disguises, we will ride over to see Braddock… & completely lose our element of surprise making said disguises completely pointless.

Optional Objective #2 – Destroy 3 Powder Carts: As we chase after Braddock on horseback, we will pass by carts with Powder Kegs on them. Make sure your Pistol is loaded & Reflex Shoot them as we ride by; do this 3 times.

Be sure to use Reflex Shot while the cart is highlighted white & before you get too close to the Guards in front of it or you’ll likely just shoot them instead. In between carts, Spur your Horse on to close the distance between you & Braddock. This is a finicky one to do & may take you a couple of attempts as if you miss a shot, your basically done since you don’t have time to reload to take a second shot at the same cart.

Memory #3 – The Braddock Expedition: Near the end of the chase, Braddock will fall off his Horse, & we will have to tail after him on foot. When in range, just take him out with a Reflex Shot.

With Braddock taken care of, Ziio will show us what we have been looking for… the entrance to the First Civilization Temple.

Boston:


Achievement #5 – How D’Ya Like Them Apples: Complete Sequence #3.
Story Related. After another small time jump, we will be back in Boston. There is no official Memory to complete, but return to the Green Dragon to debrief with our friends… & reveal a pretty interesting plot twist about the faction we have been serving this entire time.

Present Day – Temple:
After Sequence #3, we will get to free roam a bit around the Temple as Desmond. Feel free to do this, but at the moment, there is nothing really for us to do Achievement-wise, however we can witness more visions from Juno.

When you are done exploring, return to the Animus, & begin Sequence #4.

Sequence #4:

Frontier:

Memory #1 – Hide & Seek: As of now, we will be swapping perspectives from Haytham to playing as our game’s poster child, Ratonhnhaké:ton. Play a game of hide & seek with our friends, & we will be introduced to tracking which is a skill we will use throughout the game.

Optional Objective #1 – Find All the Children Without Making A Mistake: When we need to locate our friends, we will receive two Optional Objectives that are tied to one another. We have four friends we need to find, we need to find them quickly, & we need to find them all without searching an incorrect hiding place.

Simply run around the area using Eagle Vision, & analyze all the clues you come across which will shrink the search area until we know the exact location of each child; it will take 3 different clues to analyze to reveal the location of each kid. Two kids will also be located in the same hiding spot which makes things easier…

Optional Objective #2 – Find All Children Within 4:00 Minutes: See above.

Memory #1 – Hide & Seek: With all our friends found, we will play the game again & this time we get to go hide. Go find any pile of branches to hide in… & we will be found…

Return back home to Kanièn:keh, & find our mother.

Memory #2 – Feathers & Trees: After a 9 year time jump, we will be a young adult & we will get a Tutorial on doing parkour through the trees.

Optional Objective #1 – Do Not Touch the Ground or Water: For this Tutorial, we must remain in the trees at all times. We can walk along fallen logs as well as rocks though, just not on bare soil/grass or in the water.

Memory #2 – Feathers & Trees: Rescue Kanen’tó:kon before he falls into the pond, & we will then be tasked with navigating up to an eagle’s nest to obtain an Eagle Feather; doing this will complete Optional Objective #1.

Optional Objective #2 – Find 3 Eagle Feathers: This next Optional Objective is a useful & easy one. Though not directly tied to any Achievement, we need to find all 50 Eagle Feathers in the game for one of the many prerequisites for the Completionist Achievement. Look around the area, & find at least 3 Eagle Feathers before you head to the Memory Destination.


The first 2 Eagle Feathers will be in our immediate proximity, but for the third, we will need to travel a little ways further through the tree branches towards our Memory destination.
Sequence 4: Young Boy Become Legend
1. Locations: Frontier, Davenport Homestead, Boston
2. Sequence #4 Memories: 3, 4
3. Sequence #5 Memories: 1, 2, 3, 4, 5
4. Discovery Missions: N/A
5. Optional Objectives: 32/130
6. Achievements: 7/84
-----------------------------------------------------------------------------------------------------

Frontier:

Memory #3 – Hunting Lessons: Now for a very important Tutorial Memory – hunting. Here we will learn the basics of how to hunt Animals.

Optional Objective #1 – Hunt 3 Different Types of Animal: We need to harvest Meat from a Rabbit, Fox, & a Deer.

Optional Objective #2 – Combine Bait & A Snare to Catch An Animal: See below.

Optional Objective #3 – Air Assassinate 2 Animals: First off, you will want to find a location where you can very quickly get up into a tree. Once you have your spot, place a Snare down directly below the tree, Bait it, then get up into the tree. If a Rabbit or Fox approaches the Bait, the Snare will kill it, & we can collect its Meat/Pelt. If a Deer approaches the Bait, perform an Air Assassination to kill it.

If you are having difficulty locating a Rabbit for Objectives #1, seek out the yellow flowers to analyze so you can track one.

You can keep working on these Optional Objectives even past 5 harvests so long as you do not return to Kanen’tó:kon.

Memory #3 – Hunting Lessons: Escape (or kill it with your Bow…) the Bear that attacks us after we return to Kanen’tó:kon, & return back to Kanièn:kah.

Memory #4 – Something to Remember: Meet with the village Elder for some more plot, & potentially an irresponsible usage of an ancient artifact…

Optional Objective #1 – Avoid 2 Mid-Air Collisions: During our spirit quest with Juno, we will have to navigate through a forest while piloting… an Eagle. You can only collide with an object once, as if you hit a second, we will fail the Optional Objective & you will have to reload.


Achievement #6 – Heroes Are Born: Complete Sequence #4.
Story Related. Return back to reality, & the Elder will release us from the village to go out into the world to seek out one who knows about… the Assassins.

Sequence #5:

Frontier:

Memory #1 – A Boorish Man: Navigate through the Northern end of the Frontier, & travel to Davenport…


Achievement #7 – By Invitation Only: Be invited to join a Club.
To be invited to join a Club, you need to unknowingly complete one of their many Challenges. The easiest to do, is joining the Hunting Society which can be done by harvesting Meat/Pelts from 10 Animals.

As we make our way to Davenport, be sure to skin 10 Animals to unlock this Achievement & join our first of four Clubs.

Davenport Homestead:

Memory #1 – A Boorish Man: Travel to the Davenport Homestead, & head to the Memory Start at the Manor to speak with old man, Achilles. He won’t want to talk to us… so we will camp out in his stables instead.

In the morning, we will break into the man’s house to prove he needs to teach us how to be an Assassin… but that won’t work. So back to the stables we go.

Optional Objective #1 – Do Not Lose More Than 50% of Your Health: During night two, Poachers will show up to ransack the Homestead & we will stop them; do not let yourself drop below half health. Defeating the first two Poachers will unveil quite a few more of them. You should be more or less proficient in melee combat by now & should have issues Countering them all.

Memory #1 – A Boorish Man: Defeat the Poachers & we will have earned Achilles’ respect. He will invite us inside & then give us the cliff notes from Assassin’s Creed 1 to Revelations…

Boston:

Memory #2 – Achilles’ Errand: After a 6 month training time jump, we will need to assist Achilles on an errand into town. Go to the General Store, & buy what supplies you can for Achilles. When we leave the stores, the city will be in a bit of upheaval & we will need to tail a suspicious man.

This man will actually be a sniper, & when he sets himself up on a roof, we will need to quickly Assassinate him.

Optional Objective #1 – Escape Within 1:20 Minutes: After taking out the sniper, immediately rush to flee the Notoriety Level 2 area in under 1:20 which is not difficult at all if you stick to the rooftops.

The moment you leave the area, we will complete the Memory instantly.

Memory #3 – Boston’s Most Wanted: Now that we are safe, locate Achilles but a man named Samuel Adams will find us instead. To reduce our current Notoriety, remove 2 Wanted Posters around the city. Tear down the Posters, & return back to Adams.

Optional Objective #1 – Do Not Raise Your Notoriety To Level 3: After Adams teaches us to Bribe a Crier, as of now, we cannot raise our Notoriety up to Level 3. To put it simply, from here on, do your best to stay undetected & not engage any Guards.

Memory #4 – The Lost Son’s Return: Enter the Underground, & navigate through the tunnels with Adams to reach North Port exit. Reach the locked door, & pick the lock to continue on.

Enter into the Green Dragon Tavern to disrupt the printing press, then walk with Adams to the harbor so we can be returned back to the Davenport Homestead; speak with the Harbormaster & do just that.

Davenport Homestead:

Memory #5 – River Rescue: Upon our return, head up to the Manor to speak with Achilles & we will finally acquire the Hidden Blades. No sooner do we receive them, that we will be interrupted by a man in distress. Speak with the pioneer Godfrey (whom we briefly met when we first reached Davenport) to officially begin Memory #4, & we will have to rescue his friend, Terry.

Optional Objective #1 – Do Not Touch the Water While Rescuing Terry: Race over to the river, & we will make it just in time to see Terry floating by holding onto a log. There is only one proper way of completing this Objective. Follow the rocks & logs down the river after Terry, & we will reach a fallen tree extending over the river that we can cross over to get to the right side a little ways down. Follow along the right side of the river now & we will begin running alongside Terry’s log above him where we can jump over to it. Though the cinematic will show us diving into the water, if we did not touch it about to this point, we will complete the Optional Objective.

Be warned if you accidentally enter the water too close to Terry, you will save him but fail the Optional Objective which will give you a new Checkpoint; you will have to Restart the entire Memory if this happens.

River Rescue is a dual-Memory contributing to both Main Missions as well as Homestead Missions.
Sequence 5: Make Yourself At Home
1. Locations: Davenport Homestead, Atlantic Ocean, Present Day
2. Sequence #5 Memories: 6
3. Sequence #6 Memories: N/A
4. Discovery Missions: N/A
5. Homestead Missions: The Whittler’s Weapons, Silent Hunter
6. Optional Objectives: 35/130
7. Achievements: 10/84
-----------------------------------------------------------------------------------------------------

Davenport Homestead:
We are finally getting close to be unleashed into free roam for Assassin’s Creed 3, but for now, we will stay local to the Davenport Homestead. Before we pursue Memory #5, we can do a few things around the area. We should see 4 Peg Leg Trinket markers on the Map that we will want to collect for the Completionist Achievement.

From here on as well, it is important to hunt as much as possible so that we can earn a lot of money as well as get a stockpile of Materials.

Homestead Mission – The Whittler’s Weapons: Like we saw at the end of Memory #4, there will be someone in trouble along the road close to the Frontier Fast Travel. Head to them, & clear out the Mercenaries accosting the man then help him off the cliff. The man’s name will be Lance, & he is a carpenter.


Achievement #8 – House Party: Recruit any of the Artisans & see them settled on the Homestead.
After we rescue Lance, we will quite easily convince him to take up residence here at the Davenport Homestead. Godfrey & Terry didn’t count for the Achievement, but Lance & the remaining others do; we will need to bring all 13 Artisans to the Homestead to unlock the A Complete Set Achievement.

Davenport Homestead – Peg Leg Trinkets: Go & grab the 4 Peg Leg Trinkets around Davenport; the only one that will cause you issues is the Trinket to the far Northwest. Approach the Trinket from below as close as you can, then follow the cliffs along to the East until you see a log spanning between two ledges way above us. Follow the cliff wall along a few paces to the right, & we will be able to scale the wall up to the log so we can cross over to collect the Trinket. In no way is this obvious, & it took me a while to figure out…

Atlantic Ocean:

Memory #6 – The Hard Way: With the 4 Peg Leg Trinkets collected, meet up with Achilles near the Davenport Harbormaster, & we will be introduced to Robert Faulkner. When we are done being teased with the prospect of sailing, return to Achilles back at the Manor.

Back at the Manor we will be given a brief Tutorial on how to send out Convoys to make us more money.

After another brief time jump, return to Faulkner to see the Aquila restored, & we will set sail...

Optional Objective #1 – Do Not Take Any Damage Before You Reach Martha’s Vineyard: The only threat for this Objective is ourselves. Simply do not steer the Aquila into any other ships or rocks as we travel over to Martha’s Vineyard.

One of the few things Ubisoft has ever done right. Assassin’s Creed? More like Booty’s Creed, cause all I want to do is sail the seven seas, baby!

Memory #6 – The Hard Way: When we arrive at Martha’s Vineyard, Faulkner will get us some gunnery officers, while we stir up some trouble almost immediately. With new Cannons installed, complete the brief naval combat Tutorial, & we will sail back to the Davenport Homestead…

Optional Objective #3 – Use the Swivel Guns to Destroy 2 Ships: As we go to leave Martha’s Vineyard, we will be ambushed by enemy Ships. To start, it will be three Schooners; these can be taken out very easily in 1-2 shots from our Swivel Guns; destroy two of the three using our Swivel Guns to complete the Objective.

Optional Objective #2 – Successfully Brace 3 Times When Attacked: With the Schooners taken out, a Frigate Class Ship will then appear & we will get a brief Tutorial on Bracing to reduce damage. With that done, drop your sails down to half, & bait the Frigate into two more attacks that you can Brace against to fulfill the Objective.

Once the Optional Objective is complete, use your Broadside Cannons to eliminate it.


Achievement #9 – The Day the Templars Cried: Complete Sequence #5.
Story Related. Return back to the Davenport Homestead, & go see Achilles. Don the Assassin’s garb, & it will finally be time… to begin Assassin’s Creed 3 – officially roll the title card… a second time.

Present Day – Manhattan:

Desmond Memory #1 – Modern Tower: With Sequence #5 done, we will return back to the present & Shaun will have found the location for one of the Abstergo Batteries we need.

Why is this Abstergo Battery so high in a building in Manhattan, & how did we find it so fast? I don’t know. Why does an ancient civilization’s temple even need batteries to operate? I don’t know!


Achievement #10 – Criss Cross: Complete Present – Skyscraper.
Story Related. Follow through with this brief Present Day Mission, & we will obtain an Abstergo Battery & unlock this Achievement.

When we return back to the Temple, we can head back up to where we saw Juno last & place the Abstergo Battery into the socket; we can also then head over to the next socket & see more visions from Juno…

Sequence #6:

Davenport Homestead:
When we return to playing as Connor, we will officially be finished with being locked into completing Sequences/Memories… halfway through the game. As of this point, all Collectibles, Side Missions, Naval Missions, & Challenges are available to us. We can also now access any of our Ubisoft Club Outfits & Weapons as well!

Encyclopedia of the Common Man: Enter into the Manor, & speak with Achilles to unlock this long running task we need to complete for an Achievement. As we bring new Artisans to Davenport, we can scan them three times for new entries for the Encyclopedia.

Whenever we return to Davenport, make a point of stopping in to see all your Artisans. If you view them in Eagle Vision & they appear gold, scan them, & it will unlock an entry in the Encyclopedia of the Common Man.

To track your progress, open the Map, then scroll down to your Logbook where you can find a tab called Building the Homestead. Here we can see our progress towards the Encyclopedia of Man & how many instances of who we still need to scan doing different jobs.

Homestead Mission – Silent Hunter: Head to the marked Homestead Mission, & we can find a woman named Myriam on the ground, hurt. Take her up to the Manor for first aid, then go get some payback. While there are no Optional Objectives for this Mission, it is a great opportunity to get some Rope Dart kills; we need to accumulate 5 to unlock the Predator Achievement.

Kill the Poachers & return back to the Manor; as of now, we will unlock Myriam as a new member of our community!
Sequence 6: Into the Wild
1. Locations: Davenport Homestead, Atlantic Ocean
2. Sequence #6 Memories: N/A
3. Side Missions: The Man-Eater, Boy Who Cried Wolf, Finding the Sasquatch, The Haunted Lighthouse, The Headless Horseman
4. Discovery Missions: Fort Duquesne, Fort St. Mathieu, Lexington Items
5. Naval Missions: Fort Wolcott, The Ruins At Cerros
6. Optional Objectives: 38/130
7. Achievements: 12/84
-----------------------------------------------------------------------------------------------------

Davenport Homestead:

Peg Leg Missions: With all the Peg Leg Trinkets collected around Davenport, we can turn them into Peg Leg for one of Captain Kidd’s Letters.

Atlantic Ocean – Fort Wolcott:

Naval Location – Fort Wolcott: Close by, we can speak with our Harbormaster Robert Faulkner & we can check out the available Naval & Privateer Contracts. To start, sail to Fort Wolcott, & we will need to infiltrate the Fort. Though optional, I do recommend going after the Chests here in the Fort to earn some really good early cash.

Optional Objective #1 – Perform 3 Ledge Assassinations: Look for ledge Assassination opportunities whenever you can as we sneak through the Fort. Our 3 instances should be upfront & specific, but we can get a bonus one at the very end of the Mission if you set it up.

Optional Objective #2 – Limit Health Loss to Above 33%: After we analyze the clue, the Aquila will open fire on the Fort signaling us it is time to escape. As we fight our way out, we cannot drop below 33% health.

Optional Objective #3 – Achieve A Minimum Kill Streak of 3: As we rush through the exploding Fort, we will drop down into a room with 5 Guards that will que this Optional Objective; we must kill at least 3 of them during the same Kill Streak.


Achievement #11 – Bring Down the House: Explore Fort Wolcott.
Escape Fort Wolcott with Captain Kidd’s Treasure Map, & rejoin the Aquila to complete this Naval Location, & unlock the Achievement.

Atlantic Ocean – Cerros:

Naval Location – The Ruins At Cerros: Next up, we should sail down to South America & explore the ruins at Cerros where we can obtain Captain Kidd’s Sword.

There are no Optional Objectives for this Mission…

Davenport Homestead:

Naval Missions/Contracts: At the moment, since we have very little money & no Aquila Upgrades, we will hold off on completing any of these… let us return to the mainland.

Frontier:
When you are finished at Davenport, we can set out into the Frontier. Remember, whenever possible, hunt every Animal you come across as selling Pelts is our best source of income currently.

Maps: Note that we can purchase Maps from General Stores to mark all Feathers, Almanac Pages, Chests, & Peg Leg Trinkets on our primary Map. When you have the quid to spare, I strongly recommend purchasing them as we need to find them all for the Completionist Achievement; just Fast Travel to Boston if you have not found any General Stores yet in the Frontier.

Finding all Chests is another task in the Discovery tab required for 100% & it is a good source of immediate income; I recommend buying those Maps first as it will just make purchasing the other Maps (& later expensive purchases) much easier…

In order of purchases, I recommend buying the: Frontier Chests, Lexington Feathers, Monmouth Feathers, Black Creek Feathers, John’s Town Feathers Maps first then the Trinket Map then the Page Map. We can buy the Boston / New York specific Maps when we reach them…

Frontier Viewpoints: There are 9 Viewpoints scattered across the Frontier; travel around & Synchronize them.

Frontier – Black Creek:

Hunting Society Mission – The Man-Eater: While in the Black Creek region, we can see the marker for a Hunting Society Mission. Head to it, & we will be tasked with taking out a Bear; for one of the Hunting Society Challenges, we also need to kill a Bear using our Hidden Blades…

Our target Bear will be located Southwest over in the Packanack region.

Fort Duquesne: In the far Western corner of the Black Creek region, we will find Fort Duquesne. Kill the Fort Captain, then destroy the Powder Keg reserves; with that done, lower the Fort Flag, & we will have the area liberated.


Achievement #12 –Eye Witness: Witness a predator killing an enemy.
Chances are, this will come naturally/randomly for you as we explore the Frontier. If you want to deliberately receive it, travel to any region that has Wolves, Cougars, or Bears in it, find a group of stationary Guards, then throw Bait down around them. Go off to hide, & eventually a predator should show up & most likely kill a Guard.

Frontier – Great Piece Hills:

Frontiersmen Mission – Boy Who Cried Wolf: Over in the Great Piece Hills region, we can find a Frontiersman, Daniel Boone. Speak with them, & not only will we receive this Mission a little ways Southwest of our position, but we will also be allowed to join their Club.

Approach the area nearby, analyze the clues at the camp to lure out a Wolf. Kill the Wolf, & we will complete the Mission.

Frontiersmen Mission – Finding the Sasquatch: Return back to Boone & we can receive our next Mission; we will have to track Sasquatch far over into the Black Creek region.

Frontier – Black Creek:

Frontiersmen Mission – Finding the Sasquatch: Fast Travel to our Fort in the region, then head up North to the marker & analyze the clues left behind to hone in the area… & we will find Mr. Squatch.

Frontier – Great Piece Hills:

Frontiersmen Mission – The Haunted Lighthouse: Return back to Boone, & we can receive our next Frontiersmen Mission.

This Frontiersmen Mission will take place in the Great Piece Hills far to the East coast. Analyze the fake ghost at the top of the lighthouse… & that will be that. Myth busted!

Frontiersmen Mission – The Headless Horseman: Close by the lighthouse, we can now find a new Frontiersmen to go speak with… somehow it will still be Daniel Boone.

This Frontiersmen Mission will be found down in the Troy’s Wood region & out of our reach at the moment.

Frontier – Lexington:

Delivery Request – Lexington Items: Travel over to Lexington & we can obtain a Delivery Request. For this Mission we will have to collect: Bear Pelts x3, Wolf Pelts x5, Beaver Teeth x5, Bobcat Pelts x3, & Cougar Pelts x3. Keep these Items in mind as we explore the Frontier…

General Store #1: Head over to the Northeastern edge of Lexington, & we can find a General Store across from the Buckman Tavern. Enter the store & sell the Shopkeeper at least one intact Pelt from any Animals; all Pelts are considered intact unless they specifically say Damaged if you killed the Animal with a firearm. The intact Pelts description should say “hide is in perfect condition”.

For the Coureur Des Bois Achievement we need to sell intact Pelts at all 9 General Stores in the game.

Frontier – Scotch Plains:

Fort – St. Mathieu: At the Southern most end of the Scotch Plains region, we can find Fort St. Mathieu. Take out the Fort Captain, ignite the Powder Keg reserve, & hoist the Patriot Flag to claim it.

Frontier – Troy’s Wood:

Frontiersmen Mission – The Headless Horseman: From Fort Saint Mathieu, we can enter into the Troy’s Wood region & investigate the body to complete the Mission.
Sequence 7: Hunting Monopoly
1. Locations: Frontier, Davenport Homestead
2. Sequence #6 Memories: N/A
3. Side Missions: The Man-Eater, Feline Feet, The Patriarch, The Pack Leader, Acute Cat, The Elk Bachelor
4. Discovery Missions: Frontier Letters, Troy’s Woods Items
5. Homestead Missions: Abused
6. Naval Missions: N/A
7. Optional Objectives: 38/130
8. Achievements: 13/84
-----------------------------------------------------------------------------------------------------

Frontier – Concord:

General Store #2: We can find the next General Store over in Concord at the upper Northwest end of town; sell the shopkeeper an intact Pelt.

Courier Mission – Frontier Letters: While in Concord, we can also receive a new Courier Mission; we will have to deliver Letters to citizens in Concord, Lexington, the Diamond Basin, & Monmouth.

Frontier – Monmouth:

Homestead Mission – Abused: In the town of Monmouth, we can see the marker for a new Homestead Mission. Head to it, & we will need to rescue two citizens being harassed by British Guards. After they are saved, speak with them & invite them to come stay at Davenport.

General Store #3: Our final General Store here on the Frontier can be found at the Eastern edge of Monmouth, just before a small bridge crossing the river; sell the shopkeeper an intact Pelt.

Frontier – Packanack:

Hunting Society Mission – The Man-Eater: At long last, we will head to the marker for our first Hunting Society Mission, & can finally complete it. Track down the Bear, & kill it; the Bear will only appear after we have fully Analyzed all the clues.

Frontier – Monmouth:

Fort – Monmouth: We can find our final Fort on the Frontier in the Southwestern corner of Monmouth – Southwest of the Viewpoint here. As always, clear out the Captain, ignite the Powder Keg reserves, & lower the Flag to capture it.

Frontier – Troy’s Wood:

Hunting Society Mission – Feline Feet: Travel over to the Hunting Society camp in Troy’s Wood (or Black Creek) to receive our next Hunting Society Mission; our target Bobcat is located up in Black Creek…

Delivery Request – Troy’s Woods Items: Close by the Hunting Society member in Troy’s Wood, we can find a Delivery Request Mission. For this one, we need to turn in: Bear Claws x3, Bobcat Claws x3, Wolf Fangs x3, Cougar Fangs x2, & Elk Antlers x3.

Frontier – Black Creek:

Hunting Society Mission – Feline Feet: Travel up North past Fort Duquesne, & analyze the clues to find the Bobcat. After we examine its tracks, the Bobcat will appear & we will have to chase it down; if the Bobcat gets away, you have to Fast Travel back to the Fort & try again.

The Bobcat has a set path it runs in through a cave, & if you plan ahead of time, you can lay down Snares along the path to try to kill it that way.

Hunting Society Mission – The Patriarch: While we are here in Black Creek, we can head over to the Hunting Society member for a new Mission involving a unique Deer.

Frontier – Kanièn:keh:

Hunting Society Mission – The Patriarch: Head over to the marked location in the Kanièn:keh region, analyze the clues to narrow down the search area to find the Patriarch; it also spawns regardless of the clues we find. Once you have found the Patriarch, hide in some Bushes or up in a tree & lure it over with Bait to take it out. Alternatively, if you have a Horse, you can just ride it down & Assassinate it.

Frontier – Black Creek:

Hunting Society Mission – The Pack Leader: For our next Mission, we will need to take out a unique Wolf over in Black Creek. As always, find the clues, & locate the Pack Leader’s… pack. Kill 3 Wolves to lure it out, & kill the Pack Leader just like any other Wolf.

Hunting Society Mission – Acute Cat: For our next Mission, we will have to kill a unique Cougar over in the Kanièn:keh region.

Frontier – Kanièn:keh:

Hunting Society Mission – Acute Cat: Head over to the marked area & use a leaning tree to cross over the river up into the cliffs a little ways above the marker to the East & carefully navigate through the rocks to find the Cougar.

Frontier – Black Creek:

Hunting Society Mission – The Elk Bachelor: For our final Mission, we will have to kill a unique Elk over in the Valley Forge region.

Frontier – Valley Forge:

Hunting Society Mission – The Elk Bachelor: Travel to the marked area, analyze the clues if you need to, & locate the Elk.

Frontier:
As of now, we should have completed all Frontier, Hunting Society, Courier, & Delivery Request Missions as well as collected all Feathers & Peg Leg Trinkets located in the Frontier. Our next order of business before we carry on to Boston, will be to complete the first phases of our Club Challenges – or the ones we can at least.

Hunting Challenges #1:
1. Kill 5 Deer
2. Kill a Wolf
3. Skin 10 Animals
4. Trade hunting spoils worth 500£
5. Use Bait with a Snare to capture 5 Animals
6. Kill a Bear with the Hidden Blade

We should have earned the bulk of these naturally during our time on the Frontier. Deer & Wolves can be easily found in the Kanièn:keh region, Bears in Packanack or John’s Town, & Rabbits or Raccoons are best Bait/Snared along the beach West of Monmouth.

Hunting Challenges #2:
1. Stealth kill 5 Animals while using Bait
2. Skin 25 Animals
3. Kill 10 Animals with the Hidden Blade
4. Capture 20 Animals with Snares
5. Kill 15 Animals with the Bow

For stealth killing Animals, find a good Bush to hide in, Bait it, then use your Hidden Blade to take them out. Alternatively, you can also Bait underneath a tree or beside a rooftop & jump off that for stealth kills too. For Snare kills, use Bait like we did in Challenges #1; the Monmouth beach is still a good spot.

Hunting Challenges #3:
1. Skin every species of Animal
2. Kill 5 Animals from Horseback
3. Trade hunting spoils worth a total of 2000£
4. Kill 10 Animals in close combat
5. Complete your Hunting Map
6. Have collected 50 Undamaged Pelts

We can earn the rest of these as we complete our Hunting Map; use Bait or analyze clues in different biomes of the Hunting Regions for the best results at tracking the missing Animals down. The Animals located at the Davenport Homestead also count!

These are the Animals that can be found:

Black Creek: Lynx, Elk, Beaver, Rabbit
Concord: Deer, Beaver, Raccoon, Rabbit
Diamond Basin: Cougar, Wolf, Deer, Beaver
John’s Town: Elk, Wolf, Bear, Rabbit
Great Piece Hills: Lynx, Wolf, Elk, Rabbit
Kanièn:keh: Cougar, Deer, Wolf, Rabbit
Lexington: Deer, Fox, Raccoon, Rabbit
Monmouth: Fox, Rabbit, Raccoon, Elk
Packanack: Bear, Lynx, Beaver, Rabbit
Scotch Plains: Cougar, Deer, Raccoon, Rabbit
Troy’s Wood: Wolf, Elk, Deer, Rabbit
Valley Forge: Elk, Raccoon, Beaver, Rabbit

Davenport Homestead: Elk, Raccoon, Beaver, Deer, Rabbit, Fox, Wolf


Achievement #13 – In Good Standing: Complete all Challenges for any of the Clubs.
We will unlock this Achievement after we complete all three tiers of Challenges of the Hunting Society; we will be needing to complete the Challenges for all other Clubs in the game regardless for the Completionist Achievement…
Sequence 8: Tracing One Warm Line
1. Locations: Davenport Homestead, Atlantic Ocean
2. Sequence #6 Memories: N/A
3. Side Missions: N/A
4. Discovery Missions: N/A
5. Homestead Missions: Burglar On the Homestead, The Fight, Prudence’s Primrose
6. Naval Missions: The Ghost Ship, Dead Chest’s Treasure
7. Optional Objectives: 43/130
8. Achievements: 14/84
-----------------------------------------------------------------------------------------------------

Davenport Homestead:
Remember whenever we are around Davenport & it is daytime, check in to see our Artisans to see if they are doing any of their three jobs; they will appear gold in Eagle Vision if they are doing one. If it is nighttime, everyone will be asleep & not doing any jobs.

Homestead Mission – Burglar On the Homestead: Back in Davenport we will have unlocked two new Homestead Missions we can complete. To start, head towards the Lumber Mill & we will find Catherine standing in the middle of the road – there is a thief about!

When we approach the mill, the thief will start running away & we will have to chase them down… fatally.

Homestead Mission – The Fight: With that done, we can do a new Homestead Mission over near Lance’s Woodshop. The logger’s boys will come tell us that Terry & Godfrey are fighting & we will have to go break it up. We will need to complete a small mini-game of pushing Terry & Godfrey apart which can actually be quite difficult to do; for once, playing off a smaller screen can be useful as trying to keep both your eyes simultaneously on the moving bars is tough depending on the size of your monitor/aspect ratio.

Fortunately, we cannot fail, & will have to keep pushing them back again & again until we get it right.

Homestead Mission – Prudence’s Primrose: With the previous Missions done for our Lumberers, let us go check on our new Farmers to see how they are making out here. When we arrive at the farm, Warren will be calling out for his wife Prudence & will need our help to track her down.

Analyze the clues she has left behind, & we will find her getting attacked by a Bear. Quickly rush over & rescue her.

Peg Leg: With the Peg Leg Trinkets cleared out of the Frontier, return them to Peg Leg & we can receive two more of Kidd’s Letters.


Achievement #14 – Tumblehome: Upgrade the Aquila.
As we loot Chests & sell Pelts, we should be earning some good quid & might be able to start affording some Aquila Upgrades; the cheapest we can buy is the Extra Cannon which costs 2500£.

While there is no direct Achievement for fully Upgrading the Aquila, it is a task we must do for 100% in the Naval Missions section. We will want to make it a priority as it will also make completing the Optional Objectives for the Privateer Contracts & some Memories much easier to do!

Atlantic Ocean – Northwest Passage:

Naval Location – The Ghost Ship: We can now complete two new Naval Location Missions as well. First, we will sail up North to locate a ruined ship called the Octavius.

Optional Objective #1 – Do Not Fall Into the Water: Self explanatory. For the entirety of the Mission, we cannot fall into the water. What makes this a bit tough, is our feet cannot even touch the water from dandling off a ledge grab!

Optional Objective #2 – Reach the Octavius Within 1:00 Minute: When we locate the Octavius, we must quickly slide down the slope & hop across the icebergs to reach the ship. If you rush, you can make it with 20s to spare, so you have a bit of lee-way for route planning & paying attention to where you are jumping.

Naval Location – The Ghost Ship: Get onboard the Octavius, & make your way to the captain’s quarters to retrieve another one of Captain Kidd’s Treasure Map Fragments. Of course, it cannot be that easy, & after we have the map piece the ship will begin falling apart; quickly escape!

Atlantic Ocean – Dead Chest Island:

Naval Location – Dead Chest’s Treasure: Our next Mission will take us to Dead Chest Island where we can find another of Captain Kidd’s Treasure Map Fragments. As a forewarning, the Optional Objectives for this Mission can be quite challenging…

Optional Objective #1 – Perform 3 Running Assassinations: When we get over the cliffs, we will find a Mercenary who has looted the Treasure Map Fragment & we will have to chase after him. As we go, we will pass by other Mercenaries; be sure to kill them with a running Assassination using our Hidden Blades. The Mercenaries will be directly in our path & basically impossible to miss… for the easiest time, just hold down the Assassination button as you are sprinting instead of manually pressing it to automatically perform the Assassination.

The final running Assassination is with two Mercenaries that can be difficult to pull off. If you chase the fleeing Mercenary the whole way before he stops, the camera angle will mess up & make it impossible to lock on to the other Mercenaries standing around. When you reach this point, you need to wait for the running Mercenary stop beside the others, THEN charge at the other Mercenaries holding down Assassinate.

Optional Objective #2 – Stay Within 40m of Your Target: This entire time as we chase after the Mercenary, we have to stay within 40m of him at all times!

Optional Objective #3 – Kill the Target Before He Reaches the Cave: After we are finished our running Assassinations, climb up the rubble & hop across the elevated masts after the fleeing Mercenary. Rush across the falling mast at the end, then slide down the inside of a ship where the fleeing Mercenary will run directly below us; Air Assassinate him. If we miss this Assassination, it will be impossible to catch up to him.
Sequence 9: ... To Find My Wooden Leg
1. Locations: Boston
2. Sequence #6 Memories: N/A
3. Side Missions: Monster of the Sea, Unidentified Flying Object
4. Discovery Missions: Fort Independence, Fort Hill, North Boston Letters, Boston’s Contract, Central Boston Items, South Boston Items
5. Homestead Missions: The Brawler
6. Naval Missions: N/A
7. Optional Objectives: 43/130
8. Achievements: 16/84
-----------------------------------------------------------------------------------------------------

Boston:
At long last, it will be finally time for us to return to Boston. For now, ignore the Memory Start & let us clear out all Collectibles & side tasks first.

Exploring the City: Use all Viewpoints, & find all Peg Leg Trinkets, Almanac Pages, & Chests around the city.

We also want to go to all three General Stores here in Boston & sell at least one intact Pelt at each of them; roaming Consumable Merchants do not count & it must be “brick & mortar” stores.


Achievement #15 – Blowing In the Wind: Retrieve every Page for one of Ben Franklin's Almanacs.
Each Almanac Volume has 4 different Almanac Pages we need to collect; collect all 4 for a single Volume & we will unlock this Achievement. There isn’t an Achievement for finding all Almanac Page, but it is one of our Discovery requirements for 100%.

Joining the Thief’s Club: As we explore around Boston, make a point of Stealing a few pounds off of Civilians. After you have stolen at least 100£, a kid will approach us & ask us to join the Club & give us access to the Thief Challenges.

Boston – Underground:
As one of our Challenges for the Frontiersmen as well as a separate Discovery requirement for 100%, we need to discover all Fast Travel points in the Underground. To access the Underground, go to any Fast Travel location in Boston (not the Harbormasters) & we can find a cellar entrance we go use to reach the Underground.

Once inside, we need to search around for the 10 different tunnel entrances that will simultaneously unlock new Fast Travel points throughout Boston. It can be a bit disorienting, so frequently check you Map for areas you have not explored yet; you basically have to fully Map out the Underground to find all the Fast Travel points… If you come to a locked gate, search above or below it for a way around to unlock it from the other side.


Though tedious, we only have to do this once, & it will make navigating around Boston much faster in the future…

Crown Coffee House: Some Fast Travel points will be stuck behind puzzles. To open the Crown Coffee House point, interact with the Magic Lantern & move the Scales to the bottom, the Globe to the top, Cross to the left, & Wheel to the right.

South Commons: For the South Commons Fast Travel Point, we can find another Magic Lantern. The solution for this is Mason Symbol at the bottom, Crown on the top, Feather to the left, & Human to the right.

Boston Gate: For the final Magic Lantern puzzle, place the Mason Symbol on the top, Scales at the bottom, Female Symbol to the left, & Male Symbol to the right.

Boston:

Fort Independence: We can find Fort Independence in the Southwestern corner of Boston; you will have discovered it if you went around collecting all the Chests as there will be one inside it. As always, kill the Fort Captain & ignite the Powder Keg reserves before we hoist our Patriot Flag.

Fort Hill: The other Fort in Boston can be found along the Eastern waterfront. Kill the Fort Captain, ignite the Powder Keg reserves, & hoist the Patriot Flag.


Achievement #16 – Predator: Hang 5 enemies by using Rope Darts.
As we explore around town, keep your eyes open for beams up above lone Guards. When the opportunity presents itself, use a Rope Dart on the Guard to pull him close, then leap backwards off the beam to perform a Hanging Execution. Do this 5 times to unlock the Achievement.

Simply pulling the Guards towards you & killing them while still standing on the beam does not count.

Courier Mission – North Boston Letters: We can find this Courier Mission in Northern Boston, just South of the topmost Viewpoint.

Homestead Mission – The Brawler: Up in Northern Boston, head to the marker for a Homestead Mission & we will encounter a man named Norris being attacked by Guards. Help him out, & he will reveal himself to be a miner. Fortunately, that is something we desperately need back in Davenport, & we will invite him to move in!

Frontiersmen Mission – Monster of the Sea: Close by where we helped Norris, we can see the marker of a local Frontiersmen. Enter inside the tavern, & speak with Daniel Boone at a table to receive this new Mission.

Head around Northern Boston, & Eavesdrop on at least three of the marked Citizens to learn more about this “monster”. Once we have the truth, speak with the widow of the “serpent weaver” then head to his workshop to fully bust this myth.

Frontiersmen Mission – Unidentified Flying Object: Return back to see Daniel Boone at a local tavern, to learn of potential UFOs here in Boston! Head over to the marker in Western Boston, then climb up into the trees to find a parasol which was mistaken as a UFO… sounds about right.

Assassination Contract – Boston’s Contracts: In Northern Boston, Southwest of the lowest Harbormaster here we can find the marker for an Assassination Contract. Speak with the contract issuer, & we will have 5 new markers added to our Map of Targets we need to Assassinate.

If the Target spots us, they will flee. Though strangely if they become hostile & we do not engage them, Guards may intervene & kill them for us…

Delivery Request – Central Boston Items: At the Northeast end of Central Boston close to the waterfront, we can find the Citizen for our next Delivery Request. For this one we need to deliver: Paper x3, Hair Accessory x2, Toy Dolls x2, Golden Rings x1, & Soap x2.

At the moment will either not have the Crafting Recipes for any of these Items or do not have our Artisans at a high enough Level to make them; we will have to complete this Mission later on.

Delivery Request – South Boston Items: We can find this Mission beside the East Fields Fast Travel point at the Southeast end of Central Boston. Speak with the Citizen, & we will need to deliver: Raccoon Pelts x5, Deer Pelts x5, Beaver Pelts x5, Buttons x2, & Fox Pelts x3.

Ideally you should have all the Pelts you need through our hunting escapades. But similarly to the previous Delivery Request Mission, we do not have our Woodworker at a high enough Level to Craft the Buttons we need.
Sequence 10: The Artisan Audit
1. Locations: Davenport Homestead
2. Sequence #6 Memories: N/A
3. Side Missions: N/A
4. Discovery Missions: N/A
5. Homestead Missions: White Trophy
6. Naval Missions: N/A
7. Optional Objectives: 43/130
8. Achievements: 16/84
-----------------------------------------------------------------------------------------------------

Davenport Homestead:

Homestead Mission – White Trophy: Before we continue on with Sequence #6, return back to Davenport, & let’s check in to see how Norris is doing. Head to the Homestead Mission marker… & we will come across Myriam instead. She will tell us that there is a troublesome Cougar out & about throughout the area, & wants our help to take it out.

Analyze the three clues, then chase after the White Cougar… right into Norris’ new mine. Enter the mine & lure the White Cougar out of it so Myriam can kill it.

Encyclopedia of the Common Man: It is important to note that this does not have to be “farmed” immediately, however we can earn entries for the Artisans we currently have; it is difficult to go around & obtain all of these naturally without farming. Each Artisan will have 3 entries we need to obtain for the Encyclopedia; you can check your progress viewing your Map & scrolling down to the Encyclopedia of the Common Man tab in the Logbook.

When an Artisan is doing a task that has an entry, they will appear gold while being view in Eagle Vision. Aim at them (with your Bow or Pistol for some reason) & wait for the circle to become highlighted to count as a scan which will record it in our Encyclopedia; if the Artisan appears blue, they are not doing a task that is scannable.

Artisans only do tasks during the daytime, & unfortunately, there is no “pass time” feature in the game. A work around is to replay a Memory where it is daytime, when we quit the Memory, we will exit out at the same time of day; at the moment, loading up Sequence #5 – Memory #4 River Rescue will set us at a decent time of day when we quit it.

Travel to each Homestead around Davenport, & spend a day or two following each Artisan around to scan their tasks; Artisans that have multiple people make collecting entries go much faster. It is also important to note that for some Artisans, there are multiple different scannable entries; all we need to do is accumulate three of them. If possible, try getting to each Artisan at the crack of dawn & follow them all throughout the day for guaranteed success at witnessing them perform 3 of their many possible tasks.

Lumberers Encyclopedia Entry – Churning Butter: We can find Catherine outside the Lumber Mill homestead churning butter.

Lumberers Encyclopedia Entry – Chopping Firewood: We can find Terry & Godfrey chopping & stacking firewood together in front of the Lumber Mill homestead.

Lumberers Encyclopedia Entry – Sawing Logs: We can find Terry & Godfrey using a two-man saw to buck up a log outside of the Lumber Mill homestead.

Woodworker – Building A Chair: We can find Lance working on a chair in front of the Lance’s Woodshop homestead.

Woodworker – Assessing the Wheelbarrow: We can find Lance assessing a wheelbarrow full of soil & writing things down in a journal in front of the Lance’s Woodshop homestead; he can also be found performing this task at other Artisan’s homesteads as well.

Woodworker – Assessing the Door: We can find Lance assessing the front door of the Lance’s Woodshop homestead; he can also be found performing this task at other Artisan’s homesteads as well.

Huntress – Maintaining Musket: We can find Myriam sitting outside her cabin at Myriam’s Camp maintaining her hunting musket.

Huntress – Cooking Meat: We can find Myriam rotating some spit roasted Rabbits over a fire & adding kindling to it outside her cabin at Myriam’s Camp.

Huntress – Hunting: We can find Myriam up in a hunting blind in a tree near her cabin at Myriam’s Camp searching for Animals to shoot; she can also be found in other hunting blinds around her area performing this task.

Farmers – Cutting Wheat: We can find Prudence cutting wheat in behind the Prudence & Warren’s Farm homestead

Farmers – Inspecting Vegetables: We can find Warren inspecting some planted vegetables in the fields near the Prudence & Warren’s Farm homestead.

Farmers – Plowing the Field: We can find Warren plowing one of the fields near the Prudence & Warren’s Farm homestead.

Miner – Re-Fueling Lanterns: Norris is one of the more annoying Artisans to get their entries for as his tasks are far spread out during the day. The vast majority of the time we will find Norris crouching outside of his mine re-fueling a lantern; the mine is found down a path Southeast from the Norris’ Mine homestead.

Other times he will simply be smoking from a pipe or eating an apple… which are not scannable tasks…

This man will walk down to the mine from his home, re-fuel a lantern, have a smoke, walk back home, sweep his porch, walk back down to the mine, re-fuel a lantern, eat an apple, walk back home, sweep his porch, WALK BACK DOWN TO THE MINE, re-fuel a lantern…

Miner – Support Beam Repair: We can find Norris standing near the entrance of his mine checking the support beams with Lance; this task is usually done at dusk.

We cannot earn Norris’ final entry until we beat further into the game & expand his mine; while you can potentially try getting him to go gold panning… it is extremely rare to see him do this & you will spend hours waiting. His gold panning spot is along the riverside immediately in front of his mine. Best just to move on for now.
Sequence 11: Just Tea, Thank You
1. Locations: Boston, Davenport Homestead
2. Sequence #6 Memories: 1, 2, 3, 4
3. Side Missions: Liberate North Boston, Liberate Central Boston, Liberate South Boston
4. Discovery Missions: N/A
5. Homestead Missions: N/A
6. Naval Missions: N/A
7. Optional Objectives: 52/130
8. Achievements: 17/84
-----------------------------------------------------------------------------------------------------

Boston:

Memory #1 – On Johnson’s Trail: When you inevitably get tired of shadowing your Artisans at Davenport, it will be time for us to return to our Memories. In Boston, link up with Samuel Adams.

Optional Objective #1 – Stay Below Notoriety Level 2: Simple enough, just do not aggravate the Guards during this Memory… which is easier said then done as we will have to enter combat to save a man.

Liberation Missions: After we save the man, we will see new Liberation Missions appear throughout Boston; ignore/avoid these for now! After we beat this Memory & do not have to worry about the Optional Objective, we can turn our attention to liberation…

Memory #1 – On Johnson’s Trail: Join Adams at his meeting, then head to the docks to destroy the British tea shipments.

Optional Objective #2 – Limit Firearm Use to Under 6 Shots: As the Objective states, just avoid using your Pistol & kill Guards with melee Weapons whenever you can.

Optional Objective #3 – Use Powder Kegs to Destroy Smuggled Cargo 3 Times: This is where our Pistol WILL need to be used however. We only have 3 targets to destroy, & all 3 of them must be taken out via Powder Kegs. Not all smuggled cargo will have Powder Kegs nearby, so you will have to walk them over from an area that does.

Memory #1 – On Johnson’s Trail: With the tea destroyed, we now have to fully liberate the Central District; now we can begin completing the Liberation Missions, just refrain from using your Pistol or Muskets.

Memory #2 – The Angry Chef: Return to Molineaux Tavern, & Stephane Chapheau will tell us it has been robbed… he will then walk out the front door holding a cleaver.

Optional Objective #1 – Limit Time Spent In Open Conflict to Under 15s: While we will have to enter fights to protect Stephane, we need to deal with the Guards as quickly as possible; abuse your Pistol if you have to.

The hardest part for this Objective is if you engage the encounter with the two Grenadier Guards in it; you will want to ideally Assassinate one of them before the combat begins, then use Break Defence/Disarm on the second.

Optional Objective #2 – Limit Chapheau’s Health Loss to Above 33%: We cannot let Stephane’s health drop below 33%.

Optional Objective #3 – Perform 5 Low Profile Assassinations: This Objective will feed into the first one & we will want to kill all Guards Stephane fights as best we can using quick Assassinations without even entering official combat. Only killing Guards directly aggravated by Stephane will count towards this Objective; we can’t just quickly stealth kill 5 random Guards unfortunately.

For ease, if you think Stephane will be passing by some Guards, head over to them but wait until they are walking towards Stephane to assault him before you kill them. You can also “low profile” Assassinate Guards who are attacking Stephane, & not targeting you directly as well – when your Mini-Map is yellow, not red.

Boston Liberation: As of now, we can go & complete all of the Liberation Missions in North & South Boston. Do that, & we will have three new Assassin Recruits: Stephane Chapeau, Duncan Little, & Clipper Wilkinson.

Note that unlike most Collectibles/Missions, Liberation Missions will only appear on our Map if we have physically explored the area. If your District says it is liberated, but definitely is not, you need to fill in more blank areas of your Map for the Missions to appear; North Boston is particularly bad for this. If you check your Logbook by scrolling down while viewing your Map it will tell you what/how many Liberation Mission instances you still need to complete.

Liberate North Boston: After we clear out all of the Liberation Missions in Northern Boston, we can complete this… Liberation Mission, with Duncan Little.

Liberate South Boston: After we clear out all of the Liberation Missions in Southern Boston, we can complete this Liberation Mission with Clipper Wilkinson.


Achievement #17 – Man of the People: Liberate all Districts in Boston OR New York.
We will have liberated Central Boston during Memory #2 of Sequence #6. Carry on to liberate North & South Boston by completing all Liberation Mission tasks, then completing the official Liberation Mission to liberate the said District as well as recruit a new Assassin.

When we liberate all three Districts in Boston, we will unlock this Achievement.

Assassination Contracts: Now that we have our new Assassin Recruits, we can call upon them to assist us with different commands. More importantly, we can now send them on Assassination Contracts to earn Xp; for the Magna ♥♥♥ Laude Achievement we need at least one of our Recruits to reach the full rank of Assassin, for 100% however, we need them all to reach Assassin rank.

Hold down the Left Bumper to bring up the Assassin Wheel, & select Assassination Contracts; this is very similar to Mediterranean Defence from Assassin’s Creed – Revelations. There are 14 different Templar Controlled Locations that are varying Difficulties. From here on, make a point of keeping your Assassin Recruits busy on Contracts to not only rank them up, but to get us some nice passive income as well.

Memory #3 – The Tea Party: When you are ready to continue, meet up with our compatriots, & head down to the harbor to prepare to destroy the remaining British tea. Once the tea is starting to get dumped, the Guards will move in to stop us…

Optional Objective #1 – Dump 10 Crates of Tea In the Water: In between fighting waves of Guards, search around on the two ships for Tea Boxes. Pick them up, then throw them into the water to destroy them. The sooner you can complete this Objective the better…

Optional Objective #2 – Throw 3 “Redcoats” In the Water: When Guards do show up, lure them over to the water’s edge, then Counter/Throw them over into the water. This is pretty simple to do.

Optional Objective #3 – Perform A Musket Air Assassination: This will require deliberate set up. Muskets can be found on racks on the ships or picked up from dead Guards. The best way to do this is to wait for a wave of Guards to rush the ship, & perch on the ships rail. As they get close, leap off the rail to Air Assassinate them off the harbor or on the ship gangway.

Davenport Homestead:

Memory #4 – Hostile Negotiations: With all the tea dumped in Boston, return back to Davenport & we can find Achilles near the Manor viewing the ocean. Speak with him… & we will initiate a 6 month time jump…
Sequence 12: Selling Out
1. Locations: Davenport Homestead, Frontier
2. Sequence #6 Memories: 4
3. Sequence #7 Memories: N/A
4. Side Missions: N/A
5. Discovery Missions: N/A
6. Homestead Missions: Room At the Inn, Manor Mysteries, Norris Goes Courting, Happy Expectations, Bowls Beginner
7. Naval Missions: N/A
8. Optional Objectives: 55/130
9. Achievements: 19/84
-----------------------------------------------------------------------------------------------------

Davenport Homestead:

Memory #4 – Hostile Negotiations: After the time jump our old friend Kanen’tó:kon will arrive at the Manor warning us that, surprise surprise, William Johnson is demanding the full sum of money to pay his people off. Time to finish the fight…

Frontier:

Memory #4 – Hostile Negotiations: Travel to the John’s Town region in the Frontier & meet up with Kanen’tó:kon.

Optional Objective #1 – Reach Johnson Undetected: Circle around the red area of the Restricted Area until you find an optimal line to take you through Bushes, trees, etc. to where Johnson is. It is easiest to work your way clockwise from the South end all the way up to the Northwest end which will bring you right to the backside of the manor they are meeting at… & we will also be in the most optimal position.

Optional Objective #2 – Limit Native American Casualties: We cannot let any of the Kanièn:keh people get killed during their meeting with Johnson. If you positioned yourself at the Northwest side of the manor, we can easily climb up onto the roof & Air Assassinate Johnson in seconds.

If you are anywhere else, you will need to close in as fast as you can to the backside of the manor so you can Air Assassinate Johnson. We cannot be detected, or innocent people will die.

Optional Objective #3 – Perform A Swan Dive to Escape: After we kill Johnson, escape East or West of the Restricted Area & perform a Leap of Faith into the water below.


Achievement #18 – Tea Is For Englishmen: Complete Sequence #6.
Story Related. Kill William Johnson, & escape the area to complete Sequence #6, & unlock this Achievement.

Sequence #7:

Davenport Homestead:

Homestead Mission – Room At the Inn: Now that it is Sequence #7, we will have unlocked new Homestead Missions to complete. Head to the new marker in Davenport, & we will encounter a travelling peddler offering samples of his brewed ale. Godfrey will introduce us to him… &… long story short, we will now have an inn built in Davenport run by Oliver & his wife Corinne.

Thing is, we will need to invest 1000£ into the inn, but fortunately, that shouldn’t be too difficult to obtain.

Once the Mile’s End Tavern is built, be sure to enter inside & speak with Oliver & Corinne so they can now begin wandering around… completing tasks…

Innkeeper Entry – Pitching Hay: As one of our scannable tasks, we can find Oliver in a stable near the Mile’s End Tavern moving hay with a pitchfork.

Innkeeper Entry – Grinding Wheat With Bull: As another scannable task, we can find Corinne near the stable overseeing a bull attached to a wheat mill.

Innkeeper Entry – Bartender: Most other tasks are observed outside of the Tavern, but if it is still daytime & Oliver is nowhere to be found, enter inside & we can scan him working the bar.

Homestead Mission – Manor Mysteries: With the Mile’s End Tavern now established, head up to the Manor to go speak with Achilles who will ask us to retrieve an old chest that was stashed somewhere on the property. It was in a cave that has long since collapsed, so we will need to get some explosives off of Norris.

Blow open the cave, & navigate to Achilles’ chest. After we loot it, we will only have 2:00 minutes to escape back out the way we came.

Homestead Mission – Norris Goes Courting: Next head to the far Southwest end of the property to find Norris gold panning; unfortunately we cannot use this as a scan opportunity at the moment. Norris needs help finding a gift for our Huntress, Myriam. Speak with Prudence for an idea, then head up to the marked cliffs to find some wild flowers we can pick. Once we have them, deliver the flowers to Norris.

Miner – Mining: With Norris’ mine now upgraded, the odds of him being found further inside it mining for us to scan are much higher.

Homestead Mission – Happy Expectations: With the previous Mission completed, we will unlock two more we can do here in Davenport. First head over to the Farm, & we will find that Warren & Prudence are now expecting! Unfortunately… we have no Doctors around here – sounds like a new Artisan to track down!

Homestead Mission – Bowls Beginner: Before we set off to Boston, let’s pop over to see Godfrey & Terry who will be playing Bowls. This Mission will give us a Tutorial on how to play… Bowls; we will then unlock it as a permanent game we can now play here.


Achievement #19 – Multitasking: Complete 50% of the Progress Tracker entries.
By this point in the game, if you have completed everything covered in the guide so far, you should have reached 50% game completion. If you have completed some Privateer Contracts, you will have reached this sooner.

If it does not unlock then you should definitely be within the 40% range. Everything we do in the game counts towards our completion percentage; this is an inevitable Achievement in our 100%...

For the Original Gamer Achievement we need to play all three kinds of games on the Homestead; Bowls is one of them. The game of Bowls we played in the Memory does not count nor does any of the game version we find down at the docks unfortunately…

Bowls: The premise of Bowls is to get as many of your four Balls as close to the little red ball called the Jack; sort of like curling, but not quite. You must knock your opponent’s balls away from the Jack to lower their Points, while also trying to stick your own as close as you can; the more Balls that are close to the Jack at the same distance will earn you Points.

There are infinite Rounds, but the target score is 5 Points. Choosing to start first or second comes with its own pros/cons & is up to personal preference. I initially liked starting first, but then decided starting second was better for me.
Sequence 13: Flipping the Board
1. Locations: Davenport Homestead, Frontier
2. Sequence #7 Memories: N/A
3. Side Missions: N/A
4. Discovery Missions: N/A
5. Homestead Missions: N/A
6. Naval Missions: N/A
7. Optional Objectives: 55/130
8. Achievements: 21/84
-----------------------------------------------------------------------------------------------------

Davenport Homestead:

Fanorona: Unfortunately, Bowls was definitely the easiest of the games. For our second game, head to the Manor & we can play Fanorona with Achilles. This game is a bit tricky to describe as it is all about moving your pieces towards or away from your opponent’s to “capture them”. I recommend choosing to start first. When the game begins, start with trying to make as many diagonal moves you can so you can chain as many captures as possible.

Always prioritize moving your pieces away or towards lines of enemy pieces of two or more if you can. I found at least; it was also easy to pick up strategy from your opponent on what “good moves” were.

When you get your opponent down to their last few pieces, the game changes entirely into a high stakes chase; you need to corner their pieces without offering up your own as you chase them. You almost need at least 2-3 pieces left to be successful however as if you only have 1, you will just bait yourself into being captured. This second half of the game is almost harder than the first as the AI is very good at keeping those last few pieces alive when you have no chains to exploit.

Nine Men’s Morris: Now for the worst for last, travel over to the Mile’s End Tavern & we can verse Oliver at Nine Men’s Morris. Morris is basically Ticktacktoe meets Checkers. The goal is to place three of your pieces in a row of three so you can remove one of your opponents piece; each player has nine pieces. This game is abysmal & you really feel like you are playing against a level ten AI opponent.

Like Fanorona, there is a second phase to this game that is even harder than the first. Unlike Fanorona when you can get carried away with good chains to throw the AI off… Morris is purely calculated & deliberate. The moment your opponent removes one of your pieces, or sets up to… the game is over for you.

I fully intended to write a comprehensive guide for Nine Men’s Morris, & spent about six hours attempting it… but it was impossible. The strategy for up to turn five is very easy as the AI will always do the same moves… but after that the amount of variety & strategy involved gets kicked up into the twelfth gear. Unfortunately, I was doing well in a game, & actually ended up winning it… but was then unable to describe how I did it (which even if I could, there is so much variety in end game that it wouldn’t have actually been that useful). I then spent another three hours trying to replicate what I did… & even just tried win again, but couldn’t… & now I give up. I am sorry.

Idi4300 gives a much better tutorial than I ever could with text, so please, do not waste six plus hours on this board game like I did… If they help you beat Nine Men's Morris, please leave them a kind comment & Like their video to help them out in return!

https://youtu.be/aWKbWodRfeU


Achievement #20 – Original Gamer: Win a game of Fanorona, Morris, & Bowls on the Homestead.
This Achievement is difficult for all the wrong reasons as you basically need to be an absolute pro to beat Fanorona & Morris; Bowls is easy comparatively. Draws do not count as winning!

Bowls took me around 4 attempts, Fanorona only 2 (which I am very proud of), & Morris took me… well… over 80. As I mentioned above, I probably got my first victory in Morris (& Achievement) after about 30-50 games… but it was a fluke. I was then unable to win a second time playing another 30-50 games.

If I see another person’s hand sweep above the board while I am thinking of my next move… I will Assassinate them.

Frontier:


Achievement #21 – Prince of Thieves: Loot a Convoy without killing any of its Guards.
Before we attempt this Achievement, we will want to have some Smoke Bombs handy; we can buy them at any General Store. Once we have them, we now need to get a Convoy to spawn. Fast Travel to the Fort up in the Black Creek region & begin jogging down the main road towards the town of Concord. As we run down the road, once it starts to turn more East then Southeast, there is a spawn point that will trigger a: Guard patrol, a Peddler, or Convoy to appear. If anything but the Convoy spawns, Fast Travel back to the Fort & run down the road again.

Once we have the Convoy, we now need to loot it without killing any of the Guards. Only problem is that we cannot loot the Convoy without dispatching the Guards first. Sneak up behind the Convoy, & very carefully stealth knockout the four Guards at the back picking them off one by one. Make your way to the front, stealth knockout who you can & when you are engaged in combat very carefully dispatch the remaining Guards using your Bare Fists; Smoke Bombs will help keep you safe.

There is a small chance if you use a Bare Fist Counter to take the Guards out, they may get killed if they land funny or connect with other objects. They can also accidentally get shot as well.

Joining the Boston Brawlers: Now that we have completed Sequence #6, if you Fast Travel somewhere into the Frontier (or Boston technically) we should be approached by a spokesman for the Boston Brawlers who will invite us to join their Club.

The perquisite for joining this Club is by defeating Guards using only your Bare Fists. If you have not already been asked to join then we definitely will after taking out the Convoy with our Bare Fists…
Sequence 14: Colonial Scourge
1. Locations: Boston, Frontier, Davenport Homestead
2. Sequence #7 Memories: N/A
3. Side Missions: N/A
4. Discovery Missions: N/A
5. Homestead Missions: N/A
6. Naval Missions: N/A
7. Optional Objectives: 55/130
8. Achievements: 22/84
-----------------------------------------------------------------------------------------------------

Boston:

Homestead Mission – Happy Expectations: Head to Boston now, & let us go track down a Doctor. When we find them, they will be attacked by some Civilians; defend them, & use your Bare Fists to deal with the attackers.

Tell him about Prudence & Warren, & he will agree to move to Davenport.

Boston Brawlers Mission – The Boston Brawlers: Since we are a part of the Club, we can also go & do a Mission for the Boston Brawlers up in North Boston. Speak with the Club representative, & he will tell us that they are organizing a bare-knuckle boxing tournament. Before we can join it however, we first need to track down & defeat some other notable fighters.

Brawler Challenges #1: For the most part, you should have already completed the majority of these Challenges save for a few:
1. Meet with Harold Ring at the old brewery in Boston
2. Disarm 5 enemies
3. Kill 5 enemies affected by a Smoke Bomb within 10s
4. Kill 25 enemies with your Hidden Blades
5. Stealth kill 10 enemies without being detected

Brawler Challenges #2: Once again, a few of these you will have most likely completed right away while others are a bit more specific; while we do the ones we are missing, be sure to summon your Assassin Recruits into combat to help us.
1. Fight & kill 10 Grenadiers
2. Kill an enemy with every type of Weapon
3. Perform a Double Assassination 5 times
4. Have your Recruit assist you in combat 10 times
5. Liberate 3 Forts

For Weapon types, these are: Bare Fists, Hidden Blade, Small Weapons – Tomahawk, Small Weapons – Daggers, Large Weapons – Swords, Large Weapons – Heavy, & Large Weapons – Blunt. Kill an enemy at least once all of these Weapons to complete the Challenge; it can be any Weapon from these types… We also need to kill an enemy with: our Pistol, Bow, Rope Darts, & Poison Darts.

Brawler Challenges #3: For our final set of Brawler Challenges, we can complete everything except for one.
1. Use a Rope Dart to perform a Predator Move 5 times
2. Achieve a 7 enemy Killstreak
3. Own every Weapon available in the Stores
4. Disarm & kill 10 Jägers with their own Weapons
5. Defend yourself from a Firing Line by using a Human Shield 10 times

Owning every Weapon available in the Stores will take some time; we unlock new Weapons to buy after completing more Sequences. We also need to Craft every available Weapon as well; Ubisoft Club Weapons do not count, of course.


Achievement #22 – Jäger Bomb: After becoming fully Notorious, kill 10 Jägers before losing your Notoriety.
As we farm out these Challenges, we will most likely increase our Notoriety. Once it becomes Level 3, Jägers will infinitely spawn to track us down & attack us; for this Achievement, keep our Notoriety at Level 3 & kill 10 Jägers.

Jägers can be pretty tough, but they have a very strange exploit… they are susceptible to being Disarmed. Find a Jäger (or have one find you) & approach them with Bare Fists. Disarm their Weapon from them, then make sure you kill them with it; do this 10 times to complete the Challenge as well as this Achievement as long as you maintain Level 3 Notoriety the entire time.

Thief Challenges #1: While we work towards our Boston Brawler Challenges, we also may as well complete our Thief Challenges too.
1. Loot 10 dead bodies
2. Perform an Air Assassination 25 times
3. Catch a Courier
4. Pickpocket 200£
5. Kill 25 enemies from a hiding place

The most tedious of these are our 25 kills for both types of Assassinations. For Air Assassinations, you can get a large group of enemies to chase you, climb up a tall building to briefly lose them, then leap off & do an Air Assassination on one of the Guards. Climb back up the building, leap off… rinse & repeat. For hiding place kills, Fast Travel to Forts for a high concentration of enemies then jump into a Hay Pile. Use Whistle to lure Guards over one by one & kill them. Alternatively, you can run around the city to lure Guard patrols over to Hay Piles as well; kills from Bushes & Benches do not seem to count.

Thief Challenges #2:
1. Escape open conflict by using Blending or hiding 10 times
2. Lure away a Guard Dog using Bait 3 times
3. Steal everything a Guard owns 3 times
4. Steal everything a Rich Citizen owns without being detected
5. Perform 30 stealth kills without being detected

For stealing from a Rich Citizen, look for people in fancy clothes such as nice long coats, powdered wigs, & tricorn hats. For a reliable place to find a Guard Dog, Fast Travel to the Harbormaster in the Monmouth region & search the center of town for a patrol of two Guards & a Guard Dog. Get as close as you can to the Guard Dog without being seen, then throw down some Bait to lure it over; you can lure the same Dog over & over again to different Bait piles.

Thief Challenges #3: To earn the final list of Thief Challenges, we need to return to Boston, & the kid representative for the Club will approach us to give it to us.
1. Poison 5 enemies
2. Find & empty 10 Chests in New York
3. Win 500£ playing games
4. Pickpocket or Loot 1500£
5. Have successfully attacked & looted an enemy Convoy 3 times

We will be looting the New York Chests later on, but we can do everything else. Head back to the Fort in the Black Creek region to spawn in Convoys we can loot. To earn 500£ in games, just pick your favourite one to play but I would recommend only doing Beginner Difficulty; we can find Beginner Bowls down at the docks back in Davenport. With a max bet of 100£, you only need to win 5 games.
Sequence 15: Eyes In the Back...
1. Locations: Davenport Homestead, Frontier, Bunker Hill
2. Sequence #7 Memories: 1, 2, 3
3. Side Missions: N/A
4. Discovery Missions: N/A
5. Homestead Missions: Pig Herder, Norris Tries Again
6. Naval Missions: N/A
7. Optional Objectives: 62/130
8. Achievements: 22/84
-----------------------------------------------------------------------------------------------------

Davenport Homestead:

Homestead Mission – Pig Herder: Back at Davenport, go & check in on Prudence & give her a hand with a few things around the farm.

Homestead Mission – Norris Tries Again: Head over to Norris’ Mine next & he will need more help in courting our Huntress, Myriam. Search around Myriam’s Camp & we can find a broken knife… a good replacement gift perhaps?

Doctor #1 – Harvesting Medicinal Herbs: Dr. White will have set up his clinic just across from Terry & Godfrey’s Lumber Mill. During the daytime, head over to see him, & as one of his scannable tasks we can find him in behind his house picking flowers.

Doctor #2 – Seeing Patients: During the day, we can find Dr. White speaking with patients near the end of his driveway leading to the main road; patients can be random NPCs or our very own Artisans coming to see Dr. White.

Doctor #3 – Doctor’s Notes: We can find Dr. White sitting on a rock near the end of his driveway leading to the main road writing down notes in a journal.

Frontier:

Boston Brawlers – Peter Bunyon: Travel to the Troy’s Wood region & track down Peter Bunyon… an ancestor of Paul perhaps? Speak with Peter, & we will challenge him to a Fist Fight – defeat him. Unfortunately, it will be a typical modern day fight as we know them… & all his buddies will also join the fight as well.

Memory #1 – The Midnight Ride: Head to Paul Revere’s House in Boston to meet up with the man, & we will set forth to assemble the army… The militia house’s will be in Southeastern Lexington, Northeastern Troy’s Wood, & Southern Concord.

Optional Objective #1 – Do Not Trigger Open Conflict: As we ride through the Frontier, we cannot become detected by any Guards & enter into open conflict. If you come across patrols, give them wide births.

Optional Objective #2 – Reach Prescott’s Location In Under 2:00 Minutes: After we reach the final militia house, we will be ambushed by British Guards. Once back on our Horse, quickly ride for the marked area in Western Lexington; ride for the area as we lose the Guards to not waste any time. You can reach it in under 1:00 minute, so you have quite a bit of time to spare…

Memory #2 – Lexington & Concord: Now it is time for the first battle of the Frontier. Meet up with John Parker in Lexington, & we will begin the defence. After the battle commences, we must quickly rush over to Concord to alert the militia there.

Optional Objective #1 – Rescue 1 Group of Civilian Hostages: When we enter into the town of Concord, we will receive this Optional Objective. Though we are still being timed to link up with the militia, we need to divert ourselves to go save some Civilians from being captured; we can find them across the Southwestern bridge crossing the river in Concord.

Memory #2 – Lexington & Concord: With the Civilians rescued, quickly rush to find James Barrett to warn him that the battle has begun.

Optional Objective #2 – Kill 7 Groups of Regulars With A Single Order: Eventually the British army will find us, & we need to command our men during the defence. There will be three different groups of Patriots we can ride over to & command to shoot. Pay attention to where the British companies are coming in from, ride to one of our own, & command them to fire.

We need to kill 130 British Guards total so this Optional Objective is pretty difficult to miss unless you let your men get massacred.

Memory #3 – Conflict Looms: Travel to the Memory Start in the Great Piece Hills & link up with a Patriot who will take us to see Israel Putnam…

Bunker Hill:

Memory #3 – Conflict Looms: Travel to Bunker Hill with the scout, & speak with General Putnam about how to get to John Pitcairn. Unfortunately, this Memory has our first roadblock Optional Objectives that are extremely challenging to do; the first is okay, but it is the last two that will cause you A LOT of grief…

Optional Objective #1 – Cross Charlestown Without Taking Damage: To bait out John Pitcairn, we will have to cause some chaos amongst the British ranks. For this Optional Objective, we have to get to the shipyard without taking any damage – primarily damage from cannons. Stay out of the open, & travel down as many winding alleys as you can along with sticking as close to building walls as possible. When the opportunity presents itself, dive into water as soon as you can & swim the rest of the way to your Objective.

Optional Objective #2 – Air Assassinate A Grenadier: Make sure you keep Optional Objective #3 in mind as we complete this Objective… There will be two ships we need to sabotage; there will only be 1 Grenadier & they are found on the Eastern ship. For whatever reason, Ledge Assassinations are unreliable & somehow aggro the Guards more often than not. I recommend swimming to the opposite side of the ship to board it.

Where the Grenadier patrols at the back of the ship, there will be a Guard patrolling near the helm & a Guard going from one side of the ship to the other. Carefully Ledge Assassinate the one walking across the ship; you may have to immediately drop into the water after you do so to avoid that random aggro chance. Next, climb up & carefully Assassinate the Guard patrolling near the helm; do not corner Assassinate them though or we cannot pick up their body. We can then throw his body into the back corner of the ship near the helm, lure the Grenadier over, & can then Air Assassinate him using the nearby crate stack.

You may have to also carefully Assassinate everyone on the ship regardless to detonate the black powder reserves… Using your Bow up in the ship’s upper rafters can be an easy way to take out the Guards stealthily.

Optional Objective #3 – Remain Undetected While On Board of Ships: Once the first ship has been destroyed & the Grenadier Air Assassinated, swim over to the next ship & destroy its black powder reserves.

We do not get a Checkpoint after we destroyed the first ship, meaning if you get detected on this one, you have to redo destroying the first ship & Air Assassinating the Grenadier!

If you have them, using Poison Darts is a great stealthy way to take out the patrolling Guards. Sometimes if the Guards refuse to stop searching for you if they were alerted, you will have to fully drop off the ship for them to reset. Once again, using your Bow from up in the masts is the easiest Way to clear the ships undetected.

Memory #3 – Conflict Looms: After successfully banging your head against the Optional Objectives, simply hang a Patriot Flag off one of the destroyed ships.
Sequence 16: Stopping the Insurrection
1. Locations: Bunker Hill, Davenport Homestead, Frontier, New York
2. Sequence #7 Memories: 4
3. Sequence #8 Memories: 1, 2
4. Side Missions: N/A
5. Discovery Missions: N/A
6. Homestead Missions: Raw Materials, Deserter
7. Naval Missions: N/A
8. Optional Objectives: 70/130
9. Achievements: 24/84
-----------------------------------------------------------------------------------------------------

Bunker Hill:

Memory #4 – The Battle For Bunker Hill: Return back to Putnam, listen to his speech… & let the final battle for Bunker Hill commence.

Optional Objective #1 – Cross the Battlefield Without Taking Damage: You know the drill for this one. Scope out cover before you leave the bit you are hiding behind – when the Cannons stop firing, quickly run to the cover you spotted. Rinse & repeat. Do not make mad sprints or you will most likely get shot. You only really have time to get from one piece of cover to the next; trying to skip cover will also most likely get you shot.

Alternatively, you can actually just sprint the whole way there as long as you cling to the leftmost cliff wall/Memory boundary the entire time. There is still a chance you can get clipped though, but if you don’t stop running, it is possible to do…

Optional Objective #2 – Air Assassinate Pitcairn Without Being Detected: Be sure to look at the below Optional Objective…

Climb up the cliff & Pitcairn will be 50m away from us. Flank around the far corners of the camp through the Bushes clockwise avoiding the bulk of the Guards. In the corner where there is a Captain patrolling near some tents, we can see a tree we can climb up. Do just that, then follow the tree branches to be perfectly above where Pitcairn is on his Horse; leap off the tree onto the flagpole, then Air Assassinate him.

Optional Objective #3 – Limit Regular Kills to Only 4: We can only kill 3-4 Guards before we Assassinate Pitcairn. Whenever possible, just sneak past Guards & avoid them entirely…


Achievement #23 – The Whites of Their Eyes: Complete Sequence #7.
Story Related. With Pitcairn now dead, loot a letter off his body & return to General Putnam… the Templars plan to assassinate George Washington…

Sequence #8:

Davenport Homestead:

Homestead Mission – Raw Materials: Before we leave to New York, check your Map to see a new Homestead Mission over at Norris’ Mine. Speak with Norris & he will tell us he plans to collect some iron ore… but it is controlled by the British in the Frontier & will need our help.

Frontier:

Homestead Mission – Raw Materials: Meet up with Norris in the Packanack region, & defend him while he preps some explosives to access the iron ore. Defend him three times as he detonates explosives.

Homestead Mission – Deserter: While in the Frontier, head over to the John’s Town region, & we can find a new Artisan in trouble that we can invite to Davenport. Big Dave. Free him from the Guards, & he will agree to move to the Homestead… we now have our Blacksmith.

New York Chests: When you have the money to spare, be sure to purchase the three new Chest Maps for New York so we can loot them all; it will cost a total of 6500£.


Achievement #24 – Magna ♥♥♥ Laude: Have a trainee reach the Assassin Rank.
For one of our Assassin Recruits to become an official Assassin, they need to get to Level 11 which will take 1100 Xp. Since Assassin Contracts are “technically” unlimited, continue to send our Recruits to complete them in any of the 14 locations. When one reaches Level 11, we will unlock this Achievement…

Davenport Homestead:

Blacksmith #1 – Sharpening Axes: With Big Dave now settled, head over to Big Dave’s Smithy during the daytime & we can scan one of his tasks. We can find Big Dave near his homestead sharpening an axe; an Artisan will be there with him.

At the moment, this is the only scannable task he does – we need to do more Homestead Missions for him.

New York:

Memory #1 – Something On the Side: When we reach New York, follow Benjamin Tallmadge to the market, then follow one of Hickey’s counterfeiters & Eavesdrop on him.

Optional Objective #1 – Perform A Successful Static Eavesdrop: When the counterfeiter reaches his man, we cannot alert anyone while we Eavesdrop; getting up onto a high place is the best option.

Optional Objective #2 – Perform A Successful Eavesdrop While Moving: Tail the counterfeiter again, & this time he will link up with another one of Hickey’s men on the move. Stay behind them, & stick as close to groups of passing Civilians as you can to stay Blended. Once they start talking they shouldn’t turn around, though they can be bumped by Civilians which can cause them to look around…

Optional Objective #3 – Do Not Tackle Or Shove Anyone: This is an easier said than done Objective. Once we locate Thomas Hickey, we will have to chase him through the streets… full of Civilians. This becomes an obstacle course of dodging Civilians as we try to Tackle only Hickey. Hickey also throws down coins behind him which can attract Civilians.

There is no timer however so just focus on staying away from Civilians & wait for a good moment when they aren’t close to Tackle Hickey.

Memory #2 – Bridewell Prison: No sooner did we get to New York… then we would be whisked off to prison. Eavesdrop on some Prisoners near our cell to learn that there is a potential jailbreak happening soon. Go to sleep, & when we wake, we will be taken to the prison common area.

Optional Objective #1 – Limit Prison Guard Deaths to Only 2: While we are plotting the jailbreak, do your best not to get caught or aggravate any Guards; this Optional Objective spans the entire Memory…

Memory #2 – Bridewell Prison: Track down Mason Weems, & he will challenge us to a game of Nine Men’s Morris; fortunately this is a scripted game & we will not play it to completion.

A Prisoner named Finch has stolen Weems’ key, & we will need to Pickpocket it off of him without being detected. This can easily be done just by Blending with the Prisoners beside him.

For the next phase of the plan, we need to get thrown into “the pit” by picking a fight with the Prisoners; remember not to attack any Guards.

Once in the pit, Pickpocket the Warden, & we can now begin the escape. This is where Optional Objective #1 begins in full; do your best to avoid all Guards!

Optional Objective #2 – Reach Hickey Within 2:00 Minutes: When we locate Weems on the upper floor, he will give us access to the “VIP quarters” of the prison. Not only can we still not take out Guards (or at least more than 2) but we must now rush to get to Hickey’s cell in under 2:00 minutes.

Hickey is located on the third floor. Follow in behind the first Guard up to the second floor, then take the set of stairs opposite them to the third floor. You can then just rush to Hickey’s cell & interact with the door before any of the Guards go hostile.
Sequence 17: New York... New York
1. Locations: New York, Temple, The Stadium
2. Sequence #8 Memories: 3
3. Sequence #9 Memories: N/A
4. Side Missions: The Sailor
5. Discovery Missions: Almanacs, Peg Leg Trinkets, Fort Division, Fort Washington, East New York Letters, New York Contracts
6. Homestead Missions: The Proper Tools
7. Naval Missions: N/A
8. Optional Objectives: 72/130
9. Achievements: 26/84
-----------------------------------------------------------------------------------------------------

New York:

Memory #3 – Public Execution: Attend your own execution, & make your way up to the gallows. The moment we are hung, call in our Assassins & we will be rescued… somehow unbeknownst to everyone.

Optional Objective #1 – Do Not Let Washington’s Bodyguards Die: See the Optional Objective below before continuing…

Once we are free of the gallows, we need to reach Washington fast before any of his bodyguards die. Chase after Hickey & deal with the two Guards that come after us. Once they are dead (completing Optional Objective #2) keep after Hickey & attack him from behind before he can kill any of Washington’s bodyguards…

Optional Objective #2 – Kill 2 Enemy Milita: See above.


Achievement #25 – Caged Wolf: Complete Sequence #8.
Story Related. Kill Thomas Hickey, & we will head to Philadelphia with Achilles to speak with George Washington… but by the time we get there, he will have left to New York?

Present Day – The Stadium:


Achievement #26 – Daddy Dearest: Complete Present – Stadium.
Story Related. If you were wondering when it would be time for another Desmond Mission… it is now. Once we reach the stadium in Brazil, follow the neon green signs through the stadium while remaining undetected. Locate the Templar Assassin, Cross, then chase after them to recover the next Abstergo Battery. Why doesn’t Desmond… you know… have a Hidden Blade? I don’t know.

Get the Abstergo Battery, then flee the stadium

Present Day – Temple:
When we return back from Brazil, make sure you head over & plug in the Abstergo Battery we collected; if you are ever unsure where it goes, look up at the walls to spot Juno who will be beside the socket…

Sequence #9:

Davenport Homestead:
Sequence #9 takes place during the Winter & there will be very few tasks we can scan for the Encyclopedia of the Common Man with most of our Artisans staying indoors. Ignore scanning during the period of this Sequence…

Homestead Mission – The Proper Tools: Head over to Big Dave’s Smithy & speak with the man himself. Big Dave will want a better set of blacksmithing tools & ask us if we can buy some for him when we go to New York…

Boston:
As of Sequence #9, all Chests will now be fully available for us to loot. If you still are missing a Chest, it is located inside a Tavern; check all the Liberation Contact markers & enter into their respective Taverns to find the one with the Chest in it.

New York – North:
At long last, it will be time for us to explore New York & clear out the Collectibles here…

New York Chests, Peg Leg Trinkets, Almanac Pages, Viewpoints: Travel around New York & collect all the aforementioned.

Fort Division: We can find Fort Division in the far Northeastern corner of New York almost immediately adjacent from where we enter the city from the Frontier. Kill the Captain, blow up the Powder reserves, & hoist the Patriot flag.

New York – North District Liberation: While in the North District, head to our Liberation Contract marker in the Northwestern corner & speak with Deborah Carter… or Dobby. Now head around to all Liberation Missions we have uncovered & complete them.

Delivery Request – North New York Items: We can find a Delivery Request near the harbor at the Eastern bay of New York North. We will need Cough Syrup x1, Eye Drops x1, Pomade x1, All-Purpose Remedy x1, & Stomach Ache x1. Most of these we will be unable to Craft until we have a higher Level Doctor…

Liberation Mission – Hoarding Provisions: When you have completed all 9 Liberation Missions in New York – North, speak with Dobby & go kill the local Templar Leader.

New York – West:

New York Chests, Peg Leg Trinkets, Almanac Pages, Viewpoints: Travel around New York – West & collect all the aforementioned.

Fort Washington: In the central Western corner of New York – West, we can find Fort Washington near the coastline. Kill the captain, destroy the Powder reserves, & hoist the Patriot flag.

Delivery Request – West New York Items: Just North of Fort Washington along the harbor, we can encounter a Citizen with this Mission. We will need: Salt x1, Venison x5, Hare Meat x5, Elk Meat x5, & Bread x2.

New York – West District Liberation: As we explore the New York – West, we can find the Liberation Contract to meet with Jamie Colley. Complete the 9 instances of Liberation Mission, then return back to Jamie to kill the local Templar Leader.

Boston Brawlers Mission – The Sailor: In the Western corner of New York – West, South of Fort Washington, we can track down our next fist fight competitor, the Sailor; beat up him & his lads…

New York – East:

New York Chests, Peg Leg Trinkets, Almanac Pages, Viewpoints: Travel around New York – East & collect all the aforementioned; these will be the final instances we will need to collect for the rest of the game…

Courier Mission – East New York Letters: Directly North from the current Fast Travel point at the far Southern end of New York – East (& Northwest of the Harbormaster) we can find a Citizen with a Courier Mission. Deliver the 4 Letters across New York…

Assassination Contract – New York’s Contracts: Close to one of the Viewpoints we need to use at the Southern end of New York – East, we will find a Citizen who will give us a list of targets to take out.

Delivery Request – East New York Items: Further Northwest from the previous Viewpoint, & West from the upper most Harbormaster in New York – East, we can find another Citizen with this Mission. We will need to collect Ale x3, Ciders x2, Spirits x2, Tea x2, & Deer Jerky x2.

New York – East District Liberation: Complete the 9 instances of Liberation Mission throughout New York – East then speak with Jacob Zenger to organize how to deal with the local Templar Leader.

Assassin Recruits: To max out the Progress Tracker entries for the Boston & New York Liberation Missions we need to get all 6 of our Assassin Recruits to Level 11 (Assassin Rank). Always keep sending our recruits on Assassination Contracts & do not stop until each recruit is an official Assassin…

If you run out of Assassination Contracts then make a point of summoning your recruits into combat as often as possible. We can repeat the final Contracts in all areas, but can only do them once per day (they do reset, but I am not sure how long it takes).
Sequence 18: Fists of Fury
1. Locations: New York, Boston, Frontier, Davenport Homestead
2. Sequence #9 Memories: N/A
3. Side Missions: The Smuggler, The Stinger, The Ropebeater, The Merchant, The Tournament
4. Discovery Missions: New York Underground
5. Homestead Missions: Cutting Ties, The Proper Tools, Silk Errands, Finding His Flock
6. Naval Missions: N/A
7. Optional Objectives: 72/130
8. Achievements: 28/84
-----------------------------------------------------------------------------------------------------

New York:

Homestead Mission – The Proper Tools: This Homestead Mission can be found in any of the three General Stores in New York; the nice part about this, is that it will mark all three of them on our Map. Head to any one of them, & purchase the Ebony Hammer Handle & the Hardened Steel Hammerhead for 50£.


Achievement #27 – Coureur Des Bois: Exchange undamaged pelts at all 9 different General Stores.
Travel to the remaining three General Stores here in New York & sell them any regular Pelts to unlock this Achievement; they cannot have “Damaged” in the Item name. To obtain a “regular undamaged” Pelt, the Animal must be killed with a melee Weapon or the Bow.

All three General Stores in New York can be found in New York – East. In the Frontier we can find General Stores at the towns in the Monmouth, Concord, & Lexington regions. For Boston we can find General Stores in each of the three Districts.

Homestead Mission – Cutting Ties: Our only other Homestead Mission found here in New York will be close by one of the General Stores in New York – East. Head to it, & a girl named Maria will come at us pleading for help. Her mother is in trouble. Rush over & beat up the (Censored by Steam) bag harassing Maria’s mother, & Ellen, will “thank us”. Fortunately for us, she is a tailor & cannot stay in the city… new Artisan, baby.

Benedict Arnold Missions: In the North corner of New York, we can see a marker called Benedict Arnold Mission. These are completely optional in earnest & do not contribute to Full Synchronization or the Completionist Achievement.

Feel free to complete or ignore them as you like.

New York – Underground:
In the Southern corner of New York – East, close to the Harbormaster here there will be a Fast Travel point. Travel here, & it will be our first entrance into the New York Underground. Like in Boston, navigate the Underground 11 different entrances to unlock as new Fast Travel points.

Note that if you there is a final Fast Travel point that is story locked; our Progress Tracker for New York West Entrances will be stuck at 84% until we beat further into the game…


North Dutch Church: When we reach the fourth Fast Travel point in the New York Underground, it will be the exit to North Dutch Church. The solution for the Magic Lantern here will be Jester on the bottom, the Cross on the left, the Illuminati Eye on top, & the Scales to the right.

St. Paul’s Chapel: For one of the center West Fast Travel points, we will have to solve another Magic Lantern puzzle. The solution for this one will be Sun on top, Mason Symbol to the right, Male Symbol to the left, & the Scales on the bottom.

Trinity Church: Further West of St. Paul’s Chapel, we can find another Magic Lantern (& our final one at that). The solution is Illuminati Symbol on top, Double Headed Eagle to the left, the Crown to the right, & the Mason Symbol on the bottom.

Boston:

Boston Brawlers – The Smuggler: With New York done, it is time for some cleanup. Head to the Mission marker in Boston – North, & defeat the Smuggler in a fist fight… or both of them… in a fist fight.

Frontier:

Boston Brawlers – The Stinger: For our next competitor, travel to the Diamond Basin region & head near the lake to find the Stinger. Beat him in a fist fight.

Boston:

Boston Brawlers – The Ropebeater: Return back to Boston, & we can find the… Ropebeater? in Boston – Central. The Ropebeater is actually quite tough & no Counter will work on him or breaking his defence. Instead, we have to use the environment to defeat him.

Kite the Ropebeater near one of the wooden fence structures that has the large rope going through it & have the Ropebeater put his back to it. Parry an attack, but do perform any Counter & let the Parry time run out instead. As soon as the Parry stops, immediately follow up with an attack & we will kick the Ropebeater over the wooden fence; rinse & repeat.

New York:

Boston Brawlers – The Merchant: Back to New York now & head to New York – North, close to Fort Division, to find the Merchant. Beat him in a fist fight; either break his defence or Counter Throw him.

Boston:

Boston Brawlers – The Tournament: With all competitors taken out, return back to see Harold Ring at the old brewery to join the fist fighting tournament. Put everything we have learned together & defeat the Red Coat, Docker, Surgeon, & the Huntress. They each have their own gimmicks, but they are all easily beaten just by Breaking Defence or Counter/Disarming them.

Davenport Homestead:

Homestead Mission – The Proper Tools: Return to Davenport now & we can bring Big Dave his new hammer.

Blacksmith #2 – Forging Horseshoes: Now that we have a Level 2 Blacksmith, we can find Big Dave working his forge which counts as a scannable task.

Homestead Mission – Silk Errand: We can also go check on our new Artisan, Ellen, & see how she is settling in. She will ask us to grab some silks she left behind at her home back in New York; Fast Travel over there & collect them for her, then bring them back.

Because it is winter time, Ellen will not be performing any scannable tasks for her entry in the Encyclopedia.

Homestead Mission – Finding His Flock: Head to the Mile’s End & head inside to speak with Oliver & Lance… when a priest will wander into the inn, Father Timothy. Just like that, we now have our own church… though we will need to invest 1000£.


Achievement #28 – A Complete Set: See all 10 optional characters settled at the Homestead.
Though Father Timothy is not an Artisan (& does not have an entry for the Encyclopedia of the Common Man) he does still count towards this Achievement. Once he has his church, & all other Artisans have been re-located to Davenport, we will unlock this Achievement.
Sequence 19: The Shard of Eden
1. Locations: Davenport Homestead, Atlantic Ocean
2. Sequence #9 Memories: N/A
3. Side Missions: N/A
4. Discovery Missions: N/A
5. Homestead Missions: Get Me A Doctor, Tools of the Trade, Fool Me Once, The Final Straw, The Wedding, Manor Mysteries, An Eye For Trouble, Slander
6. Naval Missions: The Mad Doctor’s Castle, Oak Island
7. Optional Objectives: 77/130
8. Achievements: 29/84
-----------------------------------------------------------------------------------------------------

Davenport Homestead:

Homestead Mission – Get Me A Doctor!: Outside the Manor, we can find Prudence who will be in distress! Her baby is coming! Rush to Dr. White’s clinic & bring him back to Prudence before the timer runs out – we also have to grab Warren as well.

Homestead Mission – Tools of the Trade: Travel over to Lance’s Woodshop next & he will ask to speak with us. Like Big Dave, he will also need some better tools. Fortunately, we can just go to Boston & collect them, with Lance.

Fast Travel there & walk with Lance to his old shop… but we will discover his apprentice has sold it to someone already. Speak with the apprentice, then tail him to find where he stashed Lance’s tools.

Homestead Mission – Fool Me Once…: Get back to Davenport, then head North up towards Myriam’s Camp to catch up with Norris who now has a better gift for Myriam. Take him over to see her, then we will instead need to help Myriam hunt a few Wolves. Later, she will be attacked by a Burglar, & we will need to kill them.

Homestead Mission – The Final Straw: Head to the center of the community, & we will find a group of the Artisans gathered here. Speak with Godfrey, & we will learn that Ellen’s ex husband has brought a group of men to Davenport to take her daughter away! Quickly rush up to Ellen’s homestead, & beat these guys up!

Don’t pull out a Weapon or we will instantly fail.

Homestead Mission – The Wedding: Next up, head over to Father Timothy’s church & we can find Myriam there. As you can tell from the title of the Mission… Norris’ knife gift may as well have been a ring. Why bother going steady, when you can just get married?

After the preparations have been made, help build up some confidence into Myriam, then walk her down the isle.

Homestead Mission – Manor Mysteries: If you thought the Homestead Missions were done for now, you were wrong, as the wedding has now unlocked even more for us to do. Head up to the Manor, & go speak with Achilles. He will want us to go to New York & pick a painting for him.

Do just that, & retrieve it for him, then bring it back to the Manor.

Homestead Mission – An Eye For Trouble: Head to the Mile’s End inn next, & we can find Big Dave & Oliver behind it… holding a British Guard at gun point. It will not go well.

Blacksmith #3 – Repairing Wagon Wheels: Now that Big Dave is a Level 3 Blacksmith, there is a chance we can find him at the new stable Northeast of his smithy repairing a broken wagon wheel.

Homestead Mission – Slander: Head over to Lyle’s Clinic next & speak with Dr. White. Go to Boston & track down the courier who delivered a slanderous letter to the doctor. We then need to go around the city & bribe a few paper boys to stop spreading fake news about the doctor. Once you find the person in charge of them, either beat his bottom or Pickpocket the tabloids off of him.

Peg Leg: By now, we should have collected all 24 Peg Leg Trinkets from the Frontier, Boston, & New York. Return them all to Peg Leg down at the harbor, & we can unlock our next Naval Location Mission.

Atlantic Ocean – Edinburgh Castle:

Naval Location – The Mad Doctor’s Castle: Break inside the abandoned Edinburgh Castle, & search the inner museum for the next Captain Kidd Scroll.

Optional Objective #1 – Reach the Assailant’s Location Within 1:00 Minute: After reviewing the clues, we will need to quickly get up to the upper balcony of the museum; use the broken bear statue off our right, then use the hanging objects to scale over to it. Even with mistakes, you can do this in around 40s with 20s to spare.

Optional Objective #2 – Solve the Riddle Within 1:00 Minute: Eventually we will navigate back to the grand hall & investigate the clues here. After witnessing another flashback, we have to find a way into the assailant’s secret room. Approach the grandfather clock & set the time to 5:50 or since it is in Roman numerals, V for the hours hand & X for the minutes hand.

Atlantic Ocean – Oak Island:

Naval Location – Oak Island: Now that we have all pieces of Captain Kidd’s Treasure Map, we can pin down the location of Captain Kidd’s final resting place.

Optional Objective #1 – Solve the Riddle Within 5:00 Minutes: After walking a few steps onto Oak Island, Faulkner will repeat Captain Kidd’s riddle to us, & we must then head to all 4 landmarks & solve the puzzles.

Get to each viewpoint, analyze the clue, then shift the symbols around so they match the features below us. This is actually very simple to do & can be done in only 2:00 Minutes.

Optional Objective #2 – Do Not Use Any Ranged Weapons Against Animals: Once we pinpoint the treasure’s location & approach it, we will be attacked by Wolves. Do not use your Bow or Pistol, & instead time your kills with the Hidden Blade QTEs; this is just the most efficient way of killing Wolves in general…

It seems the speed of the QTEs have been increased for these Wolves as well so you have to be very fast!

Optional Objective #3 – Limit Health Loss to Under 30%: If you mess up one of your Hidden Blade QTEs, it is likely the Wolf will do too much damage to you, & you will have to reload the last Checkpoint.


Achievement #29 – Kidd Gloves: Uncover the mystery of Oak Island.
Investigate the intersection point, then unceremoniously blow it open using some Powder Kegs to reveal Captain Kidd’s “money pit”. Dive into it & navigate through the limestone cavern to find the treasure, the Shard of Eden.

Escape the cavern, & we will unlock the Achievement.
Sequence 20: So Uncivilized
1. Locations: Davenport Homestead, Frontier, New York
2. Sequence #9 Memories: 1, 2, 3
3. Side Missions: N/A
4. Discovery Missions: South Boston Items, West New York Items, East New York Items, North New York Items
5. Homestead Missions: N/A
6. Naval Missions: N/A
7. Optional Objectives: 83/130
8. Achievements: 31/84
-----------------------------------------------------------------------------------------------------

Davenport Homestead:


Achievement #30 – Monopoly Man: Send a Convoy to Boston, New York, & the Frontier.
This could have been earned a little while ago with New York now unlocked. Go to the Manor & head to the Accounting Book (every General Store also has an Accounting Book too). First you will need to make sure you have at least three Land Convoys; they can be Crafted with Oak Lumber & Oak Bark.

Toggle over to Trading, select a Land Convoy (Sea Convoys will also work) put any Resource in it (it can just be one cheap thing), & you can see we can send it to Merchants in the Frontier, New York, & Boston (for each of the three General Stores we have discovered). Send a Convoy to a Merchant in each area, & the Achievement will unlock as soon as they go; we do not need to wait for them to return.

Delivery Request – South Boston Items: Now that we finally have high Level Artisans, we can start dealing with this back log of Delivery Requests. If you have not already done so, be sure to loot all available Chests as well as they can contain Recipes we need for Crafting some of these! Scroll between the Stockpile & Crafting to either purchase or Craft all the Items; some Items can only be hunted for.

For this Delivery Request we need: Raccoon Pelts x5, Deer Pelts, x5, Beaver Pelts x5, Buttons x2, & Fox Pelts x3.

Delivery Request – West New York Items: Staying on the Animal train, for this Delivery Request we need: Salt x1, Venison x5, Hare Meat x5, Elk Meat x5, & Bread x2.

Delivery Request – East New York Items: Next up, we will need to purchase/Craft: Ales x3, Ciders x2, Spirits x2, Tea x2, & Deer Jerky x2.

Delivery Request – North New York Items: Next up, we will need to purchase/Craft: Cough Syrup x1, Eye Drops x1, Pomade x1, All-Purpose Remedy x1, & Stomach Ache Remedy x1.

Delivery Request – Central Boston Items: For our final & most expensive Delivery Request to complete, we will need to purchase/Craft: Paper x3, Hair Accessory x2, Toy Dolls x2, Golden Rings x1, & Soap x2.

We can Craft/purchase all Items needed for the Central Boston Items, except for the Golden Rings as we still need Big Dave to reach Level 4 to be able to make them; the Golden Rings will have to be left for Sequence #10…


Achievement #31 – Patent Not Pending: Craft one of Franklin's inventions to decorate your Manor.
First you need to collect all of the Almanac Pages scattered around Boston & New York to unlock the 9 Inventions we can Craft. For this Achievement, we only need to make one Invention, however as a part of our Homestead Progress Tracker, we will have to eventually Craft all 9.

Fortunately, they are pretty easy to make; we can make them all except for the Electrostatic Generator & the Glass Armonica as we need Big Dave to be Level 4.

Fully Upgrading the Aquila: If you have looted all Chests in the Frontier, Boston, & the currently available Chests in New York you should have quite a bit of cash. Now that the bulk of our Delivery Requests have been completed, I strongly recommend making this a priority & keep saving your money…

It will cost a total of 104,500£ to purchase all 8 Aquila Upgrades.

Frontier – Valley Forge:
With all other prior business completed, it is time for us to travel to the newly unlocked Western area of the Valley Forge Region.

Memory #1 – Missing Supplies: Ride to Valley Forge & meet up with George Washington. Speak with him, & he will tell us of a new lead on our next target, Benjamin Church.

George Washington Conversations #1-2: Before we start searching for clues on Church, go follow George Washington as he walks around the camp. As he walks, talk to him; do this twice, & the W marker on our Map will disappear.

For our final Frontier Challenge #2, we need to listen to all of these optional conversations with George Washington; these two conversations can only be heard during this Memory! If you miss them, you will have to Replay it later…

Memory #1 – Missing Supplies: Back at the task at hand, head over to investigate the abandoned church… & we will form an unlikely alliance.

Optional Objective #1 – Catch the Cart Driver Within 30s: Track down the cart that Ben Church was using to take the stolen supplies away & we will find it along with a Mercenary… who will run away. Quickly sprint after & tackle him before 30s runs out. If you start running as soon as we gain control of Connor again, we can tackle him in under 15s.

Optional Objective #2 – Do Not Hide In the Hay Cart While Following the Convoy: Track down the rest of the convoy & we will have to tail them. The obvious & easiest choice to do this is just by hiding inside the Hay Cart in the convoy, but for this Optional Objective, we must tail them on foot without being detected. Fortunately there is very deliberate tree placement along the road…

Optional Objective #3 – Kill 3 Camp Guards Without Being Detected: When we reach the convoy’s destination, we will need to tail the convoy drivers through the camp. As we go, look for opportunities to quickly kill Guard from Bushes or Hay Piles or just lone Guards we can quickly sprint to/Assassinate.

New York:
When we Fast Travel to New York, the season will change & it will now be spring; our Artisans should now be back doing all of their scannable tasks again…

Memory #2 – Father & Son: Meet up with our ally in New York – East near the harbor & we will set out to find Benjamin Church together.

Optional Objective #1 – Do Not Get Detected While Stealing the Mercenary Outfit: When we reach Church’s hideout, we will need to steal a disguise to get past the Mercenaries. Simply approach the Mercenary & Assassinate him, then loot his body; there aren’t really any Guards around to spot us.

Memory #3 – The Foam & the Flames: We will launch directly into the next Memory after we enter into Church’s hideout.

Optional Objective #1 – Limit Ally Health Loss to Less Than 50%: When we go to confront Church, it will be a trap; during the attack, focus on all enemies around our ally to make defending them the priority. Smoke Bombs can be useful to stun the Mercenaries if you get overwhelmed.

Optional Objective #2 – Do Not Take Any Fire Damage: After disposing of all the Mercenaries, they will try to stop us by blowing the whole brewery up & we will have to escape. There is no time limit, so just be aware of where you are running/jumping as you get through the brewery.
Sequence 21: Difference of Opinion
1. Locations: Atlantic Ocean, Davenport Homestead, Frontier, New York
2. Sequence #9 Memories: 4
3. Sequence #10 Memories: N/A
4. Side Missions: Boston Brawlers, Thief’s Club
5. Discovery Missions: Central Boston Items
6. Homestead Missions: The Comeback, Thousand-Pound Idea
7. Naval Missions: N/A
8. Optional Objectives: 86/130
9. Achievements: 33/84
-----------------------------------------------------------------------------------------------------

Atlantic Ocean:

Memory #4 – A Bitter End: Meet up with our ally at the harbor in New York, & we will set off after Benjamin Church in the Aquila.

Optional Objective #1 – Limit the Damages Caused By Collisions to Less Than 20%: When the Memory begins, we will be sailing the Aquila through a tight passage between some cliffs. Since there is no time limit, I recommend dropping down to Half Sails to slow the speed of the ship.

Optional Objective #2 – Stay Within 500m of the Schooner: Initially keeping the Aquila safe will be easy, as we can go as slow as we want, but when we have to chase after a fleeing Schooner, it will become a bit trickier.

Use Full Sails in open spaces to gain distance on the Schooner, but whenever you have to turn more than 10-15° drop your sails down to Half Sails to guarantee your safety. Taking damage from the Schooner’s Cannon fire is fine. Pay attention to strong crosswinds & drop to Half Sails when you encounter them to maintain control.

Optional Objective #3 – Perform A Sequential Kill Streak of 3: Once the Schooner goes through the cliffs, we will be in the home stretch. Deal with the other the Schooner ambush, then use Chain Shot to board the enemy Man-of-War Frigate.

Once we board the Man-of-War, we will need to kill all the Guards on board; the enemies are unlimited so long as the Officers stay alive. Find a group of Guards/Sailors & quickly get a Kill Streak of 3 before going after the Officers…


Achievement #32 – Two If By Sea: Complete Sequence #9.
Story Related. Deal with Benjamin Church, & we will put him & this Sequence to rest…

Sequence #10:

Davenport Homestead:

Homestead Mission – The Comeback: At the turn of the next Sequence, we will of course have more Homestead Missions to complete. Head to Big Dave’s Smithy, & we will find Dave & some of the other Artisans arguing over what to do about the soldiers looking for the big man.

Set up an ambush, & deal with the campaign against Big Dave once & for all.

Homestead Mission – Thousand-Pound Idea: Head over the Lance’s Woodshop next & speak with him about an overdue package he ordered from France. Pop over to see the postmaster in New York, & we will have to reclaim some documents from some goons hired by Lance’s old apprentice. Collect them all, then take them back to Lance in Davenport.

Tailor #1 – Washing Linens: Since it is now spring, we can finally witness Ellen completing her tasks for the Encyclopedia. For one, we can find her scrubbing linens in a washing tub outside her homestead.

Tailor #2 – Sewing Coat: We can find Ellen on the porch of her studio working on a blue coat & white shirt.

Tailor #3 – Alterations With Client: We can find Ellen near her homestead & studio working on clothing alterations for one of our Artisans who is standing on a box.


Achievement #33 – An Extraordinary Man: Complete the Encyclopedia of the Common Man.
This is probably one of our most tedious Achievements to earn in this 100%. As of now in Sequence #10 (springtime), we have access to all necessary Homestead Missions to fully level all our Artisans. This will give us the most opportunities for scannable tasks.

Most Artisans only work during the day, if you need to pass time, load up Sequence #4 – Memory #1 then abort the Memory – when we return to Connor, it will be early in the day. You can see how many more entries you need per Artisan in the Logbook in our Map.

Delivery Request – Central Boston Items: With our Blacksmith now at Level 4, we can finish off this Delivery Request & Craft that one set of Golden Rings.

Inventions: We can also Craft the final 2 Inventions we need to make which will be the Electrostatic Generator & the Glass Armonica.

Frontier – Valley Forge:

Washington Conversations #3: Now that it is Sequence #10, head to the Valley Forge camp on the Frontier & we can see the W marker for George Washington. Head to it, & speak with him about the war effort.

New York:

New York Chests: Now that we have begun Sequence #10, we can locate another 5 new Chests.

Special Iron Ingots: With all Chests now available to be looted, we should also have access to all Recipes. Any & all Items can be hunted, purchased, or Crafted… except Special Iron Ingots. We can find a finite amount in Chests or from beating Homestead Missions, but once they are used, that is it.

Fortunately, we do have an unlimited supply of these from a re-fillable Chest close to our Manor in Davenport; it can only be looted if we have 0 Special Iron Ingots in our Stockpile. To find it, Fast Travel to the Manor in Davenport then run to the cliffs past the nearby stables to the Southeast. Drop down off the ledge overlooking the Aquila in the bay, & there will be a special Chest we can interact with; it will not have a marker on our Map. This Chest will give us a Special Iron Ingot, & will only refill if we expend it/Fast Travel to reset it.

Though we don’t have any Achievements tied to Special Iron Ingot related Weapons… this is just good to know, so you can get the best Weapons in the game.

Boston Brawlers Challenges #3: Since we now have access to all Recipes & an infinite source of Special Iron Ingots, we can also Craft all the Special Item Weapons. Purchase the Weapons you need to from General Stores, then Craft all 19 Weapons to complete this Challenge.

Essentially, you need to own every single Weapon available to equip in the game that is not a Ubisoft Club Weapon.

Thief’s Club Challenges #3: With all Chests now available for us to loot, we can also complete all available Thief’s Club Challenges.

The only Club for us left to complete now should be the Frontiersman.
Sequence 22: Blood Ties
1. Locations: New York, Frontier, Temple, Abstergo
2. Sequence #10 Memories: 1, 2, 3
3. Side Missions: N/A
4. Discovery Missions: N/A
5. Homestead Missions: N/A
6. Naval Missions: N/A
7. Optional Objectives: 94/130
8. Achievements: 36/84
-----------------------------------------------------------------------------------------------------

New York:

Memory #1 – Alternate Methods: Meet up with our ally in New York – West close to Fort George, & we will go to interrogate some British Guards.

Optional Objectives #1 – Use 2 Guards As Human Shields: When the fighting inevitably occurs there will be a horde of Guards below us, & three set back against a wall that will shoot at us. Simply stay within range of those Guards to bait out a firing line shot so we can use a Human Shield twice. This can also be done with the Officers in said “horde”; we only need two kills.

Optional Objective #2 – Tackle the Target From Above: After we apprehend the Guards in the firing line, one will slip away & we will have to chase them down. This Objective is a bit annoying as there is a very specific place we need to aerially tackle the runner.

Immediately sprint after the runner right down an alley, left past a Well, & left again past some fencing back into the streets. This is where it can fall apart as there are a lot of options. Ignore all of them, & run as fast as you can behind the Target until you see the green sign for the Cavelier Pub. Take a left down the following alley & run up a long set of stairs; we can leap off these to tackle the runner.

Frontier:

Memory #2 – Broken Trust: Return to the Patriot encampment in Valley Forge & we will meet up with our ally… & we will learn of a plot to have Kanièn:keh village destroyed.

Optional Objective #1 – Do Not Touch the Ground: This is a bit of a strange Optional Objective but not too crazy; just stay on your Horse as we ride to our village…

Optional Objective #2 – Stop All Patriot Messengers In Under 4:00 Minutes: Of course it couldn’t be easy. Not only can we not touch the ground now, but we will have to chase down & kill all 5 Patriot messengers. Ride down the green marked road, & we can find a messenger tending to a wounded Horse; kill them with your Pistol, then immediately reload it.

Ride further down the road & we will eventually find a group of three messengers riding ahead of us. Ride up behind the first messenger & Assassinate them from your Horse onto theirs. Immediately follow up with another Horseback Assassination &/or kill them with your Pistol(s).

Continue up the road to catch up with the final messenger on a Horse & kill them with your Pistol. We should have plenty of time left on the timer still…

Memory #2 – Broken Trust: Get to our village & we can now safely dismount our Horse. Speak with the Clan Mother about the impending attack.

Optional Objective #3 – Stop Kanien’kehá:ka With Non-Lethal Methods: Our childhood friend, Kanen’tó:kon, has assembled the fighting men from the village & is about to spring an ambush on the incoming Patriot army. We need to stop him. There are 6 warriors sneaking up on the Patriots & we need to take them all out using our Bare Fists. Simply sprint at each one of them & plow them down with a sprinting Fist Takedown; if we have to fight, Disarm them, then beat them down with our Fists.

Memory #3 – Battle of Monmouth: Now we ride to Monmouth… or Fast Travel, to go & warn General De Lafayette. There is going to be a lot going on with this Memory, so pause & quickly read through these next two Optional Objectives.

Optional Objective #1 – Kill 8 Platoons With A Single Cannonball: As the British platoons approach us, we need to shoot them in their center of mass to destroy them; we fortunately do not have to kill every single Guard, just over 3/4 of them.

Optional Objective #2 – Kill 2 Platoons At Once Using A Single Cannonball: Eventually, platoons are going to start bunching up as only the frontmost can attack us. Combining the info from above, we now need to destroy 2 full platoons with only a single cannon shot; doing this Optional Objective will also unlock an Achievement for us.


Achievement #34 – Circus Act: Kill 15 Guards with a single Cannon shot.
Try & shoot in the center of 2-4 adjacent platoons once enough have bunched up & you should complete the above Optional Objective as well as unlock this Achievement.

Optional Objective #3 – Prevent 3 Patriot Executions: After we hold out for the initial 3:00 minutes, we will get overrun & have to flee back to Monmouth which will incur a new 3:00 minute timer. As we run to each waypoint, we will encounter a firing line of Guards about to kill a Patriot. Rush over & kill them all to save the Patriot; each fight can take around 10-30s so keep on eye on the timer.

There will be three waypoints in total, each with a Patriot to save in between them along the road. They are not hidden & easy to find.


Achievement #35 – Grim Expectations: Complete Sequence #10.
Story Related. Flee back to De Lafayette & General Washington, & they will have re-grouped to better fight the British army.

Present Day – Temple:
After we complete Sequence #10, we will be woken up out of the Animus & be presented with our next Desmond Mission. We will also hear from a very old friend of ours…

Present Day – Abstergo:


Achievement #36 – The End Is Nigh: Complete Present – Abstergo.
Story Related. Break into the central Abstergo facility based in Italy, & we will have to rescue our father. Finally, we also get to use a Hidden Blade as well… & boy, his blade is huge. Compensating much?

Fight through the Abstergo facility, kill our brief nemesis Daniel Cross… who is a terrible non-boss, then confront Warren Viddic. Insanely… we also thought it was a great idea to bring the Apple with us on the Mission?!

Present Day – Temple:
As Mr. Miles suggests, you may as well go plug in this new Abstergo Battery in the Temple, as well as the others if you have not already done so. We are reaching the beginning of the end (story wise).
Sequence 23: Vendetta
1. Locations: Atlantic Ocean, New York, Boston
2. Sequence #11 Memories: 1, 2
3. Sequence #12 Memories: 1, 2
4. Side Missions: N/A
5. Discovery Missions: N/A
6. Homestead Missions: N/A
7. Naval Missions: N/A
8. Optional Objectives: 106/130
9. Achievements: 39/84
-----------------------------------------------------------------------------------------------------

Atlantic Ocean – Chesapeake Bay:
Note that this Memory has naval focused Optional Objectives that are much easier complete with an Upgraded Aquila…

Memory #1 – Battle of the Chesapeake: Head down to the Docks at the Davenport Homestead & speak with our first mate, Robert Faulkner, to kick off our operation to kill Charles Lee.

Optional Objective #1 – Destroy 3 Ships Using Only One Broadside Shot: The Memory will commence with a large scale naval battle between the Patriots & the Loyalists in Chesapeake Bay. As we approach the Loyalist fleet we will see 8 ships; for this Optional Objective you want to line up as many Schooners as you can in one shot. Do not fire at any ships, & do circles around them until a good opportunity presents itself.

Once the Optional Objective is complete, dispatch the rest of the fleet.

Optional Objective #2 – Destroy 2 Frigates By Firing On Their Powder Stores: In the next wave of the attack, after the initial 13 ships have been destroyed, clear the first few Schooners. After they are dealt with, 3 Frigates will arrive on the horizon. As the Frigates take damage to their hulls, we can expose the Powder Stores inside them below deck that we can use our Swivel Cannons to snipe.

Destroy 2/3 of the Frigates this way to complete the Optional Objective.

Optional Objective #3 – Counter Kill 5 Enemies: In the final stage of this Memory, we will have to board a Man-of-War. Ram it, board it, & we will have to fight off the crew on deck. Do not attack & simply approach enemies & let them attack you first; Counter Kill 5 of them… Do not perform a Kill Streak as that does not count.

New York:

Memory #2 – Lee’s Last Stand: With the Battle of Chesapeake Bay completed, it will now by time for us to infiltrate Fort George. Use the entrance to the New York Underground & we will have to navigate to a new Fast Travel point. Completing this Memory will also finish off our West New York’s Underground Discovery Task…

Optional Objective #1 – Remain Undetected On the Way to the Signal Fire: All Optional Objectives are tied to this one essentially. We have to reach the signal fire undetected while also under 3:00 minutes. The rooftops are the safest way to the signal tower, though there are the occasional Sniper up here you will have to watch out for; they can easily be taken out using our Bow.

When you reach the signal tower, you will most likely want to kill the 3-4 Guards around it so you can safely ascend to the top. You should be able to light the signal fire with a full minute to spare…

Optional Objective #2 – Reach the Signal Tower In Under 3:00 Minutes: See above.

Optional Objective #3 – Limit Health Loss to Under 50%: Though with us from the start, after we light the signal fire, we have to still complete the rest of the Memory with at least half our health left. Once we find Charles Lee, it will complete fortunately.


Achievement #37 – Difficult End: Complete Sequence #11.
Story Related. With the signal sent, Fort George will be bombarded by the French ships in the bay & we can set off, fully intact, to go take down Charles Lee…

Sequence #12:

New York:

Memory #1 – Laid to Rest: Attend the funeral & confront the last remaining Templar leader… we probably could have been a bit less overt with our approach.

Optional Objective #1 – Limit Regular Kills to Only 3: Escape from our Mercenary captors, & we will have to swim aboard the HMS Jersey. As part of the Memory, we cannot be detected, but try to refrain from Assassinating any of the Guards as we sneak aboard. If you are patient, you don’t have to kill anyone.

Sneak around the ferry & Eavesdrop on the different conversations; of all the Guards you may kill, there is one that is watching where we need to climb around to Eavesdrop on the ship Captain that may be worth killing…

You MUST only kill 1/3 Guards however as we need to kill the Captain who counts towards this Optional Objective. If we kill just one other Guard, we will fail this Optional Objective!

Optional Objective #2 – Escape the HMS Jersey Without Entering Into Open Combat: See below.

Optional Objective #3 – Kill the HMS Jersey’s Captain: Before we can leave the HMS Jersey, we must kill its Captain; we must do this without entering combat & while also still keeping our kills below 3.

As crazy as it sounds, simply going immediately after the Captain & clipping them with a Poison Dart is the best way to clear this Objective. After the Eavesdrop, they will exit the cabin & begin walking to the front of the ship with a Guard behind them. Carefully round the corner, & hit them with a Poison Dart before they head down the stairs; Poison Darts are as silent as they get & will keep us undetected. Just be sure to wait for them to die before jumping overboard…

Boston:

Memory #2 – Chasing Lee: Now we end this. Head to the Green Dragon Tavern in Boston, where it all began, & we can learn the location of where Charles Lee is.

Optional Objective #1 – Stay Within 50m of Lee: Lee will flee the harbor when we find him & we will have to chase after him. 50m is pretty close, but for the below Optional Objective we cannot push any Citizens; dodging Citizens should your priority. Ignore all combat from Mercenaries as well & just run past them; we cannot shove Mercenaries either unfortunately...

Optional Objective #2 – Do Not Shove Anyone During the Chase: See above.

Optional Objective #3 – Do Not Take Any Fire Damage: Eventually we will chase Lee into the burning hull of a ship. We still need to stay within 50m of him, but now prioritize your pathfinding & not running/jumping into any open flame. This is actually a bit tricky as the path (though it is linear) doesn’t appear that way & it is easy to accidentally enter fire believing it is the way you are supposed to go.


Achievement #38 – Perfectionist: Complete 100% of all Main Mission constraints.
Chase down Lee & complete Memory #2. If you completed all Optional Objectives in all Main Memories (not including Optional Objectives from the separate Naval Missions), we will unlock this Achievement.


Achievement #39 – The Sum of Truth: Complete Sequence #12.
Story Related. It isn’t over until it is over. Track down Charles Lee to a remote tavern in Monmouth… & put an end to the Templars. For Kaniehtí:io!

Take the First Civilization Amulet from Charles Lee, & hide it somewhere… only our ancestors will find.
Sequence 24: Juno
1. Locations: Temple, Davenport Homestead, New York, Frontier
2. Side Missions: All Remaining
3. Discovery Missions: Frontier Contracts, Valley Forge Items, All Remaining
4. Homestead Missions: Wait Times, Legacy, Achilles’ Painting
5. Naval Missions: N/A
6. Optional Objectives: 106/130
7. Achievements: 41/84
-----------------------------------------------------------------------------------------------------

Present Day – Temple:


Achievement #40 – No Good Deed Goes Unpunished: Open the Temple Door & learn Desmond's fate.
Story Related. Now that we finally know the location of where Connor hid the First Civilization Amulet, we will head to Davenport to collect it. Bring it back to the Temple, & use the Amulet to break the final seal… … … … .. & witness my least favourite plot twist of the entire series.

Davenport Homestead:
After Desmond “saves the world” we will return to playing as Connor after he had buried the First Civilization Amulet. Though they have no entry on our Progress Tracker, we will have some final Epilogue Missions to complete.

Animus Hacks: With Sequence #12 completed, we will be notified that we have unlocked a whole list of “Animus Hacks” which are in game cheat codes you can use. Note that while they are enabled, the Animus Hacks will disable our Achievements which could mess up your game! I strongly recommend staying away from these until you 100% the game.

New York:

Epilogue Mission #1 – Evacuation Day: Travel to New York & head to the Eastern harbor where we can find our Mission marker on a carriage.

Frontier:

Epilogue Mission #2 – Kanatahséhtpn: Next, head to our village in the Kanièn:keh region & we can speak with a Hunter staying here… our people have been evicted…


Achievement #41 – Fin: Complete each of the Epilogue Missions unlocked after the Credits roll.
Story Related. & that was it. Once we have completed both of the Epilogue Missions, we will unlock this Achievement.

Now it is time for the clean up.

New York:

Washington Conversation #4: Return to New York now that the Epilogue is done, & we can see the W marker for George Washington at the Southwest end of the city close to Fort George. Here we can find the Commander pacing around a small monument; speak with him, & he will talk to us… about Bocci.

This is the final conversation we need to do; the first three can only be accessed during Sequence #9 while George Washington is at Valley Forge. If you still need those, you will have to replay Memory #1.

Frontier:

Frontiersmen Challenges #3: Fortunately, the final Challenges we need to do for the Frontiersmen are very easy & you most likely have already completed all of them.
1. Reveal all of Boston’s Map.
2. Reveal all of New York’s Map.
3. Reveal the whole Frontier Map.
4. Reach all 30 Viewpoints.
5. Discover all Underground network entrances in New York & Boston.
6. Visit every Tavern in the Frontier, New York, & Boston.

The first 5 Challenges are self explanatory & by using all of the Viewpoints, you should have all the areas fully explored. What you will have left to do is most likely visit all Taverns. Taverns are marked by a white dice denoting that there are games on our Map – most often also saying Tavern as well. Alternatively, it will be marked with the Liberation Contract marker.

There are 4 Taverns in Boston, 5 Taverns in New York, & 4 Taverns in the Frontier found in the (2) Lexington, (1) Concord, & the Southwest end of (1) Monmouth above Fort Monmouth.

Assassination Contract – Frontier’s Contracts: Close to the Last-Drink Tavern in the Monmouth region, we can now also find our last Assassination Contract; travel around the Frontier & kill the final set of 5 Targets.

Delivery Request – Valley Forge Items: As our final Mission for the entire Discovery tab, head to the old Patriot encampment in Valley Forge & we can find a road heading down towards the ocean at the Western exit of the camp. The road will lead to a waterwheel, where we can find our last set of Delivery Request Items.

These Items will be: Bear Grease x1, Deer Marrow x3, Rabbit’s Foot x5, Elk Heart x1, & Fox Tail x1. These are all the rare drops for the listed Animal & may require you to kill multiple before you get their Item. Fortunately, this is not too egregious & you may already have the Items…

Davenport Homestead:

Homestead Mission – Wait Times: Head down to the Docks at Davenport, & we can find Dr. White working on a patient. Speak with him, & he will need assistance; go & grab Godrey’s wife Diana… Terry’s wife Diana? Go & grab Diana & she will help him. Head around the Docks now & do some patchwork assistance to tide the Sailors over until they can see the doctors…

Homestead Mission – Legacy: Head to the Manor next & enter into Achilles’ study…

Homestead Mission – Achilles’ Painting: Inside the Manor, head over to the dining room & we can finally go & set up the painting we collected for Achilles a while ago.

As of now, we should have 100% Synchronization in the: Main Missions tab, Side Missions tab, Discovery tab, & the Homestead Mission tab. All that should be left for us to do now are the Navel Missions & the Navel Contracts.

With a fully Upgraded Aquila, we will spend the last little bit during the Base Game playing Privateer in Connor’s retirement…
Sequence 25: Arr Ya Ready, Kids?!
1. Locations: Atlantic Ocean
2. Privateer Contracts: Sinking A Secret, The Ghost War Act 1, The Ghost War Act 2, Henderson In Distress, Paving the Way, Dread of Night, Blistering Dawn, A Call For Help, Search For the Sommerset
3. Optional Objectives: 112/130
4. Achievements: 41/84
-----------------------------------------------------------------------------------------------------

Atlantic Ocean:
There are two different types of optional Missions we can complete using the Aquila: Naval Missions & Privateer Contracts. Our Privateer Contracts will be marked by a white ship helm…

Privateer Contract – Sinking A Secret: There are no Optional Objectives for this Privateer Contract; simply play it through to completion.

Privateer Contract – The Ghost War Act 1: Next, we will sail after the Windermere & sink its privateer fleet. There are also no Optional Objectives for this Privateer Contract.

Privateer Contract – The Ghost War 2: For our final open sea ship assault, we will have to take down the Leviathan.

Atlantic Ocean – Saint-Augustine:

Privateer Contract – Henderson In Distress: For this Privateer Contract, we will have to defend a friendly Man-of -War against British privateers.

Optional Objective #1 – Limit Ally Health Loss to Under 50%: For the duration of this Privateer Contract, we cannot let the Henderson drop below half health. Play very aggressively & make full use of taking out Gunboats & even the damaged Schooners using our Swivel Cannons.

Privateer Contract – Paving the Way: There is a disturbance near a local lighthouse, & we must investigate it.

Optional Objective #1 – Destroy 3 Ships By Ramming Them: As we circle the lighthouse, an ambush of 10 Schooners/Gunboats will attack us; destroy at least 3 of these by ramming them.

Privateer Contract – Dread of Night: For this Contract, we must hunt down & destroy the infamous, Saint James.

Optional Objective #1 – Limit the Damages Caused By Collisions to Less Than 25%: As we chase the Saint James, simply do not run into any of the rocks/cliffs along the way. Just follow in its wake & you should have no issues…

Atlantic Ocean – The Bahamas:

Privateer Contract – Blistering Dawn: For this Contract we have to clear out some British Gunboats scouting our new trade route.

Optional Objective #1 – Limit Damage Taken to Under 25%: We will have to destroy 2 enemy Schooners & 2 enemy Frigates. The Schooners are simple enough, but you will want to be sure to take cover if being bombarded by the Frigates.

Privateer Contract – A Call For Help: Rendezvous with the Independence & defend it from the enemy ambush.

Optional Objective #1 – Limit Ally Health Loss to Less Than 75%: There will be a fleet of 17 ships attacking us & we must make sure that the Independence takes as little damage as possible.

Privateer Contract – Search For the Somerset: Now we set sail to go & destroy the privateer ship, the Somerset.

Optional Objective #1 – Limit the Damages Caused By Collisions to Less Than 25%: This is probably the easiest Optional Objective out of all the Privateer Contracts as all we have to do is sail through these first set of rocks as we head to the Sommerset’s last known location. Once we are past these first rocks… that is it.
Sequence 26: Orpheus of the Argonauts
1. Locations: Atlantic Ocean
2. Privateer Contracts: Troubled Waters, Raiding the Prospector, One of A Kind, The Sea of Wolves, A Midnight Engagement, The Giant & the Storm
3. Optional Objectives: 118/130
4. Achievements: 42/84
-----------------------------------------------------------------------------------------------------

Atlantic Ocean – Louisbourg:

Privateer Contract – Troubled Waters: Now we will move on to the next trade route, Louisbourg. To start, we will be tasked with clearing out the British privateers patrolling the region.

Optional Objective #1 – Limit Damage Taken to Less Than 50%: When we discover the privateers, we will have to destroy all 3 of them & take as little damage as we can; they will all be Frigates.

Privateer Contract – Raiding the Prospector: Further down the trade route, we will need to destroy the enemy vessel, the Prospector. Destroy the initial 8 Gunboats, then we will need to get into the ambush position.

Optional Objective #1 – Sink the Fleet Within 1:30 Minutes: When we spring the ambush, we will only have 1:30 to destroy all 11 ships. Focus on the Prospector first as it is a Brig, & as we reload our Broadsides, plunk away at the other ships using our Swivel Cannons. Use Heat Shot for the Prospector, & swap to Grapeshot to take out the other ships; it will take two direct hits from Heat Shot to kill the Prospector quickly.

This is the second hardest of all Privateer Contract Objectives by far & requires a lot of luck…

No joke, I won my Objective with only 4s to spare & the Prospector (which I shot once) rammed itself into the rocks & died which saved me a lot of time…

Privateer Contract – One of A Kind: For our final Privateer Contract on this trade route, we will need to guard the entrance of a channel for 4:00 minutes against waves of ships. Fortunately, they are more interested in attacking us then actually breaching the canal.

Grapeshot is very handy to take out multiple Gunboats/Schooners at once.

Optional Objective #1 – Sink A Frigate: This sounds easy, but when you remember we have to park at the canal entrance it becomes a bit trickier. The Frigate spawns at the 2:30 minute mark & there will actually be two of them. Clear out the ships from the first assault, & when it is safe, sail out of the channel to engage the Frigates; use Heat Shot.

Atlantic Ocean – Virgin Islands:

Privateer Contract – The Sea Wolves: We need to safely escort 8 Merchant Ships to their destination & protect them against privateers. A short way into the Contract, we will be attacked by 4 ships.

Optional Objective #1 – Complete the Contract With Less Than 4 Allied Casualties: Of the 8 Merchant Ships, we can only lose 3 during this Contract; there is friendly fire so be careful of that! The Merchants are pretty decent at evading the enemy; just pick off one Frigate at a time using Heat Shot.

It is extremely easy to ram into the Merchant Ships accidentally & kill them so be extra vigilant! My only ally casualties were because of me not paying attention & ramming into them…

Privateer Contract – A Midnight Engagement: Next we must chase down & destroy the privateer ship, the Greyhound, along with its fleet.

Optional Objective #1 – Limit the Damages Caused By Collisions to Less Than 25%: When the Contract begins, we will have to sail through some rocky passes; do not ram into the rocks & take your time as we chase after the Greyhound. We won’t really get the option to fight it properly until we get through the passes anyways…

Atlantic Ocean – Virgin Islands:

Privateer Contract – The Giant & the Storm: Now we must take out the Orpheus… during a storm.

Optional Objective #1 – Sink 3 Ships By Firing On Their Powder Stores: After we sink the initial 5 Schooners, the rest of the fleet will arrive. The Orpheus will be a Man-of-War accompanied by 2 Frigates; all of them need to be destroyed by Powder Store demolitions... easier said than done. The Powder Stores are located at the front sides of the ship’s hulls close to their rams.

The Man-of-War is the easiest to do this against as it can take the most damage, but the Frigates are basically made of glass, & it is very easy to overkill them. The easiest way to expose the Powder Stores is not that obvious, but it is the most reliable way & that is to ram the ships where the Powder Stores are located. Unfortunately, if you have a maxed out Ram (which you probably do), a direct hit from our Ram will also most likely one shot the Frigates… So what you must do is a second or two before you are about to ram the enemy’s hull, you need to fully collapse your Sails down from Full to Half to No as fast as you can just before impact. This takes some practice to do, but that is literally the only trick & will only take one of these slowed down ram attacks to expose the Powder Stores – occasionally it may take two if you slowed down too soon.

Always start with the Man-of-War first as it is the easiest to do while also being the most dangerous to us. As soon as the ships spawn, b-line directly for the Man-of-War. You will most likely have to take cover from a Rogue Wave along the way which won’t give you much time to recover & get into position. If you are lucky, the Man-of-War will have stayed course directly at you & you can go right into a slowed-ram. If you are unlucky, it may have started to drift off to the side making a ram at the front difficult or impossible. Not grounds for restarting, but it means you will have set up your rams on the go.

While we fight the Man-of-War (or after we destroy its Powder Stores) switch to Chain Shot & take out the masts of both Frigates; the Frigates are way more finicky & it is easier to set up our slowed-rams if they are stationary. You could also do this to the Man-of-War, but I found it is much more dangerous while stationary as all it can do is shoot its hundred Broadsides at us with more accurate aim. You can also opt to ignore using Chain Shot on the Frigates as it does take some extra time to do as well, but only if you are confident you know where to slowed-ram them.

Once the Frigate’s masts are destroyed (or if you ignoring that step) line up your approach head on with a Frigate & use a slowed-ram to expose their Powder Stores. Rinse & repeat. Be careful you don’t accidentally “double tap” the Frigate with your Ram after you expose the Powder Store. Sometimes the waves will make you bounce & your Ram will strike the ship twice, & destroy it before you can blow up the Powder Store… As soon as it is exposed shoot immediately with your Swivels & try to veer your Ram away from the ship.

This has to be one of the most frustrating Optional Objectives in the entire game & is the only one I had to come back to another day to attempt...


Achievement #42 – Entrepreneur, Not Pirate!: Complete all 15 Privateer Contracts.
This Achievement will unlock regardless of if you completed all the Optional Objectives or not.
Sequence 27: Burying the Hatchet
1. Locations: Atlantic Ocean
2. Naval Missions: The Chase, The Rescue, French Involvement, Biddle’s Hideout
3. Optional Objectives: 130/130
4. Achievements: 44/84
-----------------------------------------------------------------------------------------------------

Atlantic Ocean:
Now all that we have left to do is complete all 4 Naval Missions; much easier to do than the final Privateer Contracts by far.

Naval Mission #1 – The Chase: Naval Missions are marked by golden coloured Templar markers on our Map of the Atlantic Ocean. Sail off the coast of Martha’s Vineyard & we will encounter a friendly Schooner under attack by British ships.

Optional Objective #1 – Limit the Ship’s Damage to Under 50%: Escort the Merchant Ship to safety & do your best to keep the enemy from damaging it. For the most part, we can quickly take out the enemy Schooners using our Swivel Cannons.

You can hit enemy Schooners from quite a ways a way using the Swivel Cannons & can essentially snipe them long before they engage with the Merchant Ship.

Optional Objective #2 – Use a Mine to Eliminate Gunboats: In the second half of the Mission, we will encounter strings of Mines set up above the water that we need to take out using our Swivel Cannons. From here on, we can shoot them & destroy enemy ships if they are nearby; there should be a Schooner stuck to a string of Mines very shortly after destroying the first scripted line.

Optional Objective #3 – Limit Damage From the Fort’s Mortars to Under 50%: Once the Merchant Ship is safe, we will be diverted into chasing some raider ships towards an abandoned fort… that is no longer abandoned. The Mortars shoot in straight lines & if you can see them forming, avoid them; you can also reduce your sails to Half Sails or even cut them entirely to dodge bombardments. If you are sailing through a bombardment, always take cover & brace.

Our Swivel Cannons are useless against the Fort towers & they must be destroyed using our Broadside Cannons.

Navel Mission #2 – The Rescue: Rendezvous with one of Faulkner’s old friends, Amanda Bailey, & we will get a lead on our final remaining Templar. Remember him? Hey-diddle-diddle? It’s Nicholas Biddle? Do people say that?

Optional Objective #1 – Limit Damage From Rogue Waves to Under 25%: As we sail over to rescue a Merchant Ship under attack, we will also be sailing into a storm & encounter Rogue Waves. When a Rogue Wave approaches, take cover to nullify the damage we receive from it.

This is a simple Objective as we are basically signaled when to take cover by a bell; there will be 3 Rogue Waves we have to brace against.

Optional Objective #2 – Limit the Number of Missed Shots to Only 2: There will be 4 Schooners attacking the Merchant Ship & we can only miss 2 of our shots to take them all down. You can still use your Broadside Cannons, & so long as one of the many cannonballs shot strikes a ship, it will not count against the Objective.

Optional Objective #3 – Destroy 2 Frigates By Firing On Their Weak Points: When the Merchant Ship is safe, we will chase after the Randolph through the storm. After we are close to catching up with it, we will be engaged by 2 enemy Frigates.

Avoid ramming the Frigates & focus on getting body shots using our Broadside Cannons instead. Do enough damage to their hulls mostly towards the front, & it should reveal the Powder Keg stores below deck; destroy them with our Swivel Cannons. Destroy both Frigates this way.

I found these Frigates much more durable than the ones we had to destroy with the Orpheus. If you are having issues, repeat the same strategy of disabling them with Chain Shot & slow-ramming them.

Navel Mission #3 – French Involvement: For this Mission, semi-unrelated, we will have to escort the French ship La Belladonna to Boston.

Optional Objective #1 – Limit Damage to La Belladonna to Under 50%: As we escort La Belladonna to Boston, we will of course, be attacked. Prioritize its safety over our own & keep it safe at all costs. Fortunately, La Belladonna has cannons, & will defend itself…

Optional Objective #2 – Sink More Enemies Than La Belladonna (11 Kills): However… we cannot allow La Belladonna to defend itself. WE need to be the heroes here, & we have to sink more enemy ships than it. Prioritize sniping Schooners with our Swivel Cannons for quick/easy kills.

The first wave of enemies will have 9 ships to destroy & the second wave only 6 ships.

Optional Objective #3 – Kill the Officer In Under 1:00 Minute: Naturally, a Man-of-War ship will also arrive but instead of destroying it, we have to board it. Swap to Chain Shot, & aim at the ship’s masts to take them down. As soon as we board the Man-of-War, ignore all other enemies & sprint towards the marker where the Officer is; this can be a finicky Objective as we can only kill the Officer when he officially enters combat with us.

Naval Mission #4 – Biddle’s Hideout: For our final Naval Mission, we finally put a stop to Nicholas Biddle. Chase after his personal ship, the Randolph…

Optional Objective #1 – Take Out the Men-of-War Within 3:20s: Before we engage the Man-of-Wars, see the below Optional Objective first. Once it is completed, sail after the two galleons & go all out on them; the closer you are to them, the easier it will be.

Optional Objective #2 – Destroy the Randolph’s Mast With A Single Broadside: This is a misleading Objective as you do not want to actually use your Broadside Cannons, you want to use Chain Shot instead. As soon as the fight begins, opt to complete this Objective first as it is the most specific, & line up a Chain Shot as soon as the Randalph comes into line of the Aquila’s broadside.

Optional Objective #3 – Kill Only Biddle: Easy. When we board the Randolph, just b-line straight to Nicholas Biddle & kill only him – ignore everyone else.


Achievement #43 – All Washed Up: Complete all 4 Naval Missions aboard the Aquila.
Complete the 4 Navel Missions & defeat the final Templar, Nicholas Biddle, to unlock this Achievement.


Achievement #44 – Completionist: Complete 100% in all Progress Tracker grid entries.
If you have earned 100% in your Progress Tracker (DNA Tracker) we will unlock this Achievement. To do this you need to:
1. Beat all 42 Memories & complete all of their Optional Objectives
2. Join all Clubs, beat all their Missions, & all Challenges
3. Liberate all 3 Districts in Boston & New York
4. Have all 6 Assassin Recruits reach Level 11 (Assassin)
5. Collect all Almanacs, Chests, Feathers, & Peg Leg Trinkets
6. Find all 4 of Captain Kidd’s Letters & find the Shard of Eden
7. Liberate all 7 Forts
8. Discover all Fast Travel Points in the Boston & New York Underground
9. Complete all Assassination Contracts, Courier Missions, & Delivery Requests
10. Beat all 4 Naval Missions & all of their Optional Objectives
11. Fully Upgrade the Aquila
12. Beat all 6 Naval Locations & all of their Optional Objectives
13. Beat all 15 Privateer Contracts & all of their Optional Objectives
14. Complete all 35 Homestead Missions
15. Craft all 9 Benjamin Franklin Inventions

52% Complete
Sequence 28: The Infamy
1. Frontier
2. Episode #1 Memories: 1, 2
3. Optional Objectives: 3/10
4. Achievements: 45/84
-----------------------------------------------------------------------------------------------------

DLC Breakdown – The Tyranny of King Washington: (10)
Story Related: (4)
Secondary Objectives: (3)
Slay: (2)
Miscellaneous: (1)


With the Base Game completed, it is now time for us to move on to the Tyranny of King Washington DLC which can be selected from the Main Menu of Assassin’s Creed 3; this is automatically included in the Remastered Edition. You can create a brand new game or “load in” your Save from the Base Game; always choose to start a brand new game & do not use your import in the third Save Slot called “Player”! If you use the import Save Slot there is a bug where all your Side Mission & Collectibles progress will not Save & you are forced to beat each entire Episode in one sitting to achieve 100% Synchronization. If you start a brand new Save Slot, you will not have this issue. Fortunately, we do not actually receive anything by importing our Save File to the DLC so it really serves no purpose other than making the 100% much more difficult.

There are 3 different Episodes we need to complete & the Achievements are relatively the same: Beat the Episode Boss, earn 100% Synchronization (complete all Optional Objectives), along with an Episode specific Achievement regarding the “special power” we earn during it.

Whether are not this DLC is “cannon” story-wise though… I have no idea.

Episode #1 – The Infamy:

Frontier:

Memory #1 – Awaken: Start Episode #1, & we will awaken from having a strange vision of George Washington holding the Apple of Eden. Awaken… to see our mom, Kaniehtí:io… alive. Rescue a woman being attacked by Bluecoats, & we will need to rush to save the people of Concord!

Optional Objective #1 – Kill 5 Bluecoats At the Church While Remaining Undetected: When we arrive at Concord it will be raided by a group of Bluecoat soldiers. Before we open the church doors to save the Civilians inside, we need to sneak around & kill 5 Bluecoats; we unfortunately do not have our Hidden Blades, but we can sneak up behind them to knock them out quietly with our Bare Fists equipped.

It is easiest going after the Bluecoats around the left side of the church as they are spread out well.

Memory #1 – Awaken: Once the first Optional Objective is complete, we can go blood n’ guts & kill the remaining Bluecoats however we like to free the people in the church. We will then have to go & take out some Bluecoats firing cannons at the town.

Optional Objective #2 – Prevent Any Bluecoat Reinforcements From Reaching Concord: Similar to what we had to do back in Sequence #10, we will need to fire a cannon at platoons of Bluecoats & stop them from advancing into Concord. You need to one-shot each platoon as if one soldier survives, we will be unable to reload/fire again in time to kill them.

We will be attacked by snipers that we can shoot, but if there are active platoons approaching, focus on them instead & just take the damage. If you are able to clip the sniper’s platoon, but not fully kill them, then you can keep their numbers low as they won’t re-spawn unless the whole platoon is killed. You can also align your shot in the center of the road to simultaneously kill the Bluecoat platoon as well a sniper platoon as well. Unfortunately, the sniper platoons are unlimited…

After destroying a few platoons, two enemies will ride by on Horses that we need to stop. You only have one shot, & need to kill both with it. You will want some lead time on your shot as well & it may take a retry or two to learn the timing.

The wave order is: 3 platoons, 1 cavalry squad, 1 platoon, 1 cavalry squad, 2 platoons, 1 cavalry squad.

Optional Objective #3 – Do Not Permit Any Bluecoat Runner to Light A Fuse: With Concord safe, we now have to rush to the defence of Lexington next. Fortunately this time we are on foot which is much easier to deal with these guys… Ignore the Bluecoat soldiers as best as you can & just focus on running after one… runner… to the next.

Memory #2 – Warn the Village: After the Bluecoat’s assault has been thwarted, we must rush back home to our village to warn everyone about the invasion. Why does everyone speak English here now & not their native language? Who knows…

This Memory fortunately does not have any Optional Objectives to complete.


Achievement #45 – Uniquely Familiar: Receive an unexpected gift in Episode #1.
Story Related. Back at our village, we will finally receive our Hidden Blade & unlock our first DLC Achievement.

After the battle at our village, we will awaken inside a cave with the survivors. The only way to stop the Mad King, will be to call upon the strength of the Great Willow… As of now however, we will gain free roam in the Frontier. While we can pursue Memory #3, there are Side Missions we need to complete for our 100% of Episode #1…

Looting the Frontier: There are 3 types of Citizen Missions to complete, & 3 Lucid Memory Artifacts to collect. The Citizen Missions are random spawns & we will chip away at these in between Memories or looting whenever we see an instance appear. There are also 27 Treasures we can loot but these are optional & not required for 100%; the “Small Chest” icons will only re-supply our Consumables but the “Large Chest” icons have a chance to give us brand new Weapons to use or Capacity Upgrades & are definitely worth pursuing.

I recommend going after all the Treasures (even the Small Chests) as well as the Lucid Memory Artifact before pursing Memory #3. On route to these, we should encounter at least 2/3 of all our different Side Mission instances which will be very handy.


Note that this is not an exhaustive list of all Side Mission locations & only the ones I encountered during the course of the DLC. If you find new Instances not covered in the Map – bonus!*

When travelling around the Frontier, I recommend sticking to the roads as that is usually where the different Side Mission instances will be spawning near.

Lucid Memory Artifacts: There are 3 Lucid Memory Artifacts we need to interact with in this Episode. The first is found in Lexington & should already appear on our Map. The second will be found at the church in the center of the Valley Forge Bluecoat encampment at the far Western end of the Frontier; we should uncover it enroute to the mass of Large Chests here… The third & final Lucid Memory is found in the small bay just Southeast of the Kanatahséton village at the Northern end of the Frontier.
Sequence 29: Death to the Traitor
1. Frontier
2. Episode #1 Memories: 3, 4, 5, 6
3. Optional Objectives: 10/10
4. Achievements: 48/84
-----------------------------------------------------------------------------------------------------

Frontier:

Memory #3 – Sky World Journey: When you are done looting the Frontier, head to the Memory Start at the Red Willow & speak with Teiowí:sonte about the Sky World Journey. Climb up to the top of the willow, collect some its bark, & we can now brew the tea.

Optional Objective #1 – Don’t Touch Any Rocks During Slides: After we drink the tea, we will hallucinate some spectral Wolves we have to follow behind. Chase after them, & we will eventually reach a snow slide; as we travel down it, steer yourself out of the path of the rocks in our way. There will be 4 slides in total we have to get through; the first 3 are easy but the 4th slide is slightly more difficult. Not by much fortunately…

Optional Objective #2 – Kill the Elk Without Alerting It: As we have been going down the slides, we will have been tracking an Elk. After the slides are done, it will be time for us to kill the Elk. We will also have earned our new Wolf Cloak ability. The Elk is very close nearby, so just active Wolf Cloak & quickly locate/kill it.

Memory #3 – Sky World Journey: When we awaken after the dream, our equipment will have somehow been stolen from us & we will need to reclaim it from the Bluecoats. Take this opportunity to get as many kills in Wolf Cloak as you can; we need to kill 25 enemies while cloaked for the A Wolf In Sheep’s Clothing Achievement.

Memory #4 – One-Man Wolf Pack: With our equipment retrieved, head to the next Memory Start & we can speak with Teiowí:sonte’s brother. Teiowí:sonte has been captured by the Bluecoats.

Optional Objective #1 – Kill 2 Bluecoats With A Single Arrow: Analyze the 4 clues in the marked area & we will be able to track him down. Equip your Bow & head down the path ahead where we will see two Bluecoat Scouts running ahead of us. Follow in behind them, then hold down the fire button when they are running in a line to charge a more powerful shot, release the Arrow & kill both with one shot. This cannot be done as a Reflex Shot & must be a manually aimed/charged shot.

This is the only chance we have to earn this Objective, if we carry on, it will fail.

Optional Objective #2 – Call the Wolf Pack to Chase Down the Guard: We will shortly reach a small prison camp where some Bluecoats are assaulting a woman. Here we will learn how to use the Wolf Pack & summon three spectral Wolves to assist us in combat. One Bluecoat will survive, & run away from us; we must kill him using our Wolf Pack ability.

Memory #5 – Path of Revenge: Go & see the Clan Elder, & she will give us our first of three main targets, Benedict Arnold.

Optional Objective #1 – Use No Stalking Bushes During the Eavesdrop: Enter into Lexington, & we will have to Eavesdrop on two Bluecoats; while we Eavesdrop on them, we cannot use any bushes/shrubs to Blend. Use Wolf Cloak whenever possible as an easy means to follow along. Exit Wolf Cloak when the coast is clear to quickly regain your health before re-entering it.


Achievement #46 – A Wolf In Sheep’s Clothing: Kill 25 enemies while staying cloaked in Episode #1.
A very easy to do Achievement as we play through Episode #1. Simply kill/Assassinate Bluecoats while you are in Wolf Cloak at every opportunity.

Memory #6 – Justice Served: Head to the Bluecoat encampment in Valley Forge & get ready to take down our first target. With ease, use Wolf Cloak to sneak into the camp & then tail Israel Putnam to where he is meeting with Benedict Arnold at the Fort in Black Creek.

Optional Objective #1 – Free the Bear Without Killing Or Alerting the Guards: As we go to infiltrate the Fort, we will need to create a distraction. Outside the Fort will be a Bear in a cage guarded by some Bluecoats. Simply use Wolf Cloak to sneak behind the Bluecoats, & open the cage. Just like that.

Optional Objective #2 – Stay Undetected In the Fort: Once the Bear creates the distraction, we can then use Wolf Cloak to sneak inside the Fort undetected.


Achievement #47 – West Point Payback: Defeat Benedict Arnold in Episode #1.
Story Related. Locate Benedict Arnold within the Fort, & Assassinate him…

Side Mission Mop Up: If you still need to complete some Side Missions in Post-Episode, complete the instances that spawn, place a Marker down where they appeared, then run away a good distance. Run back to your Marker if you ran away far enough & the instance will respawn letting you farm out the last few you need to complete. Consult the linked Map above for some instance locations for the Side Missions.

Alternatively, after the game Autosaves when you completed a Side Mission, quit the game & reload to have it reappear for you to repeat…


Achievement #48 – Frontiersman: Reach 100% Synchronization in the Frontier in Episode #1.
Story Related. To earn 100% Synchronization in Episode #1 we need to:
1. Complete all 6 Memories
2. Complete all 10 Optional Objectives
3. Find all 3 Lucid Memory Artifacts
4. Complete all 3 Side Missions

Looting all of the Chests is optional however it will give us new Weapons & Capacity Upgrades which carry over into subsequent Episodes…
Sequence 30: The Betrayal
1. Boston
2. Episode #2 Memories: 1, 2, 3, 4
3. Optional Objectives: 6/17
4. Achievements: 49/84
-----------------------------------------------------------------------------------------------------

Episode #2 – The Betrayal:

Memory #1 – Prison Break: As soon as the Episode begins, we will find ourselves trapped inside the Boston prisons; use Wolf Cloak into tricking the Guards that you have escaped to have them open our cell.

Optional Objective #1 – Kill 3 Guards Undetected: Collect our Bow & free our friend, Kanen’tó:kon, before leaving our cell block. There are more than a few Guards between us & the next exit. Get down to the lower level, & use Whistle to lure Guards to Blend spots or around corners to take them out quietly. Alternatively, you can simply use Wolf Cloak to dispatch them expediently…

Memory #2 – Sky World Journey: As we are about to escape the prison, we will take it upon ourselves to partake in another Sky World Journey. During this journey, we will meet the Eagle.

Optional Objective #1 – Save All the Eggs: After we climb to the top of the tree to first interact with the Eagle, we will then be returned to the ground & have to defend a nest full of 3 Eggs. We will be attacked by a few waves of wild animals; kill them all during the QTEs.

Optional Objective #2 – Chain 3 Eagle Flights, Twice: When the Eagle’s nest is safe, we will earn the Eagle Flight ability. To “successfully” chain together Eagle Flights, we need to fly to three different locations without breaking Eagle Flight (staying as an Eagle). Not all sections of the course lend themselves to chaining Eagle Flights, but do your best to anticipate where the next landing is & spam Eagle Flight to try to chain to it next.

When you get to the Leap of Faith that is the end of this section & if you have not completed this Optional Objective, you will have to reload.

Optional Objective #3 – Avoid All Obstacles: After performing the Leap of Faith we will now enter free flight as an Eagle. This is actually a bit of a frustrating Objective as the Eagle’s response time is sub-optimal. I actually recommend staying as low as possible as you typically fly under objects as opposed to over them. What’s more is that “free flight” is a bit of a stretch as you cannot actually fly that high; if you fly as high as you can, you are almost guaranteed to hit low “tunnel obstacles”. You really do want to stay as close to the spectral Eagle as possible & follow its movements to make it through…

Memory #3 – Dive Bomb: When we awaken back out of the Sky World Journey, Kanen’tó:kon will inform us that the Bluecoats have sounded the alarm in our absence.

Optional Objective #1 – Kill All Guards While Remaining Undetected: See below.

Optional Objective #2 – Perform 3 Eagle Assassinations In the Warehouse: When we fly around to kill the first two Guards in the warehouse, more will enter & we will have to kill all 5 of them undetected. As well, we need to kill at least 3 of them using an Eagle Assassination. It is easiest to work from back to front. Use Eagle Flight to get behind everyone, then manually aim at a Guard to see the option for an Eagle Assassination.

This can be a bit finicky & even if there is no way you should be detected for doing the Eagle Assassination, just know that you might for no reason.


Achievement #49 – Frequent Flyer: Use Eagle Flight to travel 1km in Episode #2.
For the sake of earning an easy Achievement early, once all the Guards are killed in the warehouse just fly back & forth across the room with Eagle Flight up in the rafters; the room is roughly 100m long so you only need to go back & forth a few times to unlock the Achievement.

This can also be done at any point during the Episode & will probably unlock naturally for you while completing Side Missions…

Optional Objective #3 – Use Eagle Assassination to Kill Franklin: When we exit the warehouse/prison we will have to put it all together. As we chase Franklin across the rooftops, quickly overtake & get ahead of him using Eagle Flight then aim & Eagle Assassinate him.

Memory #4 – Consequences: After we deal with Franklin, the King will come & attack us during the “requiescat in pace” cinematic… which is actually pretty cool.

There are no Optional Objectives for us to complete.

Boston – Free Roam: Like we had to do in the Frontier, we now have a set of 4 Side Missions we need to complete along with finding the Lucid Memory Artifacts.

For Side Missions there are: Attack Convoy (4), Help the Hungry (5), Rescue Civilian (4), & Wolf Rescue (2).


Note that this is not an exhaustive list of all Side Mission locations & only the ones I encountered during the course of the DLC. If you find new Instances not covered in the Map – bonus!*

Fortunately, with how small the Boston area is, it is very easy to run back & forth between Side Mission instances to continually repeat them until they are completed.
Sequence 31: Putn'am In Their Place
1. Boston
2. Episode #2 Memories: 5, 6, 7, 8, 9
3. Optional Objectives: 17/17
4. Achievements: 51/84
-----------------------------------------------------------------------------------------------------

Boston:

Memory #5 – Return to Sender: After you are done exploring around Boston, head to our next Memory Start marker. We need to track down Benjamin Franklin & will enter into a Bluecoat tavern to get some information.

Optional Objective #1 – Capture 2 of the Opponent’s Pieces: In the tavern, we will start to play a game of Checkers; we don’t need to win the game, but we at least need to take out 2 of our opponent’s pieces. For whatever reason though, we cannot swap to the Tactical Camera & have to play looking at the board sideways…

Checkers is different from Fanorona; you have to “hop” your pieces over your opponents if there is a space behind them to capture them. Again, we do not have to win the game, just capture 2 pieces, so you can be a bit reckless. We need to capture 2 pieces before the Eavesdrop finishes as well!

Memory #5 – Return to Sender: Tail the Courier we Eavesdropped on, steal their letter to Putnam, then quickly re-plant the letter back on them.

Optional Objective #2 – Kill Both Sentinels Within 20s of Each Other: Head to the meeting location set up by Franklin & there will be two Snipers guarding the area. As soon as we Assassinate one, the 20s timer will appear; quickly cover the ground using Eagle Flight to kill the second Sniper.

Wait for Franklin to arrive & apprehend him to complete the Memory…

Memory #6 – Man of Mettle: Return to the hideout with Ben Franklin & our next task will be to retrieve a special metal that will allow us to infiltrate King Washington’s fortress in New York.

Optional Objective #1 – Steal the Horse Undetected: The blacksmith that was supposed to have Franklin’s special metal… ended up making an officer at one of the nearby Forts a set of horseshoes with it. Now we need to make off with an entire Horse. Travel to the Fort, & use Wolf Cloak to infiltrate it & get to the Horse unseen.

All we need to do is mount the Horse undetected to complete the Objective. Get onto the Horse, then we can gallop out of the Fort.

Memory #7 – Pieces In Motion: With the special metal delivered to Franklin, now we will need to obtain the diagram he will need to craft our item. Travel to another Bluecoat tavern & speak with the man who is supposed to have the diagram… of course, he will only give it to us if we beat him in Checkers…

Fortunately, we do not actually have to do that & there is no Optional Objective for it. Play enough turns to learn what we can from the officer, then “Rage Quit” & beat him with the game board.

Optional Objective #1 – Use 3 Contextual Attacks During the Bar Fight: After we end the game of Checkers, one way or another, we will start a bar fight with some other Bluecoats. There are only three objects we can use to do this; basically, only ever use Counter/Throw on the Guards to keep them alive until you can kite them to one of the objects… Initially there are only 3 Guards, but after they are dealt with, another 3 will arrive & another 3 after that, so we have a few tries.

Optional Objective #2 – Remain Undetected During the Investigation: After we leave the tavern, we now need to investigate what that officer had told us. Use Wolf Cloak to stay undetected, & use Raw Meat to distract any Guard Dogs.

Analyze the two clues then interrogate a witness to learn more about what became of our friends.

Memory #8 – Aquila Unchained: Report back to the hideout & Ben Franklin, & it will almost be time to make our move. First, we need disguises.

Optional Objective #1 – Remain Undetected While Stealing the Uniform: Exit the hideout & we will only have 5:00 minutes to steal a uniform. While we do this, we also cannot get detected. As soon as we begin, immediately use Wolf Cloak & quickly knockout the Target with our Bare Fists as fast as you can before he walks too far. Then, dip in & out of Wolf Cloak to Assassinate all other nearby patrolling Guards; there will be around 5-6 you will want to take out.

Once it is clear, we can pick up the Target’s body & safely walk it back to the hideout with plenty of time left to spare. The further away you let the Target get, the harder it is to remain undetected getting his body back to the hideout…

Optional Objective #2 – Use An Animal Power to Kill A Guard Menacing Franklin: See below.

Optional Objective #3 – Remain Undetected While Protecting Franklin: Now that Franklin has his disguise, we must escort him out of the city while staying undetected. As we go, occasionally Bluecoats will stop Franklin & harass him; just Assassinate them while in Wolf Cloak to complete the Objective. We will also be using Wolf Cloak a lot to remain undetected as we travel…

Memory #8 – Aquila Unchained: Meet up with our very own Robert Faulkner, clear out the harbor, & release the Aquila!

Memory #9 – Escape to New York: Storm the harbor with our crew & get them to safety aboard the Aquila.

Optional Objective #1 – Save All Crew Members: When we get to the end of the harbor, the sailors will begin swimming to the Aquila & we will have to hold off waves of Bluecoats. Be hyper aggressive & kill them as quickly as you can to prevent them from killing any of our crew…

Optional Objective #2 – Kill Putnam While Using An Animal Power: When Putnam shows up, we will only have 20s to kill him; simply target him for an Eagle Assassination. Easy.


Achievement #50 – Blindsided: Defeat Putnam in Episode #2.
Story Related. Kill Israel Putnam at the Boston docks to complete Episode #2 & earn this Achievement.


Achievement #51 – The New Tea Party: Reach 100% Synchronization in Boston in Episode #2.
Like the previous Episode, to earn 100% Synchronization we need to complete:
1. Complete all 9 Memories
2. Complete all 17 Optional Objectives
3. Complete all 4 Side Missions
4. Collect all 3 Lucid Memory Artifacts
Sequence 32: The Redemption
1. New York
2. Episode #3 Memories: 1, 2, 3, 4
3. Optional Objectives: 9/14
4. Achievements: 52/84
-----------------------------------------------------------------------------------------------------

Episode #3 – The Redemption:

New York:

Memory #1 – Dark Waters: As soon as the Episode begins, we will be thrust into naval combat aboard the Aquila & have to fight our way to the New York harbor.

Optional Objective #1 – Successfully Brace When Attacked 5 Times: This is a pretty easy one to do & can be done just by letting the enemies shoot at us before we destroy them. It can be a bit finicky of what counts & what doesn’t count as a “successful brace” which is why it is easiest to keep all enemies alive.

The easiest way to earn this is to have the Schooner chase you from behind & constantly brace against its Grapeshot blasts.

Optional Objective #2 – Do Not Hit Any Rocks In the Minefield: After we approach an old wreckage, we will have to navigate in through a minefield. While we head through it, avoid all rocks in our way; there is no timer so just go slow & drop your sails if you must to make tight turns.

Optional Objective #3 – Destroy 80% of Washington’s Armada In the Upper Bay: Once we are through the mines, we will attack the Bluecoat navy in the upper bay. Open up with destroying the mines & use Swivel Cannons to take out the Gunboats. We will then have to destroy 4 Frigates & a Man-of-War with another 2 Frigates & 4 Schooners arriving after we take a few of them out. Ignore the Man-of-War & opt to go after the weakest targets first. We will hit 80% when only two ships remain in the fleet.

Memory #2 – Sky World Journey: Though we can go free roaming in New York straight away, we probably should go pay our respects to Kanen’tó:kon. So, right in the middle of the street… we will go on another Sky World Journey.

Optional Objective #1 – Do Not Touch the Ground: Shortly into the journey, we will encounter a colossal Bear that we need to remove 4 spears from. After we remove the first spear, we can no longer fall down & touch the ground below; this is fortunately very east to avoid. Use Eagle Flight to navigate along the floating platforms.

Optional Objective #2 – Do Not Take Damage From Washington’s Guards: After we gain the Bear Might ability, we will be attacked by spectral Bluecoats. Just spam use Bear Might as we approach King Washington; there is about a two second delay before we can use it again so keep that in mind.

New York – Free Roam: Our Side Missions in New York are identical to the ones in Boston. To start, navigate around to loot the Treasures & you should encounter most if not all instances you need. Also be on the lookout for the 3 Lucid Memory Artifacts.


Note that this is not an exhaustive list of all Side Mission locations & only the ones I encountered during the course of the DLC. If you find new Instances not covered in the Map – bonus!*


Achievement #52 – Aftershock: Kill 125 enemies using Bear Might in Episode #3.
Bear Might trivializes most of our encounters with Bluecoats though you can most likely only use it twice in a single battle before your health gets too low. As we go around completing the Side Missions, be sure to use Bear Might as often as you can; the Achievement will not take long at all to unlock.

Memory #3 – The Parting of the Blue Sea: Meet up with Franklin outside King Washington’s pyramid, & we must help the rebels out in their assault.

Optional Objective #1 – Kill 50 Bluecoats: Ah perfect, a fun Optional Objective. During the assault, go ballistic & use Bear Might as often as you can for maximum devastation. Make sure not to destroy at least one of the three gates near the end of the fight until you complete the Objective.

Memory #4 – Feeding the Masses: Link up with the rebel leader, Thomas Jefferson, after the initial assault & we will need to devise a plan of how to stop the King. First, we need to win over the masses & to do that, they need food.

Optional Objective #1 – Kill Fitzwilliams While Remaining Undetected: Tail Fitzwilliams over to his food storehouse using Wolf Cloak & we can now finally kill the man. We can very easily clip him with a Poison Dart to complete this Objective without even exposing ourselves.

Optional Objective #2 – Do Not Let the Cart’s State Dip Below 50%: When Fitzwilliams is dead, steal the Food Cart or rather ask a farmer to do so, & we will need to defend it as it travels through the city; keep the next Optional Objective in mind for this section as well... To keep the integrity of the Food Cart, do not actually ride on it, & instead run ahead of it – this will let us get to the enemies much faster & stop them from getting too many shots off. After the second wave, sprint ahead of the Food Cart & quickly use Bear Might to blow up the Powder Kegs in our way.

There are fortunately only three waves/encounters we have to deal with…

Optional Objective #3 – Perform 3 Double-Eagle Assassinations: As we go, typically there will be groups of 2 Snipers that will emerge to shoot at us; aim at them in Eagle Flight & kill them both in a Double Assassination. We should earn this during the second wave of enemies.
Sequence 33: By the People, For the People
1. New York
2. Episode #3 Memories: 5, 6, 7, 8
3. Optional Objectives: 14/14
4. Achievements: 54/84
-----------------------------------------------------------------------------------------------------

New York:

Memory #5 – One Step At A Time: Link back up with Jefferson, & we will now have to cause unrest in New York to rally the support of the populace. Similar to Liberation Missions, travel around & complete small tasks to boost Civil Unrest. The different task types are: Beat-Up the Orator, Hang Bluecoat In Busy Street, Escort the Rebel Leader, Assassinate Bluecoat Officer, Destroy Cannons, & Destroy Statue of Washington. There are 24 different instances total & we only need to complete 9.

Complete three tasks, & we will have to go speak with Benjamin Franklin. Complete another six tasks & we can head to the markets to observe the rebellion.

Memory #6 – The Signal: Return to Jefferson & we will start setting the plan in motion.

Optional Objective #1 – Save At Least 3 Firing Squad Victims: As we go to find Jefferson’s spy, we will encounter a firing squad about to kill them as well as some Civilians. Immediately engage the firing squad before they have a chance to fire a single shot & all 3 Civilians will survive, along with the spy.

Optional Objective #2 – Reach the Tower Using Only Chained Eagle Flight: Once the spy is saved, we now need to get to the tower on the fort & set it ablaze. We cannot take a single step once this Optional Objective begins & can only use Eagle Flight. We cannot break out of Eagle Flight & stop the chain either; our feet cannot touch any surface. Once we are on the tower, the Objective will complete – we just need to reach any section of it in the Eagle Flight chain. Once at the tower, we can climb up to the top normally…

Optional Objective #3 – Kill 5 Guards With One Use of Bear Might: Once the tower is on fire & we speak with the spy again, the Powder Kegs will be in place. Reach the base of the tower & we will engage the nearby enemies; bait a group of at least 5 Bluecoats close together, & kill them all using one blast of Bear Might.

Memory #7 – Halls of Injustice: Now that the rebellion is in full motion, meet up with Jefferson & Franklin outside of King Washington’s pyramid. The pyramid interior of course functions like a classic Assassin’s Creed tomb.

Optional Objective #1 – Do Not Kill Any Animals In Washington’s Zoo: As we navigate through the pyramid, we will encounter some Bluecoat Guards & enter into the King’s private zoo. We need to analyze some clues lower down where the Cougar & Bear are; use Wolf Cloak to stay hidden in the enclosures.

Optional Objective #2 – Open the Throne Room Door In Under 1:00 Minute: When we reach the throne room door, we will have to complete a puzzle to open it. The puzzle is to move the three sets of wooden sliders to form the Apple of Eden; no exposed red/white portion of the underside must be showing. Move the pieces until the wood is one solid chunk, & the throne room door will open. Make sure all the little black lines & circles in the wood are exposed…

Memory #8 – Inevitable Confrontation: Climb to the top of the pyramid & we will have our final boss battle with King Washington. Cycle through each of your Animal Powers: Wolf Cloak 2, Eagle Flight 1, Wolf Cloak 2, Eagle Flight 1, & Bear Might 3


Achievement #53 – First In the Hearts: Defeat George Washington in Episode #3.
Story Related. Use our Animal Powers in a pretty easy final boss fight, & put a stop to King Washington once & for all to earn this Achievement.


Achievement #54 – If I Can Make It There: Reach 100% Synchronization in New York in Episode #3.
To earn 100% Synchronization for this DLC we must complete:
1. All 8 Memories
2. All 14 Optional Objectives
3. Complete all 4 Side Missions
4. Collect all 3 Lucid Memory Artifacts

64% Complete
Sequence 34: AC - Liberation: Remastered
1. Location: New Orleans
2. Sequence #1 Memories: 1, 2, 3, 4, 5, 6, 7, 8, 9
3. Constraints: 4/59
4. Pocket Watches: 1/10
5. Achievements: 57/84
-----------------------------------------------------------------------------------------------------

Achievement Breakdown: (30)
Story Related: (8)
Secondary Objectives: (7)
Collectibles: (5)
Slay: (8)
Miscellaneous: (2)

With all of Assassin’s Creed 3 completed, it will be time for us to begin Assassin’s Creed – Liberation. Through the Remastered Edition of Assassin’s Creed 3, you must select Assassin’s Creed – Liberation as soon as you begin the game in Steam; this is not accessed through the Main Menu of Assassin’s Creed 3. The Achievements for Assassin’s Creed – Liberation are identical to its standalone version…

Sequence #1:
At the start of Sequence #1, we will be locked into completing the first few Memories before we will be able to free roam.

New Orleans:

Memory #1 – Only A Nightmare: When the game begins, we will be playing as Aveline when she is in her youth. Chase after a chicken, then quickly go to re-locate your mother. It will only be a dream however, & we will shortly return to the present…

We will now have to fight off some Slavers & enter a combat tutorial.

Memory #2 – New Orleans By Night: Awaken from the dream… within a dream, & we will see a rushed intro to our character where we will dawn our Assassin Armor. Get to the pigeon coup to receive our contract instructions, then make your way to the designated Viewpoint.

Memory #3 – A Slave In Trouble: Before we drop down off the Viewpoint, make sure you use it; we will need to synchronize with all 19 Viewpoints in the game for an Achievement. When you are ready, head to the designated Dressing Chamber & we will learn a new feature unique to Assassin’s Creed – Liberation, Personas. As we head around the city, make a point of looting as many Chests as you can along the way; we will need lots of money for our 100%...

Sneak aboard the marked Cart Wagon, & we will infiltrate the nearby plantation. Speak with some of the Slaves, then we will have to rescue one of their sisters, Thérèse.

Memory #4 – The Safe House: Thérèse will be badly injured & need our help to escape the city. Go to a local Tailor & purchase some new Traveling Clothes for her for 50₠‎. Once they are purchased, return back to De Granpré’s Mansion.

Memory #5 – Taking Care of Business: Though we can now wander around, we will be locked into our Lady Persona at the moment which is not ideal for exploration. Continue to the next Memory & tail Gérald to the harbor then bribe the trading ship Guards & Charm Captain Dominguez to be allowed on board to view the ship’s logbooks.

Constraint #1 – Avoid Killing Anyone: This Memory will have our first Optional Objective to complete; in Assassin’s Creed – Liberation, they are referred to as Constraints. Simply follow along with what the Main Objectives are & do not aggravate any of the local Guards… or kill them, obviously.

Memory #6 – Father’s Troubles: Now we must search around the docks to find all the stolen cargo from our father. Use Eagle Vision to track the thief’s footsteps & we will be led to a warehouse…

Constraint #1 – Charm At Least 1 Guard: Standing in front of the warehouse doorway will be a Guard. Do not kill them, & instead opt to Charm them out of our way to complete this Constraint.

Locate the two stashes of stolen cargo, then return to Maxent to tell them that they have been found…

Memory #7 – The Key to the Problem: Meet up with Gérald, who is our Assassin contact, & we will need to plan our next steps. To start, we will need to purchase a new Dressing Chamber.


Achievement #55 – My 1st Dressing Chamber: Buy your 1st Dressing Chamber.
Story Related. Using the money we received from Gérald, purchase the marked Dressing Chamber & we will unlock this Achievement.

Memory #7 – The Key to the Problem: Change into our Slave Persona, & tail the nearby mansion’s Butler to Pickpocket a Key off him to infiltrate the Governor’s Mansion.

Memory #8 – The Colony’s Good: We will get a choice if we want to enter the mansion grounds as the Slave Persona, or go change into the Lady Persona.

Constraint #1 – Enter the Mansion Dressed In the Lady or Slave Guise: Though inferior to the other Personas in my opinion, the Lady Persona is essentially a total stealth option. To complete this Constraint & give us the easiest time for this Memory, I recommend changing into the Lady Persona; if need be, purchase whichever Dressing Chamber is closest to save you travel time…

Choose either the Slave or Lady Persona, & infiltrate the Governor’s Mansion to locate his personal office.

Constraint #2 – Kill the Governor Using A Musket: Enter into the Governor’s office… & he will flee, & Guards will enter the room. Kill them, & be sure to pick up one of their dropped Muskets. If you are mid combat when the Governor approaches, deliberately use sprint around the room to break it so you will be able to grab a Musket. Once you have a Musket kill the Governor through melee or by shooting him…

New Orleans – Free Roam: Before we leave to the Bayou, take the time to go around to use all 11 Viewpoints scattered around New Orleans as well as looting all the available Chests, & buying all 10 Dressing Chambers.

We can also earn a side Achievement or two as well while we are at it… For the Thief Achievement, we need to Pickpocket 5000₠; this will take quite a while to accumulate so it is best to chip away at this whenever you can.

Pocket Watch #1 – Cartographer’s Watch: As we explore around the city, keep your eyes open for wandering Smugglers who sell Small Arms, Consumables, as well as Pocket Watches which are a special Collectible. At the moment, we can only purchase the Cartographer’s Watch which will be 1250₠.
Smugglers can be found just East of the cemetery at the top North end of the city as well as along the Southeast end of the lower harbor.


Achievement #56 – Machete: Kill 5 Guards in 15s using only the Sugarcane Machete (without using the Chain Kill).
We will start the game with the Sugarcane Machete though you may need to go to a Weapon Shop to equip it. Once you do, run around & get a group of Guards to follow you around; if possible, opening up with a sprinting execution may be handy. Then you need to Counter/Kill 5 Guards in under 15s which is very doable; we cannot kill them using the Chain Kill Ability as the Assassin Persona. If you are lucky, getting a Double Counter/Kill is very helpful.

Memory #9 – The Escape: When you are ready to go, head to the destination Northwest of the plantation, & we will leave to the Bayou.


Achievement #57 – Sequence #1: Complete Sequence #1.
Story Related. Go to exit New Orleans & we will be attacked by some Guards. Deal with them & we will complete Sequence #1, & unlock this Achievement.
Sequence 35: A False Shepherd?
1. Location: The Bayou
2. Sequence #2 Memories: 1, 2, 3, 4, 5, 6, 7
3. Constraints: 9/59
4. Pocket Watches: 2/10
5. Alligator Eggs: 1/12
6. Citizen E: 1/6
7. Achievements: 61/84
-----------------------------------------------------------------------------------------------------

Sequence #2:

The Bayou:

Memory #1 – The Loas Guide You: When we reach the Bayou, we will read a letter from our mentor, Agaté. Follow the markers & track him down to his hideout.


Achievement #58 – Swamp Queen: Tree Run for 10 branches without touching the ground.
This is a very easy Achievement to unlock as we just need to jump to 10 different branches, not to 10 different trees; there are many good spots across the Bayou with multiple trees full of branches we can jump between.

Memory #2 – The False Mackandal: When we locate Agaté’s home, speak with him, & we will receive a new piece of equipment… the Blowpipe, which will allow us to now use Fast Poison.

Constraint #1 – Complete the Mission In Under 2:00 Minutes: As soon as the Memory begins, quickly strike the target with the Blowpipe. Climb up the nearby tree, & use free aim to strike another target. Leap off the tree into a pile of leaves, then use Reflex Shot to hit a final target & complete the Memory.

Memory #3 – Meet the Smugglers: With the Blowpipe tutorial done, go back to speak with Agaté to figure out the next steps for how to deal with this new impostor; make your way to the Smuggler’s Hideout.


Achievement #59 – Death By Poison: Kill an enemy with a Poison Dart.
See below.


Achievement #60 – Predator: Kill an enemy from a tree, with the Blowpipe, while using Eagle Vision.
Now that we have the Blowpipe & can use Poison Darts, we can earn both of these Achievements at the same time. When travelling through the Bayou, look for trees above Guards we can get into; tilted logs also apparently count. Get into the tree above the Guard, enter Eagle Vision, then free aim & strike them with a Fast Poison Dart to unlock both Achievements.

Memory #3 – Meet the Smugglers: When we reach the Smuggler’s Hideout, we will have to kill three marked Thugs that are leading the provocation against the Smugglers.

Constraint #1 – Kill 1 Guard Using Fast Poison: Simply have your Blowpipe equipped & use it to dispatch any one of the patrolling Guards in the area; it can even be one of our initial targets.

Pocket Watch #2 – Engraved Watch: While we are in the Smuggler’s Hideout we can find a Viewpoint & Dressing Room we can unlock. We can also find a Smuggler who will sell us a new Pocket Watch for 1875₠.

Memory #4 – A Faithful Acolyte: After exploring the Smuggler’s Hideout, head to the next Memory Start & we can find Élise. Canoe upriver with her & we will have to fight off an Alligator before we reach the Acolyte’s hideout. After the Alligator is defeated, we will loot our first of twelve Alligator Eggs which is one of the Collectibles we need for the Collector Achievement.

After we beat this Memory, Alligator Nests will now appear on our Map when we get close to them. If you encounter them, grab the Alligator Egg, but there isn’t much point in searching for them all; in Sequence #4, we will gain access to a bunch more Collectibles we need to find so we may as well save the Collectible hunt for then…

Constraint #1 – Kill the Followers In 3:00 Minutes: When we reach the hideout, rush in & quickly kill the 8 Followers; 3:00 Minutes is a generous time, & killing them is pretty easy by Kill Streaking.

Memory #5 – The Second Camp: Regroup with Élise & we will move on to the second Follower camp where we can locate the Acolyte.

Constraint #1 – Kill Only the Acolyte: The Followers in this camp are acquaintances of Élise & she will not want us to kill them… so we won’t. Tail the Acolyte until they reach “somewhere secluded” & kill them, then loot the Chest they are near; you can technically alert the Followers when you kill the Acolyte, but must go hide to lose your Notoriety without killing anyone else before you loot the Chest.

Memory #6 – Eve of Saint John: We must now head to where the Bayou Witch Doctor is in the Northeastern end of the Bayou speaking with Élise. Canoe upriver with her to the ritual site, & we will prepare to Assassinate the Mackandal…

Constraint #1 – Perform A Double Assassination From the Air: Once we reach the congregation, we will need to get past two Guards who will stop us from continuing to the ritual site. Take this as the perfect opportunity to Double Assassinate them (from the air) to deal with them. Climb up the nearby trees & dispatch the two Snipers along the way. Get above the two Guards, then drop down onto them performing a Double Assassination.

Memory #6 – Eve of Saint John: Reach the Mackandal & defeat his bodyguards before finally Assassinating him in turn. Once the Mackandal is dead, there will be a bit of an immersion break as someone speaks to us about a “missing piece to the puzzle”.

Use Eagle Vision, & identify a Citizen E that we must kill; there are a total of 6 Citizen Es scattered throughout the areas of the game & we must kill them all to obtain the secret “True Ending”… Kill the Citizen E, & we will witness an extended conversation between Mackandal & De Ferrer speaking about what? The Templar Order of course.

Memory #7 – The Whole Truth: Return to Agaté’s hideout, & report that we have completed his task…


Achievement #61 – Sequence #2: Complete Sequence #2.
Story Related. Finish Memory #7 of Sequence #2 & we will complete it, unlocking this Achievement.
Sequence 36: Promesse du Paradis
1. Location: New Orleans, The Bayou
2. Sequence #3 Memories: 1, 2, 3, 4, 5, 6, 7, 8
3. Constraints: 15/59
4. Pocket Watches: 2/10
5. Alligator Eggs: 1/12
6. Jeanne’s Diary Pages: 1/30
7. Citizen E: 1/6
8. Achievements: 62/84
-----------------------------------------------------------------------------------------------------

New Orleans:

Memory #1 – At the Pub: After a three year time jump, we will be back in New Orleans. To start, let us head down to the harbor & we will need to track down Captain Dominguez to get some more intel on De Ferrer.

Jeanne’s Diary Page #1: We will receive our first Diary Page at the end of Memory #1. As of now, these can be collected throughout the world; there are 30 in total we need to collect…

Memory #2 – Prelude to Rebellion: Head downstairs in De Grandpré Mansion & start the next Memory. Exit the mansion & we will have to investigate some nearby protesters.

Constraint #1 – Use Your Fists to Knock Out Opponents: Things will turn violent & we will be forced to use our charm & grace as armor… for this Constraint, do not use your Hidden Blades & take out the Guards using your Bare Fists instead.

Memory #2 – Prelude to Rebellion: After the kerfuffle, head to the Warehouse & we will be able to check out our official Assassin’s HQ. Here we will be introduced to the new Trade System that will be our new source of passive income. We will also receive the Parasol Gun which we need to use to kill 25 enemies with for an Achievement…

Buying Ships: For the Shipmaster Achievement we need to purchase the maximum amount of Trade Ships which is 8. This will require quite a lot of money which is why keeping up on the Trade System is important. There are 4 different types of Ships we can buy which are: the Galleon for 3700₠, Schooner for 4000₠, Barque for 8000₠, & the Brigantine for 9000₠. For the Achievement, buying an additional 7 Galleons is the cheapest option by far; later on, selling off your Galleons & replacing them with Barques is the best “bang for your buck” for trading due to there storage capacity.

Memory #3 – Elegant & Deadly: Since we are still locked into playing as the Lady, continue on to the next Memory. After we deal with some competition, we will no be introduced to buying up Shops; unfortunately, these do not generate passive income for us, but it does reduce the cost of items.

Further on into the Memory, we will need to become the Assassin & travel back to the Bayou.

The Bayou:

Memory #4 – Vanishing Slaves: Head to the Bayou & speak with the Witch Doctor about the vanishing Slaves. As we speak with him, he will also give us the new Berserk Poison we can now use…

Go speak with Élise, then track her down again to travel to… the Fort.

Constraint #1 – Race Through the Checkpoints Faster Than Élise: Meet up with Élise for the second time, & she will want to race us to the convoy. This is a simple foot race, & very easy to do given that our base sprint speed is faster than Élise’s. There is only 1 Checkpoint & it is the green marker on our Map.


Achievement #62 – Poison: Use Berserk Poison to force an enemy to kill 5 enemies.
During this Memory, we will have the best opportunity for unlocking this Achievement though it will require us having a Smoke Bomb or two in our Inventory.

After we finish the footrace with Élise, we will need to dispatch the 7 Guards around the convoy. Sneak through the Bushes & approach the convoy so you have the Captain (the man in a white jacket) in sight. Strike him with the Berserk Poison Dart, then quickly rush at the other Guards & throw down a Smoke Bomb. This will stun them & give the Berserk Captain ample time to kill them.

This Achievement is not cumulative, & a single Berserk Guard must kill 5 other Guards… If you/he fails, reload the last Checkpoint & try again. Being able to reload like this is why this Memory is the optimal time to attempt the Achievement though of course this can be done in free roam if you prefer...

Memory #5 – Storming the Fort: Head to our next Memory Start & meet up with Élise outside Fort Saint-Jean. Eliminate the Guards outside the Fort, then chase down the Spanish Officer & kill them, then release the Slaves from the prison to learn more…

New Orleans:

Memory #6 – In Vino Veritas: We will return back to New Orleans, & head to our Assassin HQ to begin our next Memory. We now need to incite a riot, just like Three Days Grace, & push the rebellion over the edge.

Constraint #1 – Don’t Increase Your Notoriety: Follow Gérald’s ques, but do not engage any Guards on your way to the crier. This is a very simple Constraint.

Memory #6 – In Vino Veritas: Incite the riot & we will then need to intercept a delivery of gunpowder to the Spanish. Become the Assassin once again, & meet Gérald at the ambush point.

Constraint #2 – Carriage Must Retain At Least 50% Health: Eliminate the Guards, then steal the Carriage. As we escape with it, we must evade all of the obstacles in our way; we cannot fight back, & the Musket fire is inconsequential. Maneuvering the Carriage can be a bit finicky but Gérald at least gives us ample time of when to turn left or right. The biggest hazard is the blockades of barrels/crates we have to avoid.

Constraint #3 – Kill All Targets In 1:00 Minutes: After we destroy the gunpowder Carriage, we will need to rescue some Civilians trapped by Guards inside a winehouse. There are 5 Guards in total we need to kill. The first 4 will attack us right away, but we then have to sprint up some spiralling stairs to reach the final Guard & kill them.

Memory #7 – Getting Ulloa’s Attention: Report back to the Assassin’s HQ, & we will then have to head down to the harbor to take over a Spanish Galleon. Kill the Guards, then confront a familiar Captain… kill more Guards, then escape the scene… boom.

Memory #8 – A Governor No More: With our “explosive message” sent, head to a dead drop site to collect a message from Agaté. Meet up with him, & discuss how to eliminate our current Spanish overlord…

Constraint #1 – Set Up the Ambush In Under 4:00 Minutes: When we reach the ambush site, we will have to clear out the 5 Guards in the area undetected. Employ Poison Darts to take out Guards at a range & close in with our Hidden Blades when it makes sense to do so.

Once the Guards are taken care of quickly knock down the water tower to block off the alley. Then we must go move a Powder Kegs in the street, & we will trigger the ambush.

Memory #8 – A Governor No More: Kill the Convoy Guards, then dispatch the Governor himself… or not. We will be bribed with cool loot & Mayan encoders… return to Agaté.

For whatever reason we do not unlock Achievements for completing Sequence #3, #5, or #7 in Assassin’s Creed – Liberation. I have no idea why…
Sequence 37: It Belongs In A Museum!
1. Location: New Orleans, Chichen Itza
2. Sequence #4 Memories: 1, 2, 3, 4, 5, 6
3. Constraints: 22/59
4. Pocket Watches: 2/10
5. Mayan Statuettes: 9/10
6. Alligator Eggs: 1/12
7. Jeanne’s Diary Pages: 6/30
8. Citizen E: 2/6
9. Achievements: 63/84
-----------------------------------------------------------------------------------------------------

Sequence #4:

New Orleans:

Memory #1 – Southbound: Return to the New Orleans harbor, turn into the Slave Persona, & sneak into the Slave compound undetected.

Constraint #1 – Do Not Swim: Once we Blend in with a group of Slaves, we will need to tail another group of Slaves to the harbor. We can simply Blend in with the group of Slaves in behind the first & walk with them the entire way to the harbor; there is no reason we should enter into the water.

Chichen Itza:

Memory #2 – A New Life: Arrive in Mexico with the Slaves & we will be in the third area of the game, Chichen Itza. Before we can explore around, we need to go around & speak with the local Slaves to see what they think…


Mayan Statuettes #1-8: Before we proceed to the next Memory, we can take this time to use both Viewpoints, loot all Chests, & collect all available 8 Mayan Statuettes; they will be marked on our Map.

Jeanne’s Diary Pages #2-5: We can also collect 4 new Diary Pages during this time as well… how did these get all the way over to Mexico?

Memory #3 – Gathering Tools: Once you have explored Chichen Itza, head to our next Memory Start & begin gathering some materials around the area so we can build ourselves a Weapon…

Constraint #1 – Don’t Enter Open Conflict: We cannot enter conflict at all while we loot materials. We fortunately are still able to stealth kill Guards if we need to.

Memory #4 – The Company Man: Continue into the next Memory, & tail De Ferrer to his meetings around Chichen Itza.

Constraint #1 – The Captive Man Must Retain At Least 50% Health: After the second meeting, we will encounter a captive Slave trying to break free from some Guards. Rush to his aid, & keep him defended during this encounter; there are only 4 Guards we need to kill…

Memory #5 – Trail of Truth: After we receive the cool Bull Whip, go to start the next Memory. The Slave will tip us off that there was a woman who used to live here at the camp with the exact same name as our mother…

Constraint #1 – Do No Engage Guards In Open Conflict: Once again, we are allowed to stealth kill Guards, but we cannot engage them in battle at all.

Constraint #2 – Complete the Mission in 5:00 Minutes: Quickly leave the Restricted Area & rush over to Jeanne’s supposed hut. Head around the back of the hut after following the clues, & we can find one of Jeanne’s Diary Pages.

Jeanne’s Diary Page #6: Story Related & cannot be missed…

Citizen E #2: After we collect the Diary Page, our strange contact will notify us that another Citizen E is located nearby close to the construction site. Identify them using Eagle Vision & kill them; they can be found at the very top of the temple.

Memory #6 – The Secret of the Cenote: Head to the next Memory Start now & begin making your way inside the temple. Dive into the water & swim up into the caves ahead.

Mayan Statuette #9: Navigate through the cenote for a while, & eventually we will plunge down into more water into what looks like an old ruin of the First Civilization. To continue, we once again must dive down through more water & as we do, we should see a Mayan Statuette appear on our Mini-Map; you must collect this during the Memory or you will have to Replay it later. There is unfortunately no Map we can consult for its exact location, but if you start climbing up a First Civilization obelisk to continue, you have gone too far.

This is our final Collectible to find here on Chichen Itza

Constraint #1 – Solve the Puzzle In Under 2:00 Minutes: Begin climbing out of the water up into the First Civilization ruins & when we reach the top, we will have to complete a short ball-maze puzzle to obtain the Artifact. Simply get the ball to the center of the maze; the ball moves very slowly & is pretty easy to maneuver around.

Constraint #2 – Take No Damage: This will be our hardest Constraint so far, & we must kill De Ferrer & his Guards without taking any damage. De Ferrer cannot be: Counter/Killed, Counter/Thrown, or Counter/Disarmed, but he can have his Defence Broken; the same goes for the Officer. If De Ferrer attacks, parry but do nothing afterwards & just let the block slide away on its own.

The Officer is best taken out using the Whip, but De Ferrer is easiest killed using Break Defence.


Achievement #63 – Sequence #4: Complete Sequence #4.
Story Related. Escape the collapsing temple, & we will encounter a ghost from the past…
Sequence 38: And I Whispered, No
1. Location: New Orleans
2. Sequence #5 Memories: 1
3. Contracts: 5/5
4. Ship Crew: 1/3
5. Business Rival: 2/7
6. Constraints: 28/59
7. Pocket Watches: 2/10
8. Mayan Statuettes: 9/10
9. Alligator Eggs: 1/12
10. Assassin’s Coins: 7/10
11. Jeanne’s Diary Pages: 21/30
12. Citizen E: 3/6
13. Achievements: 65/84
-----------------------------------------------------------------------------------------------------

Sequence #5:

New Orleans:

Memory #1 – Prodigal Daughter: Leave the Assassin’s HQ after we retrieve our gear, & go locate the Spanish recruiter. Once we find him, tail then chase him until he runs to hide in the local Fort…

New Orleans – Collectibles: Before we carry on with Sequence #5, now is as good a time as any to go around & collect the currently available Collectibles. Keep this Map in mind as we travel around New Orleans, & we can also complete a bunch of new Side Quests as well…


While we do this, make sure to make a point of keeping tabs on the Trade System as it is the best way for us to make income; we will need a lot of Écu to purchase the Trade Ships as well as the Pocket Watches we need… Be sure to also Pickpocket as many people as people to work towards stealing 5000₠. With how inconvenient it is to earn money, & how expensive the Ships/Pocket Watches are I recommend trying to save as much as possible & refrain from purchasing things from Weapon Shops or Tailors due to their exorbitant costs…

Jeanne’s Diary Pages #7-21: We can now travel around & locate all 15 remaining Diary Pages here in New Orleans.

Contract #1 – Delayed Justice: While as the Assassin, we can receive Contracts which can be collected at the Northern end of New Orleans. Read the Contract, & we will tasked with dispatching a Target.

Constraint #1 – Use the Hidden Blade to Kill Your Target: Simple enough. Track down the Target, & kill them with our Hidden Blade.

Contract #2 – The Snitch: Read the Contract, & we will be tasked with dispatching two Targets.

Constraint #1 – Eliminate Both Targets Simultaneously: For this Constraint, we will need to kill both Targets at the same time (using a Double Assassination). Locate them, then climb up onto the nearby rooftops where you can leap off & Double Assassinate them at the same time; performing a sprinting Double Assassination does not seem to count…

Contract #3 – Free Delivery: Read the Contract, & we will be tasked with dispatching another Target. To start, we first must locate the Courier & tail them to find the Target.

There are no Constraints for this Contract…

Contract #4 – Safe Passage: This Contract will be slightly different, & we will have to track down a Smuggler & escort them to safety.

Constraint #1 – Complete the Mission In Under 2:00 Minutes: As soon as we find the Smuggler, we need to rush them to their destination. Fortunately, it will not be far away. Sprint to the destination, avoiding the Guards (the Smuggler will follow) & when you reach it, immediately kill the Guards that have followed you as fast as possible; only 6-8 Guards should have chased you to this point.

Contract #5 – Pigeon Hunt: For our final Contract, we just have to kill one last Target; there are no Constraints either… Kill the Target, & loot them to locate the second Target; kill & loot them too.

Assassin Coins #1-7: While we are in the Assassin Persona, we can go & locate our first 7 Assassin Coins; these are marked by falling coins. Head to the marker, & takeout the Mugger; they can be killed. Regardless of how you dispatch them, make sure you loot their body to collect the Assassin’s Coin.

Citizen E #3: Head to the marked area on the Map & we can uncover a new Citizen E that we can Assassinate.


Achievement #64 – Hangman: Perform 10 predator moves using the Whip.
To perform a “predator move” we first need to find a tree branch, wooden beam, or any other horizontal perch. When a Guard/enemy gets close, grab them with the Whip from our perch, then drop down backwards off of it to hang them to death. Do this 10 times to unlock the Achievement.

This is the only “predator move” that counts towards the Achievement. Grabbing enemies during combat & pulling them towards you/executing them does not count.


Achievement #65 – Human Shields: Block 10 shots or firing lines with a Human Shield.
This will most likely have to be farmed or deliberately attempted as it is not that common for Guards to shoot at us. If possible, aggro a group of 6+ enemies – 3-4 will actively engage you while the others will hang back. After enough time, they may shoot at you where you can block the shot by grabbing a nearby Guard. Having Officers around is even better as they have personal Flintlocks they can fire at us.

If you are farming, just use Counter/Throw on all the Guards around you to keep them alive to be used as a Human Shield.

Business Rival #1 – M. Ratel’s Merchants: While still as the Assassin, we can also complete the available Business Rival Missions; we can do these as any Persona but being the Assassin is just the easiest. We need to locate the Target, & kill them without being detected.

Constraint #1 – Do Not Kill the Target Yourself: Though this Constraint may sound strange, it can be done using our Berserk Poison Darts. Locate the Target, then use a Berserk Poison Dart on his bodyguards to have them kill the Target.

Business Rival #2 – M. de Vandal’s Harbor: For our next Business Rival, we must quickly rush to the local harbor before the 1:30 minute timer runs out.

Constraint #1 – Use the Hidden Blade to Kill Your Target: When we reach the harbor, our Target will arrive. Simply equip the Hidden Blade & use it to kill him. Before they will attack us, we must first defeat 3 waves of Guards; do not charge after the Target until they enter into our defensive zone.

Ship Crew #1 – Mistress & Commander: For another subset of Side Missions we can complete, we can meet back up with a certain former “Captain” & we will begin to requisition his help.

Constraint #1 – Take No Damage: Enter into the Restricted Area & close in on the Trader. The Trader must be taken out with Bare Fists & not killed. However there are other Guards in the area. You must prioritize the Trader… but also keep yourself alive & kill the Guards when you have to.
Sequence 39: All Walks of Life
1. Location: New Orleans
2. Sequence #5 Memories: N/A
3. Detective: 3/5
4. The Plot: 5/5
5. Ship Crew: 1/3
6. Free Slaves: 2/3
7. Business Rival: 2/7
8. Constraints: 32/59
9. Pocket Watches: 6/10
10. Mayan Statuettes: 9/10
11. Alligator Eggs: 1/12
12. Assassin’s Coins: 7/10
13. Voodoo Dolls: 5/10
14. Precious Stones: 10/10
15. Jeanne’s Diary Pages: 21/30
16. Citizen E: 3/6
17. Achievements: 68/84
-----------------------------------------------------------------------------------------------------

New Orleans:


Detective #1 – Helping Hand: When we are finished playing as the Assassin, it will be time to swap to the Slave where we can complete a new set of Persona Missions. For this Mission, we need to find a missing Slave.

Constraint #1 – Complete the Mission In 60s: As soon as we accept the Mission, sprint to the destination & quickly analyze the dead Slaves body to complete the Mission.

Detective #2 – The Case: Round the corner & we can jump into the next Mission. Locate the suspect in Eagle Vision, then Tail them; there are no Constraints for this Mission.

Detective #3 – Hot Trail: Continuing on with this strange mystery. Analyze the clues as you run along the rooftops, & eventually we will find our Target.

Constraint #1 – Use the Hidden Blades to Kill Your Target: When we find the Target, we must kill them using our Hidden Blades. Chase them down & eventually Assassinate them with the Hidden Blade; loot their body to collect a letter…

Our final two Detective Missions will be found in the Bayou…

Voodoo Doll #1-5: As the Slave, we can now collect Voodoo Dolls scattered around the Northern end of New Orleans. Voodoo Dolls can be Pickpocketed off of the marked Houngans that carry them.


Achievement #66 – Thief: Pickpocket 5000₠.
Over the course of the game, as we complete other objectives, always make a point of Pickpocketing as much as possible. 5000₠ is quite a bit & if you save this until the very end, it will be a pretty tedious grind. As well, we need the money as soon as possible to make good long term purchases so we don’t have to worry about running out of money later on…

Target the Civilians that look better dressed as, typically, they will net you more money per Pickpocket.


Achievement #67 – Shipmaster: Buy the maximum number of Ships (8).
We start out initially with 1 Ship, but must purchase an additional 7 for this Achievement. If you only buy the cheapest Ship, the Galleon, it will cost you 25,900₠.

The sooner you purchase the Ships, the sooner you will be able to start making decent passive income by continually sending the Ships out; just buy whatever is the most expensive Good in the City then send the Ship to whichever City will pay the most for it.

Precious Stones #1-10: Now we will swap to playing as the Lady Persona & lock in to the more tedious part of our Collectible hunt… as the Lady cannot climb or jump… To receive a Precious Stone (Jewelled Broach), you will have to Charm specific Gentlemen who will give it to us as a present. To reach some of the Precious Stones we will need to search around to find ladders to get us up to them.

As well, keep in mind that we also need to kill 25 enemies using the Parasol Gun for the Umbrella Achievement which will take some time to chip away at…

The Plot #1 – Barely Made It: After you finish collecting all the Jewelled Broaches (or while collecting them) we can begin the Lady’s Persona Mission series, the Plot. Meet Gérald at the docks… but it will be a trap. Escape the warehouse we are brought to; there are no Constraints.

The Plot #2 – Payback: Track down the Muggers, & kill them.

The Plot #3 – Breadcrumbs: Next we need to investigate a new potential ambush site set up by more Muggers; analyze all the clues there.

The Plot #4 – Bon Voyage: Head to the docks now & go to locate the leader of the Muggers. While staying undetected, identify the leader, kill them, then loot their body; you may have to clear out a few enemies in the area with Poison/Berserk Darts to make it safe.

Also whatever you do… do not fall into the water or it will take you FOREVER to find a place to climb back up.

The Plot #5 – Old Friend: Now it is time to finish off the plot… get to Bouche’s warehouse undetected, & kill him.


Achievement #68 – Umbrella: Kill 25 enemies with the Parasol Gun.
We need to kill 25 enemies using Poison Darts or Berserk Poison Darts with the Parasol Gun while as the Lady. If you use a Berserk Poison Dart, only the shot target will count & not anyone he kills while Berserk.

Free Slaves #1 – A Family Divided: We can also complete a special Side Mission type only for the Lady Persona (that is not a Persona Mission). Head to the Mission outside De Granpré Mansion, & we will need to locate a missing Slave.

Constraint #1 – Take No Damage: Locate the Slave & he will be escorted away by two Guards. The simplest way to do this is to quickly rush them & use your Hidden Blades; you don’t want them to leave the alley as it can alert more Guards… Avoid other patrolling Guards, & take the Slave to a safe place.

Free Slaves #2 – Earthly Belongings: We can complete one other Free Slaves Mission down at the harbor & we will need to help the Slave collect his belongings.

Constraint #1 – Kill No One: For this Memory, we cannot kill anyone; using our Bare Fists counts as killing unfortunately. To get the Guards out of our way at the warehouse, just Bribe them as the Lady.

Pocket Watch #3 – Pourpre Rosa Watch: As a final order of business, if you have been good at keeping your Ships busy, we can buy the next few Pocket Watches available; we can find a Smuggler along the harbor to the Southeast as well as at the center/Northern end of the city.

We can purchase this Pocket Watch for 4375₠.

Pocket Watch #4 – Gentleman’s Watch: We can purchase this Pocket Watch for 6250₠.

Pocket Watch #5 – Flemish Timepiece: We can purchase this Pocket Watch for 9375₠.

Pocket Watch #6 – Antique Watch: We can purchase this Pocket Watch for 13750₠.

The last four Pocket Watches we need to buy later on will be very expensive, so make sure to keep those Ships sailing & saving your money…
Sequence 40: The Rule of the Jungle
1. Location: The Bayou
2. Sequence #5 Memories: N/A
3. Detective: 5/5
4. Ship Crew: 1/3
5. Free Slaves: 3/3
6. Business Rival: 3/7
7. Constraints: 34/59
8. Pocket Watches: 6/10
9. Mayan Statuettes: 9/10
10. Alligator Eggs: 12/12
11. Assassin’s Coins: 10/10
12. Voodoo Dolls: 10/10
13. Jeanne’s Diary Pages: 30/30
14. Citizen E: 3/6
15. Achievements: 75/84
-----------------------------------------------------------------------------------------------------

The Bayou:
Before we continue with Sequence #5, use the Fast Travel on the harbor or at the Northeastern end of the City close to the plantation to head to the Bayou where we can clean up the last few Collectibles & Side Missions. On top of the usual Collectibles, there are also two brand new ones we can start finding as well…


Bayou Fever: In the Northeastern settlement in the Bayou, we can see the marker for the Bayou Fever Mission series. Speak with the Witch Doctor & he will task us with collecting Mushrooms scattered around the Bayou. Rush around to the marked Mushroom locations & gather them before the time runs out; you should be able to do it with still half the time remaining. Return back to the Witch Doctor, & he will cure the infected people.

Mushrooms #1-10: Completing this Memory will unlock Mushrooms to now be collected around the Bayou...

Jeanne’s Diary Pages #22-30: We can find the remaining 9 Diary Pages around the Bayou.

Assassin Coins #8-10: We can also collect the last of our Assassin Coins as well by taking out & looting the Muggers.

Alligator Eggs #2-12: As another Bayou Collectible, head around the different Alligator Nests, kill the Alligator in them, then collect their Egg.


Achievement #69 – Survivor: Survive 10 Animal encounters.
This is very easy to do while simultaneously collecting the remaining Alligator Eggs as there will always be an Alligator guarding the nests. Engage the Alligator & let it attack you; take them all out with the QTEs. Do not Assassinate or shoot the Alligators outside of combat or it will not count for the Achievement…

Smugglers – Mapping the Bayou: There is a completely optional Mission/Collectible type called Smuggler Camps that are initiated by completing this Mission. This is optional content, & not tied to our 100%...


Achievement #70 – RHP Master: Synchronize all 19 Viewpoints.
You may have earned this Achievement a while ago, but if you haven’t make sure you use the 6 Viewpoints around the Bayou. If you used the 13 found in New Orleans, we will unlock this Achievement.


Achievement #71 – Buy All Dressing Chambers: Buy all 13 Dressing Chambers.
This is another Achievement you may have already earned previously. If you purchased all 10 Dressing Chambers in New Orleans, buy the remaining 3 here in the Bayou to unlock this Achievement.

Free Slaves #3 – A New Recruit: Link up with that Slave we helped escape New Orleans & we will have to track down his wife who has gone missing.


Achievement #72 – Liberation: Complete all 3 Free Slaves Missions.
If you completed the first 2 Free Slaves Missions in New Orleans, we will unlock this Achievement after we complete the final Mission here in the Bayou.

Business Rival #3 – M. Reynauld’s Bypass: Head to the main Smuggler’s Hideout & we can deal with a rival businessmen… permanently.

Constraint #1 – Take No Damage: Reach where Reynauld is & he will have four Guards with him. Tail them carefully, & when you can, shoot him with a Poison Dart to stay undetected unless you are confident you can kill them all without taking damage.


Voodoo Dolls #6-10: Change into the Slave Persona next & we can collect the final few Voodoo Dolls by Pickpocketing the Houngans.


Achievement #73 – Persona Collector: Collect all 30 Persona-Specific Collectibles.
For this Achievement we need to collect all 10 Assassin Coins as the Assassin Persona, all 10 Precious Stones (Jewelled Broaches) as the Lady Persona, & all 10 Voodoo Dolls as the Slave Persona.

Bayou Fever Victims #1-9: Most likely, you located a few of these while we explored as the Assassin but if you are still missing some, these are their locations; you can only cure them all if you previously found all Mushrooms.


Achievement #74 – Bayou Fever: Complete all 9 Bayou Fever Missions.
After collecting all Mushrooms, we can then go around & cure all 9 of the Bayou Fever Victims around the swamp. There is no final Mission after they are all cured & the Achievement will unlock as soon as the last one is saved.

Detective #4 – Witness Protection: With our Collectibles found in the Bayou, it is time for us to complete the last two Detective Missions as the Slave Persona. Head to the marker & we will need to locate the camp of the killers.

Constraint #1 – Do Not Engage Guards In Open Conflict: When we reach the camp, there will be 4 Guards about to execute someone & we only have 45s to kill them all. Quickly swing along the branches & use the Blowpipe to kill the two patrolling Guards then Double Assassinate the final two from above.

Detective #5 – The Culprit: Head to the final Mission location & we will now deal with the leader of the killers. The clue we must analyze in Eagle Vision is extremely difficult to spot. Walk West of the bridge we start at to find a small camp, then walk a few paces North of the tents towards a leaning tree to find very faint footprints behind it.

Analyze the footprints to find the stashed letter, then we will have 2:00 minutes to rush to the nearby Fort & kill… the killer. There are no Constraints for this Mission.


Achievement #75 – Secret Lives: Complete all 15 Persona-Specific Side Missions.
Each of our Personas has 5 different Side Missions we need to complete. The Assassin has Contracts & the Lady has “The Plot” which can be completed in New Orleans while the Slave has Detective Missions between New Orleans & the Bayou.
Sequence 41: Slasher of Prices
1. Location: New Orleans, The Bayou
2. Sequence #5 Memories: 2, 3, 4, 5
3. Ship Crew: 1/3
4. Business Rival: 7/7
5. Constraints: 48/59
6. Pocket Watches: 6/10
7. Mayan Statuettes: 9/10
8. Citizen E: 4/6
9. Achievements: 76/84
-----------------------------------------------------------------------------------------------------

New Orleans:

Memory #2 – Rotten Barracks: Now we will continue on with the main storyline. We need to enter into the New Orleans Fort to find the recruiter; we can climb into it from the far Northeastern corner or the Southwestern corner to be stealthy. From the interior walls, we can easily spot the recruiter.

Constraint #1 – Use A Powder Keg to Assassinate the Recruiter: From the walls, we can easily get above the recruiter & watch him as he patrols around the courtyard. Equip your Pistol, & from the rooftops above the courtyard we can spot a single Powder Keg in one of the corners near a set of stairs leading up to a balcony. Wait for the recruiter to walk by it, then detonate it; do not miss your shot or we will be detected & fail.

Also if you alert the recruiter & they investigate your position, there is a chance he won’t return to his patrol route & you will have to reload.

As soon as you shoot the Powder Keg, immediately run away from view of any Guards to stay undetected.

Constraint #2 – Remain Undetected After Killing the Recruiter: We now need to loot the recruiter’s body while still being hidden. The best way to go about this is using Berserk Poison Darts to clear out as many of the Guards as you can, then pick off the rest with Fast Poison Darts.

After you loot the body, escape from the Fort the same way you entered.

Business Rival #4 – M. Chapperon’s Textiles: With Memory #2 complete will unlock more Business Rival Missions to complete. For this Mission we need to locate the Target using Eagle Vision & kill them in under 3:00 minutes.

Constraint #1 – Complete the Mission In Under 2:00 Minutes: We need to kill the Target with at least 1:00 minute left on the clock. This is not actually too difficult, & the Target will be patrolling around the marked area with two bodyguards.

Constraint #2 – Remain Undetected: Stay hidden once you find the Target, then for the easiest method, take him out with a Poison Dart so that we do not get detected by his bodyguards. Once he is dead, we will still have to loot his body so either Double Assassinate the bodyguards or use Poison Darts to kill them as well…

Business Rival #5 – M. De Chevallier’s Weapons: We can find this Business Rival Mission near the harbor at the Southwest corner of the city.

Constraint #1 – Remain Undetected: Self explanatory.

Constraint #2 – Kill the Target With A Powder Keg: Locate our Target, & they will be patrolling around a large square block of buildings. At the south side of this block, in the Southwest corner near some warehouses we can find two Powder Kegs. Set them up in the street nearby where the Target patrols, & wait for him to pass by before detonating one.

There are Guards in this street we will need to deal with first, ideally with Poison Darts to stay hidden. You can bait the Powder Keg by placing a body or two near them…

Blow up the Target with the Powder Keg & run away to not get detected by anyone nearby. When the coast is clear, go loot his body.

Business Rival #6 – M. Salmon’s Ships: We can find this Business Rival Mission further East along the harbor. Before we go to locate the Target, go & change into the Lady Persona as it is required for a Constraint.

Constraint #1 – Remain Undetected: See below.

Constraint #2 – Kill the Target Using the Lady Persona: These two Constraints go hand in hand. Once you have changed into the Lady Persona, locate the Target then dispatch him using the Parasol Gun.

Business Rival #7 – M. Marcantell’s Materials: Our last Business Rival Mission can be found at the Northeastern end of the city near the entrance to the plantation grounds. Once again, we will need to be in our Lady Persona for this Mission.

Constraint #1 – Charm Your Target: As the Lady, head up to the plantation estate & locate the Target. Approach them, & Charm them to follow you away to somewhere… private. Once you are out of sight of the Guards, you are free to “surprise him” …

Constraint #2 – Remain Undetected: See above.


Achievement #76 – Business Woman: Complete all 7 Business Rivals Mission.
As of this Sequence, all 7 Business Rival Missions can be completed. 6 can be found in New Orleans, & 1 can be found in the Bayou.

The Bayou:

Memory #3 – Power of Voodoo: Travel to the Bayou now & head to Agaté’s hideout…

Constraint #1 – Find Agaté Within 1:00 Minute: This is very easy to do so long as you remain in Eagle Vision. The path towards him is linear across the tree branches – simply follow them & you can find him in 15s.

Memory #3 – Power of Voodoo: Get to the ambush point, then use a Poison Dart to kill a marked Guard in the patrol. Continue to follow the patrol & pick off Guards when they become marked to complete the Memory.

Memory #4 – The Lighthouse: Head to the Smuggler’s Hideout & speak with Élise about Spanish activity in the Bayou. She will tell us about plans to divert a trade ship off course… so we will beat the Spanish & do it ourselves first.

Constraint #1 – Avoid Killing Anyone: For this Memory, we cannot be detected, kill anyone, or swim while we go to sabotage the lighthouse. This is not all that difficult & we can use the tree branches & Bushes to sneak over to the lighthouse; there is a Guard who patrols around the lighthouse & you will want to wait until he passes you on his circuit before you start to climb it. There is also a Sniper on top of the lighthouse as well that you will want to wait to pass by you before you continue climbing up.

Constraint #2 – Do Not Swim: See above.

Citizen # #4: Before we go to the next Memory Start, we can locate a new Citizen E who will now appear with the previous Memory completed. From the Northeastern settlement, head South towards a close by island with a ruined ship beached on it; we can see the ship on our Map. Enter inside the ship, & we can find a Citizen E… kill them.

Memory #5 – Stolen Goods: Return back to our Smuggler friends after sabotaging the lighthouse & we will set off to go loot the beached trading ship. Link back up with them, then dispatch the incoming Spanish Guards.

Constraint #1 – Carry 2 Crates Yourself: After the first wave of Guards is killed, we will receive this Constraint. We will need to defend the Smugglers while they carry 9 Crates to the marked area; we need to carry 2 of these ourselves. This is best done right away before the next wave of Guards arrives.

Carry off one Crate straight away, defeat a wave of Guards, then quickly carry the next Crate after the second wave is dealt with.
Sequence 42: Au Revoir
1. Location: New Orleans, The Bayou
2. Sequence #6 Memories: 1
3. Sequence #7 Memories: 1, 2, 3
4. Ship Crew: 3/3
5. Constraints: 54/59
6. Pocket Watches: 7/10
7. Mayan Statuettes: 10/10
8. Citizen E: 4/6
9. Achievements: 79/84
-----------------------------------------------------------------------------------------------------

Sequence #6:

New Orleans:

Ship Crew #2 – The Cannon: When we are returned back to New Orleans we can see a new Ship Crew Mission is now available. Gérald will notify us of some very important cannon blueprints we can… repurpose… to protect our Trading Ships.

Constraint #1 – Kill No One: Head into the Fort & carefully sneak past the Snipers to get over to the second floor of the main barracks where we can loot the cannon blueprints from a Chest.

Once they are collected, we now need to escape. We can be detected, so long as we do not kill anyone.

Ship Crew #3 – Before the Mast: Head to the harbor, & we can complete our final Ship Crew Mission. For the final Mission… we will be challenged to a race by a sailor? Alright.

The sailor is not actually “racing” us, & we simply have to get through all 11 Checkpoints within the time limit.

Constraint #1 – Take No Damage: Not only do we have to win the race, but we also cannot take any damage – most likely from falling or being shot/attacked by rooftop Snipers. The time limit is very generous, so taking the time to take the Snipers out isn’t a bad idea if it makes sense to.


Achievement #77 – Ship Crew: Complete all 3 Ship Crew Mission.
We will unlock this Achievement after we complete the third & final Ship Crew Mission.

Pocket Watch #7 – Parisian Masterpiece: We can purchase this Pocket Watch from any Smuggler for 21,250₠. In New Orleans we can find a Smuggler East of the cemetery at the center Northmost end of the city as well as at the Southeastern end of the harbor.

Chichen Itza:

Memory #1 – Return to Mexico: When you are ready, head to the harbor & we will set sail to Chichen Itza. Get to the moored Canoe, & begin navigating it down the stream towards the hidden entrance to the cenote.

Mayan Statuette #10: After we reach our destination in the Canoe, dive into the pool below us then follow the path along until you reach a large rock column we have to climb. Before we climb it, continue along the path further down instead & we will reach a dead end with this Mayan Statuette; this Mayan Statuette can only be collected during this Memory & you will have to Replay it if you miss it.


Achievement #78 – Collector: Collect all 30 Diary Pages, 12 Alligator Eggs, 10 Mayan Statuettes, & 10 Mushrooms.
If you have been following along with this guide, we will unlock this Achievement after collecting the final Mayan Statuette. Unlike most Assassin’s Creed games, the Collectibles are not permanently marked on our Map & instead will only appear if we get close to them which can make it challenging to find them all without using a guide…

No Collectible is missable however a couple can only be found during specific Memories.

Memory #1 – Return to Mexico: Navigate through the underwater tunnels, climb the chamber, & we will re-enter the First Civilization sanctum.

Constraint #1 – Solve the Puzzle In 5 Moves Or Less: When we enter the sanctum, we will need to solve another puzzle to reveal the next Prophecy Disk piece. We need to shift the angled prisms around so the light beam is reflected to the receiver at the top of the puzzle.

To start, shift the top right prism down one, the center top prism to the right, then shift the centermost middle prism up one. Next, shift the center left prism into the center middle, then shift the top left prism down one to complete the puzzle in five moves.


Achievement #79 – Sequence #6: Complete Sequence #6.
Story Related. Strangely, this will be the only Memory in the entire Sequence, & we will complete it after we collect the Prophecy Disk piece…

Sequence #7:

New Orleans:

Memory #1 – An Urgent Favor: At the start of Sequence #7, head to De Grandpré Mansion & our stepmother will ask us for a favor regarding an escaped Slave, named George. Locate him, & help George defeat the Guards attacking him.

Constraint #1 – Do Not Engage Guards In Open Conflict: After the initial Guards are dealt with, we must now lead George to the Northeastern exit of the city without being detected by any more Guards.

Funnily enough though, is that the Guards are not interested in George at all if we are not with him. We can very easily avoid all Guards by running along the rooftops with George following below us in the streets…

The Bayou:

Memory #2 – Supplying the Revolution: Meet up with George in the Bayou & we will take him to see Élise & Roussillon. Before they will help George though, we will need to help them with a problem of their own…

Constraint #1 – Don’t Swim: See below.

Constraint #2 – The Raft Must Retain At Least 50% Health: See below.

Constraint #3 – Use Only Melee Weapons: The Smugglers will begin rowing a Raft down the Bayou, & as we go, we will encounter enemy Guards along banks & in Canoes that will shoot at us. Not only can we not swim/fall into the water, but we must kill them without using our Pistol or Poison Darts. This means you must very carefully traverse the nearby trees to reach them; there is fortunately a specific route you can take to all the enemies & once we leave the Raft, we will not return to it. Pay attention to your Mini-Map as all “red dots” denoting Guards are ones we will eventually have to take out.

New Orleans:

Memory #3 – The Last Dance: Return to New Orleans, & head to the Assassin’s HQ to speak with Gérald. “The Company Man” will currently be in New Orleans attending the Capitán’s Ball at the plantation manor, & we will be making a guest appearance. Mingle with the party guests, & locate Vázquez. Dance the minuet with him, then we can Charm him & lure him over to a secluded location… once the deed is done, leave the plantation grounds.
Sequence 43: Eve Will Lead Us
1. Location: New Orleans, New York, The Bayou, The Animus
2. Sequence #8 Memories: 1, 2, 3
3. Sequence #9 Memories: 1, 2, 3, 4
4. Constraints: 59/59
5. Citizen E: 6/6
6. Achievements: 84/84
-----------------------------------------------------------------------------------------------------

Sequence #8:

New Orleans:

Pocket Watch #8 – Engraved Silver: With the previous Memory completed, the final three Pocket Watches are now available to be purchased from Smugglers. They will not be cheap so make sure you are still regularly sending your Trading Ships out for profit. This Pocket Watch will cost us 28,750₠.

Pocket Watch #9 – Armada Gold: This Pocket Watch will cost us 35,000₠.

Pocket Watch #10 – Admiral’s Treasure: Our final & most expensive Pocket Watch will cost us 43,750₠.


Achievement #80 – One Watch Is Not Enough: Collect all 10 Pocket Watches.
As of this point in the game, all 10 Pocket Watches will now be available to purchase from any Smuggler. If you do not have the money to buy them all right now, make sure to send out your Trading Ships, & chip away at this for the last few Memories we have left…

Citizen E #5: Navigate to the Saint Louis Cathedral in the center of the city, & we will be notified of the presence of a Citizen E. Use Eagle Vision to locate them, then Assassinate them… they can be found at the very top of the cathedral near the Viewpoint.

New York:

Memory #1 – News From the North: Head to the Memory Start & we will be sent to New York… well the Frontier really… to meet up with a fellow Assassin to help us uncover the identity of “The Company Man”. Link up with them, & we will have to chase after a sentry who has spotted us.

Constraint #1 – Climb the Waterfall In Less Than 1:00 Minute: After we interrogate the sentry, we will make our way to the Fort that our Target is located at. To start, we need to climb a waterfall in our way & only have a minute to do so. This is simple to do. Simply follow the snow covered rock & do not stop climbing; the ice will box us in & show you where you can & can’t go.

Memory #2 – News From the North: Locate our Target… & it will be someone we know. Kill them… & somehow… they will still be alive, & flee… just so that we can kill them again a few moments later.


Achievement #81 – Sequence #8: Complete Sequence #8.
Story Related. Complete our short sojourn in the American Frontier, & complete the sole Memory of Sequence #8 to unlock this Achievement.

Sequence #9:

New York:

Sequence #8 – Memory #3 – Connor’s Way: Before we continue on, go to your Pause Menu & scroll over to Sequence #8 in the DNA Tab. Here we can see a Memory that is listed… but we have not completed… & for some reason, we never got to play it. “Replay” this Memory, & we will play through the events of Memory #2 but as our Assassin brother.

New Orleans:

Memory #1 – Abandoning Pretense: Return to New Orleans, & we will finally confront “The Company Man” …

The Bayou:

Memory #2 – Confronting Agaté: Travel to the Bayou to speak with our mentor… & for reasons of pure plot… we have to fight him?

Constraint #1 – Complete the Mission In 5:00 Minutes: See below.

Constraint #2 – Take No Damage: We must defeat Agaté without taking any damage. Similarly to the De Ferrer fight, this will be most annoying Constraint in the game.

As soon as the fight begins, parry Agaté, but do not perform any kind of Counter or else we will take damage – just parry the blow & wait for it to end. This will end the first phase of the fight, but be careful as even as the screen blackens, Agaté will still attack us & potentially void this Constraint.

For phase two we will have to defeat two waves of three Guards; most are difficult & will also damage us if we perform a Counter on them. The easiest way to deal with the waves is to simply throw down a Smoke Bomb & execute everyone. Completing phase two will give us a new Checkpoint we can reload to without having to repeat the beginning of the Memory…

For phase three we will have to climb up to where Agaté is on his tree house. Reach him, & we will have to dispatch another three waves of three Guards; once again, just use Smoke Bombs to make the encounters painless.

Phase four will have us climb to the top of the tree house & finally confront Agaté, for real this time.

The Animus:

Memory #3 – Reconciliation: Deal with Agaté, & we will return back to New Orleans to witness the Ending of the game. Roll Credits… except the Credits will be interrupted only a few seconds in…

Constraint #1 – Kill the Citizen E In Less Than 2:00 Minutes: We will abruptly find ourselves within the Animus, & have to sprint through an obstacle course to locate a final Citizen E at the end. The path forward is pretty obvious so long as you do not get distracted by all the background structures. The course is more or less vertical, & you need to climb up three floors in the dismantled mansion to reach the Citizen E.


Achievement #82 – Complete Aveline’s Story: Complete the game (Fake Ending).
Story Related. Complete the random interlude Memory in the Animus, & the Ending will resume to completion & we will unlock this Achievement.

New Orleans:

Memory #4 – Erudito: We can unlock this final Memory if we killed all other Citizen E’s scattered throughout New Orleans & the Bayou; the one found in New Orleans & in Chichen Itza are Story Related. If you already killed the previous 5 before the final 6th one during the last Memory, we will immediately enter into this Memory. If not, you still have to track some down…

Constraint #1 – Don’t Take Any Damage: Within Saint Louis Cathedral, we will have to defeat some Guards that will come apprehend us. Like when we fought Agaté, just use your Smoke Bombs to make the fight trivial.

When we go to fight “The Company Man” … they can remarkably be effected by Smoke Bombs as well & can be executed without you even breaking a sweat.


Achievement #83 – The Truth: Kill all 6 Citizen E & experience the True Ending.
Story Related. Defeat “The Company Man” & we will witness an inconsequential First Civilization message that contributes nothing… as all the good Assassin’s Creed games have at their end too. Skip past the Credits, & we will unlock this Achievement.

This Achievement can be buggy if you attempt to earn it immediately after Memory #3. If it does not unlock for you, quickly Replay Memory #4, & it should unlock for you… Has something to do with killing all Citizen E’s right away as opposed to having to go kill the rest of them to unlock the “True Ending”.


Achievement #84 – Complete All Mission Constraints: Achieve 100% Synchronization in all Sequences.
If you have been following along with this guide, you should unlock this Achievement after completing the final Memory of Sequence #9. Most Memories as well as Side Missions contain “optional” Constraints you must complete. Complete them all, & if your Progress Tracker in the DNA tab is at 100%, you will unlock this Achievement…
Conclusion:
Assassin’s Creed 3 was a good reminder in dark times of what America stands for & what it strived to be. Coming back to AC3 years later, I have a better appreciation for it as well as for Connor who I initially wrote off as being monotone & boring. The Naval Missions aboard the Aquila are great, & a perfect teaser for what is in store for us in Assassin’s Creed – Blackflag. The Tyranny of King Washington DLC is kind of lame though in my opinion… as neat as the Sky Journey Powers were, it just pads out an already long 100% with more busy work.

If this guide helped you achieve 100%, rate the guide or let me know in the comments. Helps me know if I am doing things right!


100% Complete
Thank you for choosing Cynical Guides, & I will see you in the next one!

If you are interested in a little bit of patronage, support my projects & consider buying me a coffee. If not, no worries; my guides are, & will always be free content. Achievement Hunting is my passion, & writing these guides is a way for me to give meaning to a life long hobby!
https://www.buymeacoffee.com/cynic0055

Other Cynical Guides:
If you enjoy this game & my style of writing guides, be sure to check out my:
https://steamhost.cn/steamcommunity_com/sharedfiles/filedetails/?id=3411505049
https://steamhost.cn/steamcommunity_com/sharedfiles/filedetails/?id=3469374668

Check out my profile for a full list of my works.
https://steamhost.cn/steamcommunity_com/sharedfiles/filedetails/?id=2992727030

16 Comments
Kareda (She/They) 19 Jul @ 8:53am 
@Cynic: Yeah I adore Black Flag and consider it a breath of fresh air. I've actually already gotten almost all of the achievements in AC4, barring the multiplayer ones that is. I just love playing Black Flag. My brain is filled with the shanties and I am playing them over and over in my head.
Cynic 0055  [author] 18 Jul @ 8:59pm 
I liked this game a lot more on my second run through (having beaten it years ago when it first came out) but I agree. The game itself is fine, but as a 100% is pretty brutal at times. AC4 Blackflag has Online Achievements to worry about, but is also a super fantastic game if you end up moving on to it. Best AC game out there by far (barring Brotherhood, but that doesn't have Steam Achievements unfortunately).
Kareda (She/They) 18 Jul @ 3:39pm 
This guide helped me 100% both games and I appreciate all the work you put in for this. Thank you. Having gotten all achievements I can safely say that I have no interest in playing either game again. I'll look into their stories but I consider myself done playing around in their areas. The good sadly does not outweigh the bad in my eyes. I like Connor and Aveline, the two are fun to play as but some stuff is just not fun. And with that I consider myself done with this game and this really amazing guide. Thank you again.
DJRH 12 Jul @ 9:59pm 
I found out a way to farm citizen missions in TOKW. This is based on 2 things:

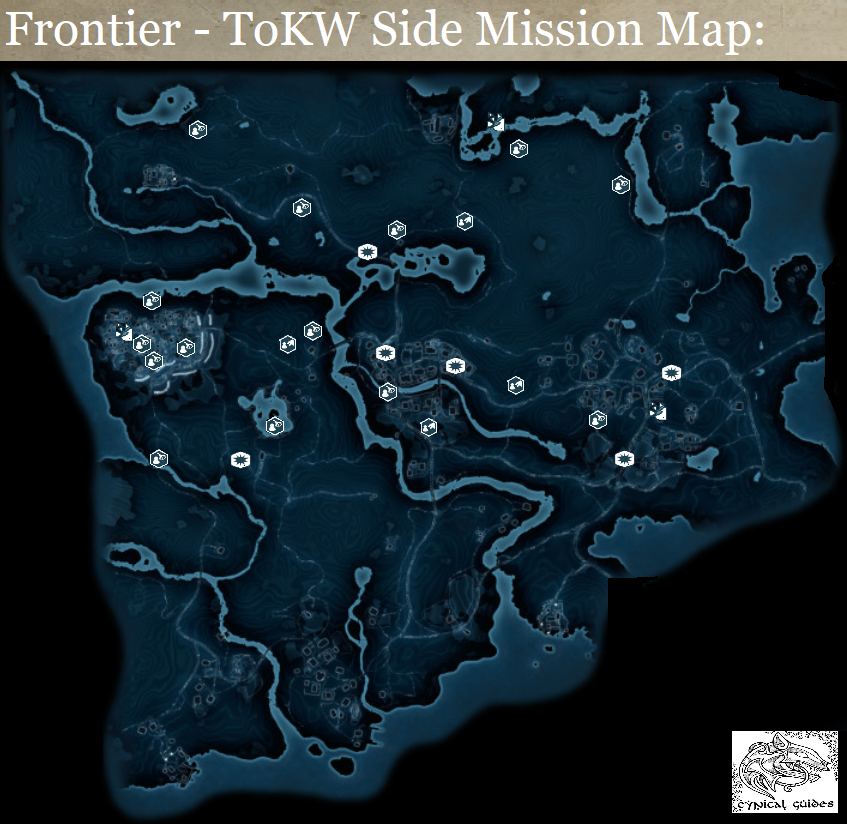
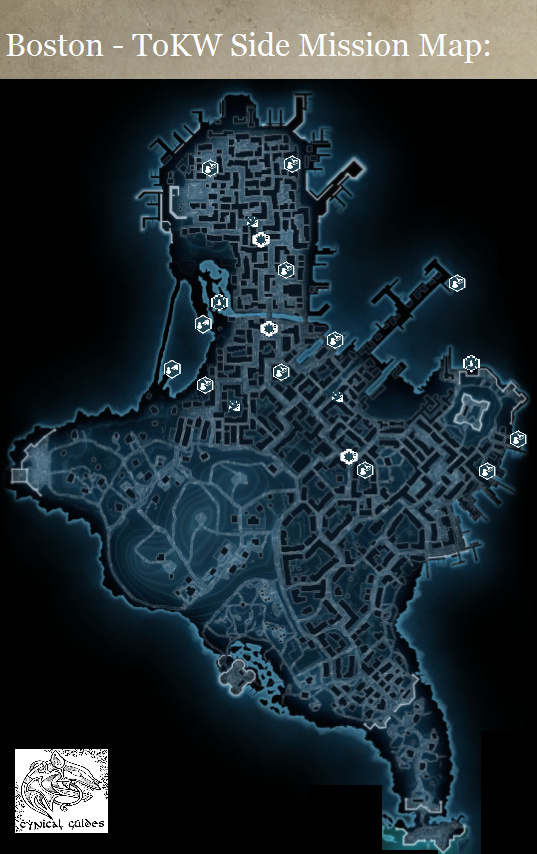
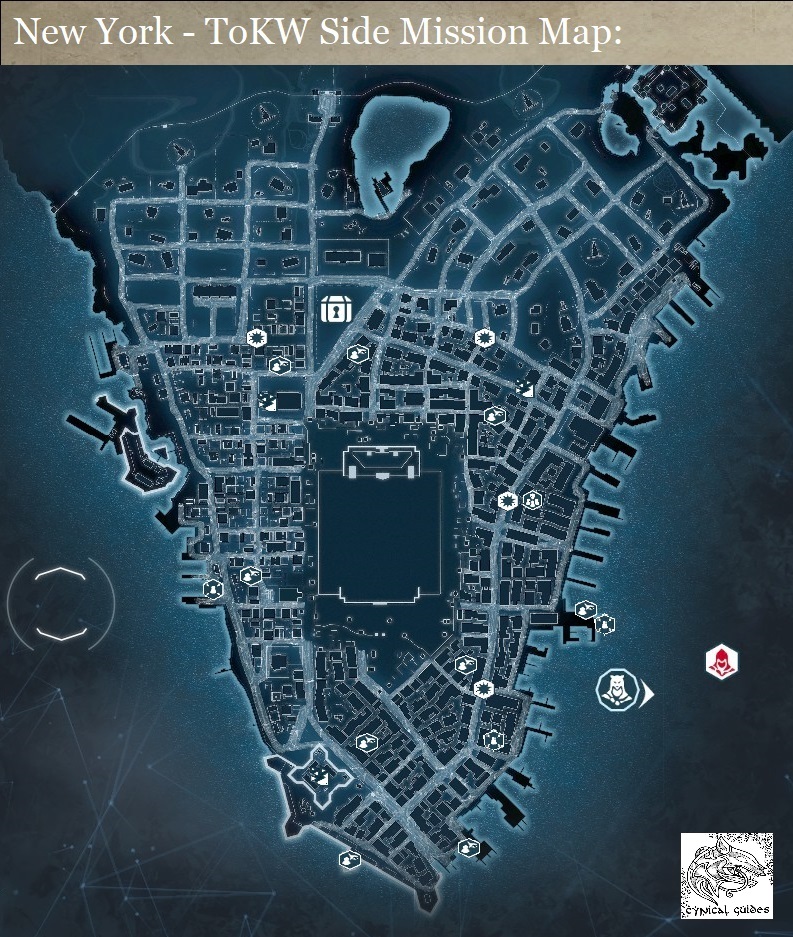
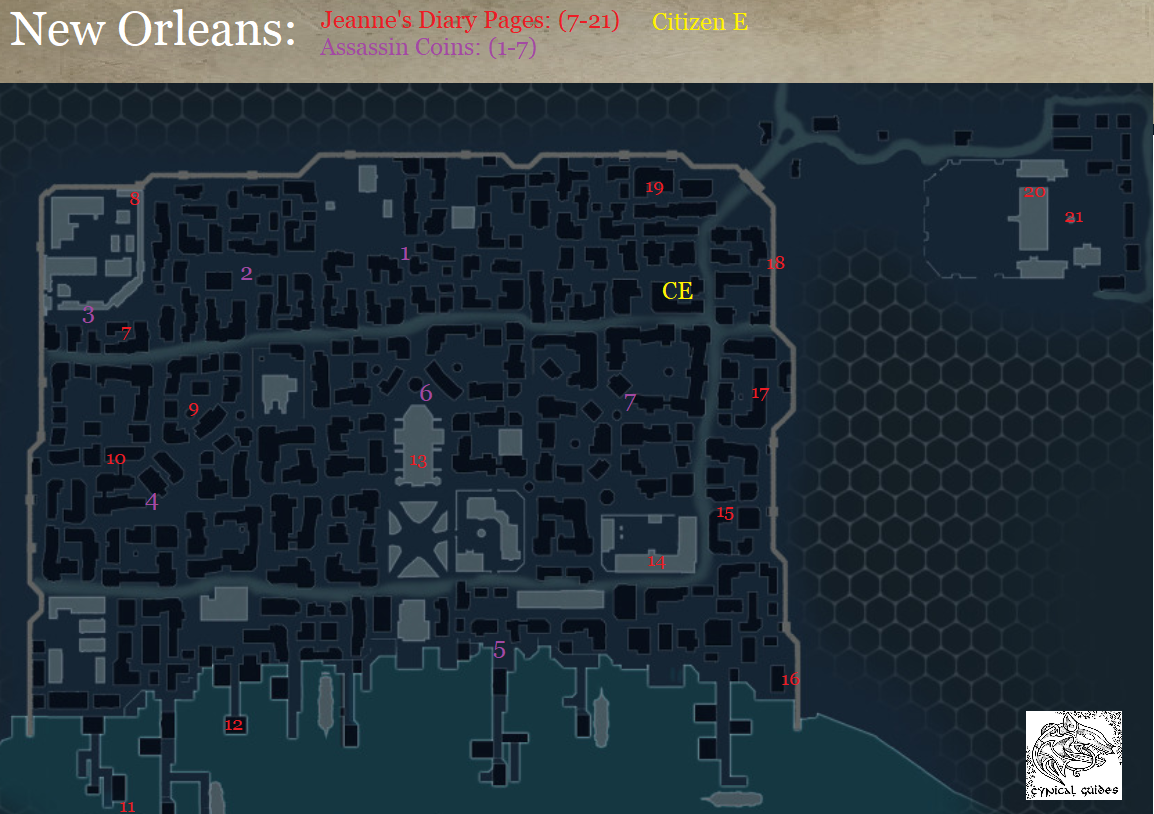
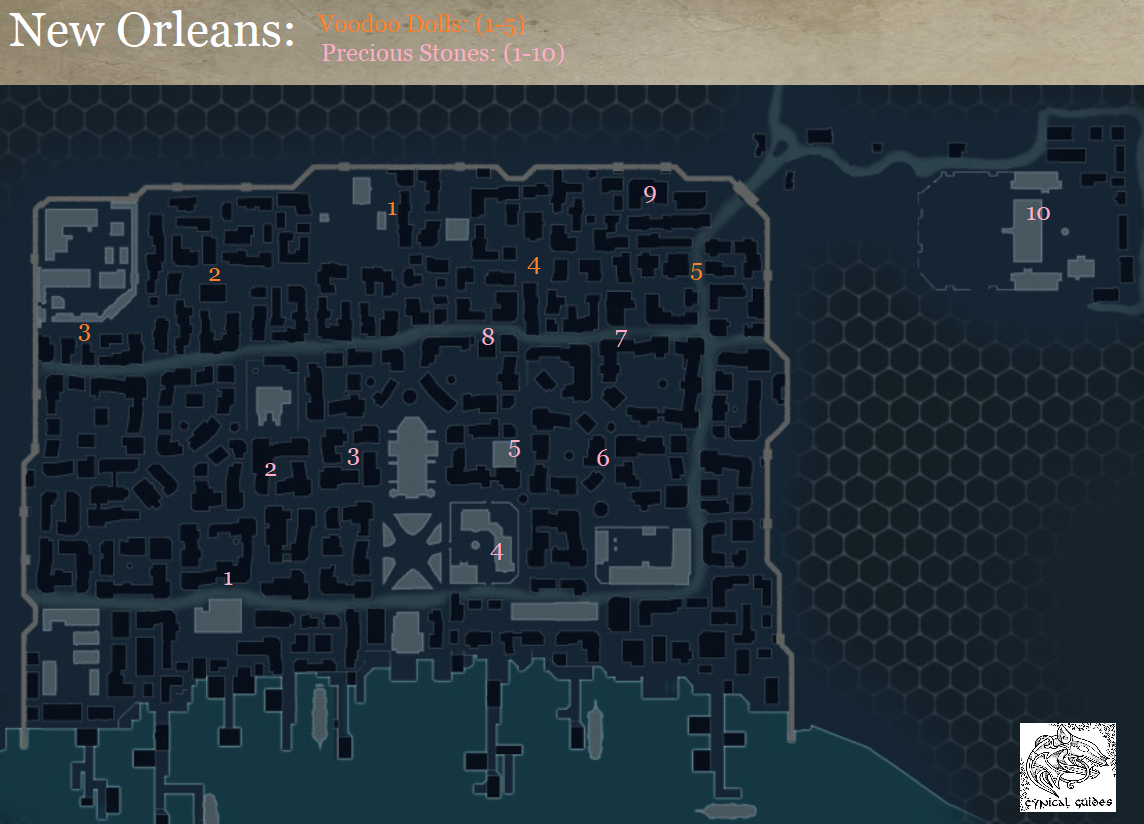
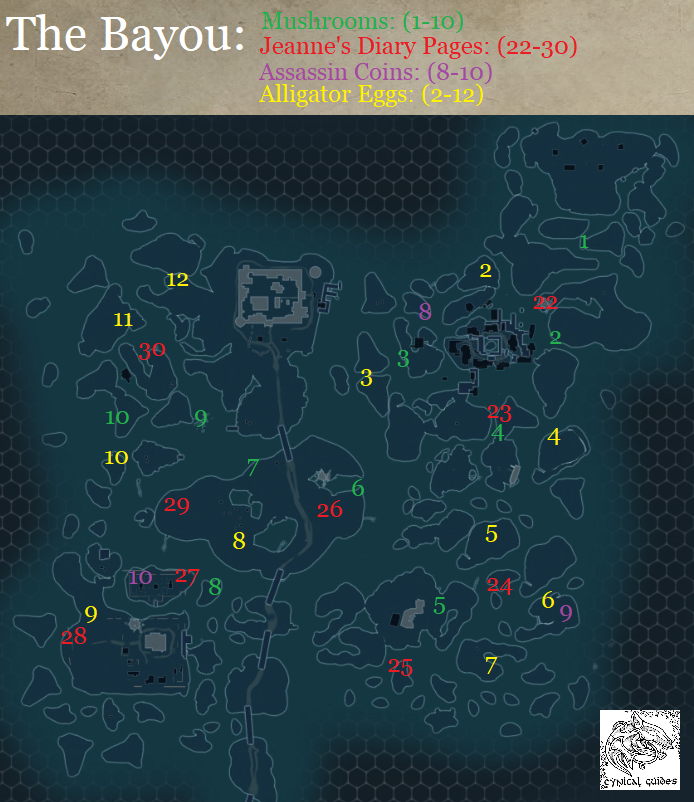
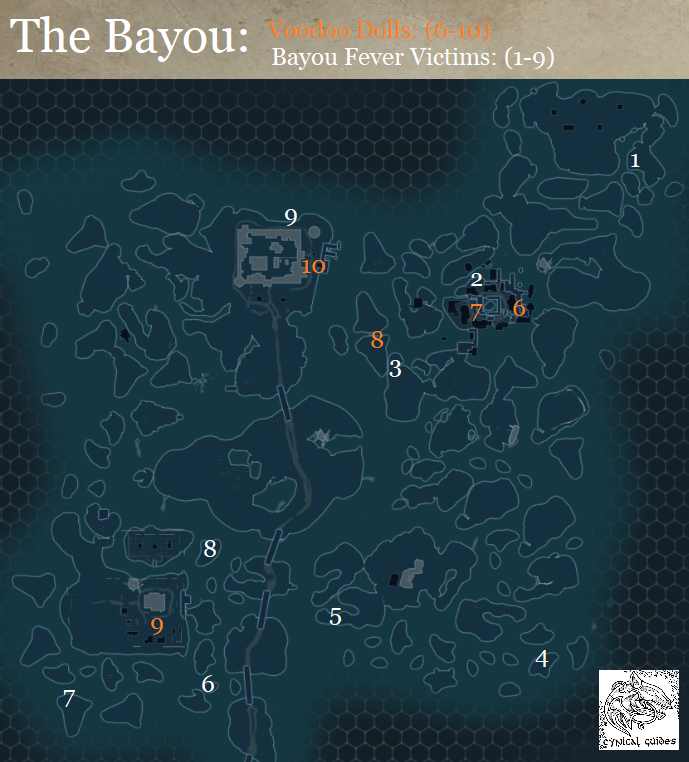
1. These missions are set to trigger when you go on certain areas of the map, with no limit per zone.
2, When you get desynchronized, the game tends to respawn you in predetermined spots based on the area where you got desynchronized.

Basically, once you find one of this missions, you can just complete it, then deplete your health bar with the wolf ability, let an enemy kill you or throw yourself of a building, then you will be respawned beside the zone where the mission spawns. Then repeat until you finish it and go looking for the next one.
Cynic 0055  [author] 21 Jun @ 9:29am 
You should be able to replay any Memory, seynpurrp. The Achievement not unlocking could be a glitch with U-Play. You shouldn't have to restart your game though.
Cynic 0055  [author] 21 Jun @ 9:27am 
Oh hey [NL]Ben, sorry about that you were taking about the Tyranny of King Washington DLC. Yes, the whole side DLC at West Point with Benedict Arnold is entirely optional & it does not contribute to Completionist.
seynpurrp 21 Jun @ 8:47am 
dude for perfectionist i literally DID every main mission on 100% everything is full synced and i didnt get the achievement, can i not replay a memory on full sync after completing it from the dna tracker? r u telling me i have to replay the whole game again until sequence 12 from sequence 1!?
[NL]Ben 21 Jun @ 3:52am 
Nevermind, I think I found the answer for the West Point Missions? Seemingly not necessary?
Cynic 0055  [author] 20 Jun @ 1:11pm 
Yeah... I hate to say it [NL]Ben, but we unfortunately do; we need 100% Synchronization (all Optional Objectives completed) for all three DLC Episodes. Though having redone them for the guide, they were not actually as bad as I remembered; I think the hardest ones are in the first DLC, the other two weren't anything special.

On that, even the hardest of the DLC Optional Objectives were nowhere near as bad as the Optional Objectives for Memory #3 in Sequence #7 or for Privateer Contract Giant & the Storm. Those were pretty horrible! haha
[NL]Ben 20 Jun @ 9:44am 
Just checking, do you need to do those pain-in-the-ass DLC challenges in the main game for Completionist? The main challenges are pretty fun and doable, but those challenges introduced at the time with that lacklustre DLC are such a big pain in the butt......