FANTASY LIFE i: The Girl Who Steals Time

FANTASY LIFE i: The Girl Who Steals Time

44 ratings
Life Tips, EXP Methods, Best Equipment, and more
By Pimez
The endgame knowledge for all Lives! This guide contains:
* General Life Tips
* Best methods to grind EXP
* Best equipment & skills
* Best DPS moves
* Damage Formula
* Explanation to Elemental Damage
* Reference for the "All Lives" skills
2
3
   
Award
Favorite
Favorited
Unfavorite
Introduction
This guide covers mostly the tips & tricks especially useful for late-game players. If you want to be fully prepared for the eventual DLC, or simply want to min-max at any point, you've come to the right place!

General Life Tips
  • Regardless if you are investing into all Lives, it is still recommended to obtain all the licenses as they allow you to fast-travel to Life Master via the Life menu
  • You can skip some missions when ranking up to Apprentice, Adept, and Expert. Take Expert for example, you can skip a "big" mission or 2 "small" missions at most, so you can simply do all other ones, instead of checking in with your Master once every few missions
  • For different Lives, benefits from reaching max ranks can vary. Most notably, all combat Lives would have access to their strongest moves, whereas Blacksmith and Carpenter can make the strongest weapons. However, the benefits are somewhat minimal for other Lives so I would give them lower priority
Skill Board Advice
  • I recommend prioritising skills in these orders:
    • Skills not listed below can be learned whenever you want
    • Combat:
      EXP -> ranking up -> Useful Moves -> Element DMG -> Charge DMG -> Charge Time -> ATK -> Crit DMG
      (only unlock the matching element for weapons you're using)
    • Gathering:
      EXP -> ranking up -> Useful Moves -> Charge DMG -> Sweet Spot DMG -> Charge Time -> ATK -> Crit DMG -> SP
    • Crafting
      EXP -> Extra Mats & Remake -> [Type] Crafter -> Action Speed -> Stats
  • Instead of learning each skill one by one, you can press [ZR] to immediately unlock all other skills leading to it
  • To reset Skill Board, go to the Guild Office (Eternia Village or Base Camp), then interact with the talking flower and have all the skill points previously spent be refunded
    • It is recommended to reset the board for both Combat and Gathering Lives as soon as you hit Hero ranks, since half of the movesets are suboptimal IMO (see below) and I recommend reserving points for other more useful skills
    • "Unlocked" skills stay unlocked after resetting the board. This means if you learn 50 less impactful skills first and unlock a powerful skill that requires 50 other skills, you can immediately reset the board and still retain access to said powerful skill
Best Methods for EXP
Before you start, make sure to equip Spec with two EXP Gain +10% on everyone! Besides the Flutter Charm (from Pre-order bonus), Specs are the only type of equipment to be able to have the "EXP Earned" skills. This means all you need to craft are at least 4 pairs of such Specs - 1 for yourself, and 3 are shared between your 3 followers or your 2 crafting helpers.
(I crafted 2 extra pairs so I don't have to swap them as frequently)

Recommended Methods for Endgame
  • Semi-AFK Methods for all Lives
    1. Gate-hop between Viridia Plateau and the Wicked Mandrake in Spirit Road, then let your 3 farmer buddies do the farming.
      (You may sit back and watch TV while enjoy their unpaid labor)
    2. Go to Moltana Wastes and look for the Red Ore Deposits, then let your 3 miner buddies do the mining.
    3. Find a high-level Treasure Grove with farming plots, preferably near the entrance and contains Shadow Carrots (for Cashnuts), then let your 3 farmer buddies do the farming.
  • Combat Lives
    • All: Redo high-level Monster House, allowing you to grind for slate recipes as well
      - Be sure not to clear it by accident
      - People recommend planting at Year 800 instead of 900 for much easier enemies
  • Gathering Lives
    • Miner: Hunt the various Golden Crown boss resources in high-level Ginormosia region
      - This video showcases a good route (Link)
    • Woodcutter: ^
    • Angler: ^
    • Farmer: Gate-hop between Viridia Plateau and the Wicked Mandrake in Spirit Road
      - Farming Shadow Carrots is also recommeded for the extra Cashnuts
      - I recommend leaving Farmer for last because you might reach lv100 without actively grinding if you regularly harvest 8 plots of Shadow Carrots like I do

After the v1.4.0 update, certain Ginormosia events ("Evil Primeval", "Dragon Dare", "Lordly Shark?") spawn high-lv bosses that immediately respawns without the 5-minute timer, so long as you save and reload from title screen without fully completing the event. Not only are the loots valuable for being grove-exclusive prior to the update, they also give huge amount of EXP. The caveat is that these events are really rare, so I recommend not worrying about grinding Gathering Lives, and only start the process if you randomly stumble upon one such event.
(See this guide on more about these Area Challenges)

Crafting Lives
Crafting Life
Remake
Bulk-Craft
Auto-Craft
Cook
-----
Fruit Punch x99
Sneaky Supper x99
Blacksmith
Light/Dark weapons (for matching element)
Life Tools (for proficiencies)
Divine set (for Item Drop Rate +)
Colosseum rewards (for unique skills)
Carpenter
Light/Dark weapons (for matching element)
Life Tools (for proficiencies)
Palace Wall x10
Cursed Fence x10
Tailor
Cape (for Item Drop Rate +)
Black Magic Dress
Alchemist
Specs (for EXP Earned +)
Accessories (for Item Drop Rate +)
Crit Aid x99
Heal-All x66
Artist
-----
Starry Night Streetlamp x10

Top option is often more recommended. So for Alchemist and you want to level up fast, I recommend bulk-crafting Crit Aid if you have the recipe. But even if you don't, Heal-All remains a decent option.

Other Resources
(copy-pasted from the compendium guide)
  • Dosh: Bulk-craft White Woolie Sticker
    - Also recommended to sell weapons/tools from boss, use the Filter option!
  • Redux Stone: Buy Long Cape (also in capital) to trade in
  • Cashnut: The Wicked Mandrake behind Spirit Road's sealed gate converts to 55 nuts each
  • Celestia's Gift: Visit others' island (keyword "flower"), for 1000 per day
  • Buddy Affinity: Gift Magical Milkshake to everyone, it's a high-lv recipe that is easy to make
    - Currenly, favourite gifts doesn't not affect affinity gained, you only get extra dialogues
Best in Slot Equipment Skills (w/ Aging)
See this spreadsheet[docs.google.com] for all possible remaking skills.
Equipment Type
Best Remaking Skills
Extra Mats
Weapons
<matching element> Damage +10%
Mimic Sticker
Gathering Tools
Charge Attack Damage +10%
*Sweet Spot Damage +10%
Tunoco Sticker
-----
Crafting Tools
<specific type> Crafter
-----
Head, Torso, Bottom, Dress, Hands, Feet
Item Drop Rate +5%
Trip Appliqué
Cape, Accessories
Item Drop Rate +10%
Attack +10
Trip Appliqué
-----
Specs
EXP Earned +10%
Item Drop Rate +10%
Attack +10
-----
Trip Appliqué
-----
Hero set
Attack +10
-----
Forage King set (except Cape)
Gathering +5 (+10 for body)
-----
Artisan King set (except Cape)
Crafting +5 (+10 for body)
-----
* For tools, Charge Attack Damage is usually slightly stronger than Sweet Spot Damage, but Fishing Rod might prefer Sweet Spot due to how often you can use its Special Attack
* Unless you only play as Magician, Attack+ is more preferrable than Magic Attack+

Equipment Type
Best Aging Skills
Weapons
<matching element> Damage +10%
- Fills the material meter to half instead of full
Shield
Guard +15% (?)
Pickaxe & Axe
Sweet Spot Damage +20%
Fishing Rod & Hoe
(1 of 3 types) Harvester +5% (?)
Crafting Tools
EXP Earned +10%
(specific type) Crafter +20%
* Skills from ♦♦♦ aging provide the same stats as ♦♦♦♦
* You can use Cross-Save to reroll aging skills without finding another Treasure Grove
https://steamhost.cn/steamcommunity_com/sharedfiles/filedetails/?id=3510285845
Why Drop Rates are important
  • Rare drops such as Elder Log become almost guaranteed to drop, making ranking up Miner and Woodcutter so much easier
  • Lets you always retain seeds after harvesting, making farming Shadow Carrots for Cashnuts much more consistent
  • Makes grinding Legendary Don Horn easier, since each Don is more likely to drop extra horns when you fight them at rank 5+ and 7
  • See this post for the explanation of the Drop Rate mechanics
Best Weapons, Tools, & Armor
(same spreadsheet) See this[docs.google.com] for all equipment stats at perfect quality.
Equipment Type
Best Equipment Choices
Weapons
<element weapons>
- Light and Dark weapons are often the most preferred
- See below for reference table
Shield
True Shield of Time
Gathering Tools
Crafting Tools
True <tool> of Time
Combat Armor
Hero set (for Attack+)
Divine set (for Drop Rate+)
- swap with the Salamander/Holy Body & Legs pieces for extra drop rate
Gathering Armor
Forage King set
Crafting Armor
Artisan King set
Specs
Adorable Eyepatch, Angler's Goggles
Accessories
Flutter Charm (for EXP, pre-order Bonus only)
Black Onyx Ring, Diamond Ring, Durable Charm, Sea Necklace,
^ Blossom Corsage, Umbral Choker (for remake skills)
Mercenary's/Magician's Pride (for Attack)

Most armor and shields are interchangeable with others in the same slot, with the only difference being the difference in Defense and Magic Defense. It's worth noting Specs and Accessories often provide so little defensive stats, that the "best" equipment isn't really much better than your starting options.

The only excepttion to this are the colosseum rewards, which are the only 3 sets of armor capable of rolling their respective unique skills.

Best Weapons for Each Element
Light
Dark
Fire
Water
Wind
Earth
Neutral
Paladin
Arcanite Sword
Apocalypse Sword
Dragoon's Sword
Boreal Blade
Verdant Blade
Floral Sword
True Sword of Time
Mercenary
Draconic Greatsword
Dragon's Despair
Scarlet Scourge
Blizzard Buster
Cobalt Dragonfang
Wolf's Fang
True Greatsword of Time
Hunter
Heavenly Aeroshot
Tenebrion
Phoenix Bow
Poseidon's Bow
Falconwing
Suncatcher
True Bow of Time
Magician
Luna Incanta
Chaos Scepter
Infernal Staff
Cocytus Icewand
Staff of the Oracle
Harvest Scepter
True Staff of Time
Brand New
Giant Stick
Dragon Stick
Fire Stick
Water Stick
Wind Stick
Earth Stick
Roasted Corn
  • Light/Dark weapons are most preferrable due to higher attack stats, as well as being resisted mostly by only the enemies with the same element
    • Any other element would usually be resisted by enemies from 2 other elements, usually being the same element, plus the one effective towards that
      - e.g. Earth weapons are resisted by all Fire & Earth type enemies
    • See the element section for a more detailed breakdown
  • You can easily tell what element a weapon is by looking at the ingredient
    - All the Legendary rank weapons require the Mana of a specific type to craft
  • Crafting most elemental weapons at Legendary rank requires reaching the Hero rank in either Blacksmith or Carpenter. Alternatively, the Fire/Water/Wind/Earth weapons can be dropped from bosses too, so you may remake these instead
    • Legendary Dark weapons in particular requires deciphering Mysterious Slates
      - Legendary Arcanite/Apocalypse Sword/Shield each has 1 in 300 chance in appearing
      - Other Legendary Dark weapons each has 1 in 150 chance in appearing
    • Corresponding True Time recipes are obtained from talking to the Plundering Panther in any Ginormosia settlement after crafting your first Time-series equipment
      (... not that it matters because they are generally not as good)
    • Roasted Corn are from defeating the lv99 Training Dummy next to the Hunter master
Combat Life
General Tips
  • The general combat strategies are similar across each Combat Life
    1. Switch weapons before engaging, if your equipped element is being resisted
      - See the "Enemy Resistance" page for a full list of element weakness
      https://docs.google.com/spreadsheets/d/1BrBcKh3peA96u3EIj19QROujZLBC4d3ilW-KWyf7Anw/edit?gid=1727692650#gid=1727692650
    2. Spam your strongest move
    3. Drink Hi-SP Potion when you're out of SP
    4. Use Special Attack if you are Paladin or Magician, otherwise don't bother
  • Use food buffs. (see "Notable Buffs" below)
  • I recommend keeping at least 50 of whatever Potions & Meals you might use, even if it means having to buy the necessary ingredients from shop, especially since money is easy to come by in this game
  • Even if you are lacking behind in your Alchemist & Cook ranks, I would still recommend buying Power Aid, Crit Aid, & Campfire Roast directly from the Swolean Island shops
  • If you are trying to rank up multiple Combat Lives at once, you can defeat the enemies needed for Master ranks when you're only at the Apprentice rank, so long as you can defeat said enemies. Doing so may reduce the amount of backtracking needed
    - See the "Monsters & Life Goals" page for the full list
    https://docs.google.com/spreadsheets/d/1BrBcKh3peA96u3EIj19QROujZLBC4d3ilW-KWyf7Anw/edit?gid=1994560931#gid=1994560931
Best Moves for Damage
In general, you want to spam whatever moves with the highest DPS (damage-per-second) that you currently have access to. Certain moves might deal higher damage, but might take too long to execute, making them less preferrable IMO.

Life
Best Moves (best to worst)
Paladin
Special II > Light Charge III > Special I > Light Charge I
Mercenary
Heavy Charge III > Heavy Charge I > Light Charge I
Hunter
Heavy Charge III > Light Tap > Light Charge I
Magician
Heavy Charge III > Heavy Charge I > Light Tap/Light Charge I
... Brand New
Unique Attack (R1 button)
Miner
Light Charge I; or
Special II -> Light Charge -> Heavy Charge III x2 -> repeat
Woodcutter
^ same
Angler
Heavy Charge I > Light Charge I; or
Special II -> Heavy Charge III x3 -> repeat
Farmer
Light Charge I
- Heavy Tap is actually better if you can hit all veggie in plot at once
* For the 3 Gathering Lives, it's technically faster doing the special attack combo, BUT you kinda need to roll for Sweet Spot Damage (which doesn't have a sticker for), and you have to use more inputs for not even a substantial increase in damage. Maybe you think it's worth making the Sweet Spot change less often too?

During combat, you can easily replenish SP with potions, so there is often little reason to use the suboptimal moves. Note that I haven't maxed out all combat Lives besides Mercenary, so my recommendations for other combat Lives might not be optimal.

As for gathering, I still recommend spamming moves with best DPS despite the lower SP efficiency in general. And if you find yourself running out of SP, and are unable to chop a down boss tree for instance, I recommend investing into better tools instead of keep pushing, especially since you also want to get Excellent for more drops.

Notable Buffs - Meals & Potions
  • Magical Milkshake + - Easily renewable AND best source of +200 Gathering
  • Smoothie + - Easily renewable source of +150 Crafting
  • Southern Stew + - Easily renewable source of +100 Combat Power
  • Monstroganoff + - Provides +200 Combat Power, but requires hunting Great Chimera
  • Power Aid + - Easily craftable
  • Magic Aid + - Easily craftable
  • Crit Aid - Directly purchasable, also easily craftable with a islander recipe

Note that Berserk Potions are really expensive to make, its normal version is not any better than Power Aid +, and does not even stack with it. I would not recommend using it under any circumstance.
Damage Formula
The mechanics is explained in a Japanese blog I stumbled upon, which this section heavily relies on. Give them a read if you are interested!
- Damage Formula - https://note.com/p334/n/n432c8416b98f
- More Testing Data - https://note.com/p334/n/n392cb7b0d560

Parameter
Formula
Base Damage
(Player Attack) x (1 + Enemy Type + Element Modifier) x (Power Aid) - Enemy Defense
Hidden Weakness
(different between enemies)
- Resist: 0.7
- Weak: 1.3 ~ 1.8
Motion Value
(different between moves)
Charge Multiplier
Special Multiplier
1 + x
Critical Multiplier
1.2 + y
Variance
Random between 0.95~1.05

You can calculate your final damage by multiplying each row, after plugging in the corresponding stats of course. For all the skill effects active on you, go to your your Equipment screen, then press into the right-stick to view them.

Sadly there is a damage cap at 9999. Otherwise Mercenary would've been the best.

-----

Enemy Type & Hidden Weakness
This refers to the elemental weakness of each individual enemy. See the next section for details.

Element Modifier
This usually applies when you have the matching skill with your equipped weapons, and provide a substantial boost to your attack stats. Essentially, "Light Damage +20%" is "Power Aid, but only if you equip light-element weapons".

It's worth noting that the True Time series weapons CANNOT be benefited from this, making them the inferior choice in most cases. In fact, a lv100 Mercenary will ALWAYS deal more damange with the legendary-rank light Greatsword than with True Greatsword of Time, even if light element is RESISTED by the enemy.

Meal & Potion Buffs
You can only have 1 meal effect active at a time. This means you cannot have Attack +200 and Combat Power +200 both active simultaneously. As for potions, only 1 of each type of buffs can be active, which also mean Power Aid and Berserk Potion overwrite each other as previously mentioned.

I haven't looked into how buffs stack with each other yet, but a quick test seems to show that they are multiplied onto the your displayed Attack stat. Will do more testing later...

(See the earlier section for recommend buffs)

Motion Values
Each move has a unique multiplier of how strong it is. For instance, the last hit of Mercenary's Heavy Charge is about 5 times as strong as the basic attack.
(If someone can compile a list of all these values, LMK)

-----

Analysis
This effectively means the "Element damage" skill always provide a bigger boost than the displayed value, and gets better against enemy with higher defense.

On the other hand, "Charge Attack damage" and "critical damage" often provide a smaller boost than the displayed value, and gets worse the more of similar skills you unlock in your skill board.

Element damage >> Charge Attack damage > critical damage
Elemental Weakness
  • Enemies have a "type weakness", which is indicated with their attack types
    • It's ±20% applied onto your attack stat
      - it's similar to having Fire Damage +20%
      - Light & Dark is 0% or 20% instead
    • Fire < Water < Wind < Earth < Fire
    • Light < Dark; Dark < Light
  • Enemies also have "hidden weakness"
    • It's multiplied directly to final damage
      - Resist: -30%
      - Weak: +30% to +80%
    • (see table below for summary)
  • Let's use Legendary Don Woolie for example
    • Its attack type is Wind => weak to Earth
    • Its attack type is Wind => resistant to Water
    • This enemy has hidden value => weak to Dark (60%!!)
    • This enemy has hidden value => resistant to Light
    • Weapon Effectiveness - Light < Water < Neutral, Fire, Wind < Earth < Dark

"Hidden Resistance & Weakness"
See this compendium page[docs.google.com] for all enemies' "hidden" resistance & weakness.
Element
Usually
With Exceptions of
Neutral
Is neutral to all
[-Dark] Main Story boss champion
[-Light] Main Story final boss (DD* & GX)
Fire
Resists Fire
Is weak to Water
[-] Fiery Panther, Pyro Panther
[-Fire/+Earth] Crimson Weedling
[+Fire/+Water] Fortoise
Water
Resists Water
Is weak to Fire
[-] Snowflake Bunny
[+Fire/+Water] Tortortoise, Splash Frog, Tropic Toad, Bitey Shark
[+Fire/+Water] Greater Sea Beetle Baller, Stelleroid, Meteoroid
Wind
Resists Wind
[-Dark/+Light] Legendary Don Woolie
Earth
Resists Earth
[-Fire] Bloom Serpent, Pseudo Oak, Weedling, Killer Weedling, King Weedling
[-Light] Bouldergeist
Light
Resists Light
Is weak to Dark
[-Fire] Pseudo Cherry
Dark
Resists Dark
Is weak to Light
- For DD, it's is resistant to all elements by default, only after weakened is it weak to Light

Analysis
  • Neutral enemies are not resistant or weak to any particular element
  • Certain enemies do not have the hidden resistance to their own element
    - e.g. Against Pyro Panther, using Fire weapons is as effective as Light weapons
  • Certain enemies are doubly weak to an element
    - Some Earth enemies, most Fire enemies, and ALL Light & Dark enemies are as such
    - e.g. Against shadow enemies, Light element gives Atk+20% AND x1.8 to final damage
  • Certain enemies are doubly resistant to an element
    - Crimson Weedling, and some Water enemies are as such
    - e.g. Against Tortortoise, Fire element gives Atk-20% AND x0.7 to final damage
  • Certain enemies have "mixed" resistance to an element
    - Fortoise, and some Water enemies are as such
    - e.g. Against Blizzbear, Fire element gives Atk-20% BUT x1.7 to final damage
  • No enemy is resistant to both Light and Dark
    - I prefer using Light weapons inside Treasure Grove, and Dark weapons elsewhere
Gatherer Life
General Tips
  • The general strategies for Miner, Woodcutter, and Angler are very similar
    1. Attack with Light Tap or Light Charge once a while changing positions
      - For Angler, maybe use Inpsect instead to avoid breaking the line
    2. Spam your strongest move - usually Light Charge, or Heavy Charge for Angler
    3. Repeat if the Sweet Spot changes
  • Use food buffs. Crit Aid works for Gatherers too!
    • Sadly for Angler, the buff wouldn't last much longer than the fish biting
    • But hey, maybe having a dedicated buff-applier in multiplier would work!
  • The Item Drop Rate+ equipment skills are especially beneficial for gathering Lives, as high drop rate almost guarantees rare drops from appearing, letting you rank up faster and more reliably
    • This also gives you near 100% refund for seeds when farming
  • With buddies, you can assign them to gather for you. This is particularly useful for fishing, since it lets you start attacking immediately when you join later. This applies to Treasure Grove too, which makes splitting up a viable strategy
Tip - Finding Fish Sweet Spot in 2 Moves
  • You can check for Sweet Spots by pointing only at 2 directions, e.g. NNE and ESE. Obviously seeing [!!] means the Sweet Spot is here, but seeing [...] also means the Sweet Spot is at the exact opposite, meaning no more check is needed from there
    • However, the "inspect" action would take too long for Miner and Woodcutter, since your character still have to walk all the way to the other side. I recommend doing light-taps about every 60˚ you walk instead
Farming Overview
  • You will be doing the majority of the life goals in your Base Camp
  • Return to base camp to check in once every 30 minutes. This starts the next 30-min timer so that veggie can grow into the next stage, and they might wilt if not watered
    • They won't wilting even if you only check in once every 10 hours, but when you check you HAVE to water them
  • Start planting as soon as you can, so that you become less time-gated when ranking up
  • Boss veggie appears randomly as you keep growing and harvesting normal veggie
    • General Strategy:
      1. Charge your Light Charge
      2. Release when any Dig-Dig Detector turn from red to blue
      3. Repeat
      4. Use Heavy Charge instead as the finishing blow
    • For each boss veggie, you can get more rewards by getting excellent as always, i.e. overkilling, but you'll only get 8 seeds and 8~10 non-boss veggies, as opposed to the usual 9 seeds and 18 non-boss veggie
    • You can get a combo going by hitting the detectors. This increases your damage output, but doesn't seem to affect rewards
      - "Good" -> "Very Good" -> "Great" -> "Wonderful" -> "On Fire"
    • The in-game guide says the meter affects reward quality? Not sure what it means or how it affects the outcome from my testing
  • Don't be afraid to change the veggie type on your farm to finish goals faster
  • When other veggies are no longer required, replace all plots with Shadow Carrot since they sell for extra Cashnuts, an important currency used in Ginormosia
    • Common, uncommon, rare, boss variant of veggie sells for different amount each
      - Most Veggie: 1,3,5,10 Cashnuts each
      - Shadow Carrot: 5,10,15,20 Cashnuts each
    • For each full plot of crops, you get minimum of:
      Normal Veggie
      Boss Veggie
      Most Veggie Types
      18 cashnut
      29 cashnut
      Shadow Carrot
      90 cashnut
      85 cashnut
  • Rain occurs very rarely, and affects crops at Base Camp
    • They no longer require watering
    • They skip the sprouting stage and mature 30 minutes after planting the seeds
    • Boss Veggie cannot spawn during rain
    • Not sure if it's a bug or feature, sometimes if you sleep after playing a while, the rain would stop entirely. If you want to keep the rain (i.e. revert the rain stopping), you should only sleep outdoor at Base Camp, since it's the only way to change time without the auto-save taking place
Crafter Life
General Tips
  • Use food buffs.
  • You can quickly change your buddies' equipment in the same screen you select a buddy. This is most useful when swapping Specs with EXP+ skills
    • Since the v1.4.0 update, you can also change any buddy's equipment at any time
  • "Turbo-tapping", i.e. holding a button would make the game rapidly tap it for you, is especially useful during the crafting mini-game (and also super helpful both for buying and trading Redux Stones.) There are two main ways to do it:
    1. Use a controller that has the feature physically built in
    2. Configure inputs through Steam's Big Picture mode
      - I have been including turbo-[Confirm] for my [L2] button
  • Proficiency skills are extremely powerful later on, as each instance of it applies to the COMBINED crafting stats in the whole team
    • After stacking a few "Metal Weapon Crafter" skills, both on yours and your buddies' tools, you would be able to remake even the end-game equipment in only 3 action sequences
  • Gallery (Artist)
    • For an islander to buy your artwork, talk to them while they are staring at one. Though you don't really make much money this way, so the White Woolie Sticker method remains more much more preferrable
    • To raise the gallery rating, simply displays high quality artwork in every slots, and they can all be same one
      - e.g. 4 Magic Cauldron and 5 Nostalgic Paintings
    • My gallery rating resets after demolishing, but jumps back to top as soon as I put all nine of my artwork back in
    • It resets once per real-life hour I believe, updating the rating and letting your islanders purchase another artwork if allowed
Closing Remark
That's all I've got for now! Maybe I will include more tips later on as well, but either way, let me know if I have got anything wrong in the guide.

And if you find this guide helpful, give it a thumbs' up so more people may see it!

References
My Compendium & Guides
I have put together various other tips & tricks in this separate guide and the Compendium spreadsheet as well. You may find more useful information there, check it out!
Google Sheet[docs.google.com] | HTML View Mode[docs.google.com]
https://steamhost.cn/steamcommunity_com/sharedfiles/filedetails/?id=3484233912
Quite a number of recipes are obtainable only from Islanders. See this guide for details:
https://steamhost.cn/steamcommunity_com/sharedfiles/filedetails/?id=3493902047
This guide contains a quick summary on obtaining all achievements:
https://steamhost.cn/steamcommunity_com/sharedfiles/filedetails/?id=3505903847
This guide contains a quick reference for various not-easily-obtainable items:
https://steamhost.cn/steamcommunity_com/sharedfiles/filedetails/?id=3507324813
This guide covers 2 useful exploits that could be helpful in the end-game:
https://steamhost.cn/steamcommunity_com/sharedfiles/filedetails/?id=3510285845
Hero rank's "All Lives" skills
Upon reach the Hero rank, each Life gain access to a unique skill that can benefit all Lives regardless of the equipped Life. Here is a reference table in case you want to prioritise some of them.

Islander
Unique Furniture
Paladin
+20 Defense/Magic Defense, +100 HP
Mercenary
-5% SP consumption
Hunter
+10% critical rate, +20% critical damage
Magician
+100% natural SP regeneration
Miner
-5% Charge-up time
Woodcutter
+5% Charge Attack damage
Angler
+10% Special Skill charge rate
Farmer
+5% Status Effect resistance
Cook
Improves potency of Meals: +20% healing and 50% effect duration
Blacksmith
+10 Attack/Magic Attack
Carpenter
+20 Gathering/Crafting
Tailor
+20 Defense/Magic Defense
Alchemist
+50% chance of obtaining an extra Potion after using it
Artist
Improves potency of Bombs: +100% damage

Personal Tier List
  • Useful - Hunter, Magician, Woodcutter, Cook
  • Beneficial - Mercenary, Miner, Alchemist
  • Situational - Angler, Farmer
  • Unnoticeable - Paladin, Blacksmith, Carpenter, Tailor, Artist

Quick Tip - Unlocked skills stay unlocked after resetting the board. This allows you to obtain even the Combat Life skills at lv70~75 with only a few resets, even though they are gated behind needing 50 other skills.
WIP Element Table
By Equipped Weapon
Table TBA

By Enemy
V. Weak to
Weak to
Mixed
Resist against
V. Resist against
(39) Neutral
---
(2) Light
(1) Dark
---
(1) Dark
---
(15) Fire
(11) Water
(1) Fire
(3) Water
(1) Water
(12) Fire
(14) Earth
(1) Earth
(16) Water
---
(16) Wind
(8) Fire
(1) Fire
(15) Water
(7) Fire
(14) Wind
---
(14) Earth
(2) Dark
---
(14) Water
(14) Wind
(2) Light
---
(17) Earth
(5) Fire
(12) Fire
(1) Light
---
(17) Wind
(17) Earth
---
(6) Light
(6) Dark
(1) Fire
---
(6) Light
---
(22) Dark
(22) Light
---
---
(22) Dark
---

6 Comments
MarkofWisdom 28 Jun @ 6:49pm 
(making alchemy and tailor very annoying since they have 2 of those types)

Even if/when they introduce a double charge skill that auto completely the project, it's probably still best to have the NPCs with x-crafter gear since it's almost certain that it'll only be usable from your own character rather than the NPCs, and them having a 20% boost to their craft level is a lot more useful in general. Though....hmm, do the x-crafter skills stack? Like having two 'metal weapons' crafter skills on a hammer would it give you +40% craft skill or just +20%? If they do stack then that could be really nice for making armors and other high tier stuff more easily, but if they don't stack then you could have the tool the NPCs have have the other x-crafter skills that they don't come with via affinity levels

True time weapons are disappointing, but they do at least look really cool with the glow, though I suppose you can just use that as a cosmetic skin while actually using the element weapons
MarkofWisdom 28 Jun @ 6:49pm 
Thanks for the explanation on how to get the element aging skills. I'll probably still use the 900 grotto with aging alter I've got in my branch list since I have it on hand, and 'aged 1000 years' is just cooler than 'aged 900 years' or less.

For some of the crafting stuff I definitely have the NPC ally tools with the X-crafter instead of +special charge since I usually don't swap to them unless the special is active, and like you mentioned most of the time the craft minigame doesn't last long enough for them to get the special ready even with a charge rate boost, while your character's special can go online a lot faster since there are several special charge boosts in the skill trees and you get a 4 item completion rather than 3 item completion like the basic special or NPC specials. If possible I generally save the specials to use them when the button mash prompts or the spin joystick prompts come up since those are the most obnoxious steps to do in the minigames
Pimez  [author] 28 Jun @ 8:58am 
Small correction, you need to plant at year 700 to get the ♦♦♦ aging skills. Apparently year 600 is not enough.
Pimez  [author] 28 Jun @ 3:37am 
@MarkofWisdom
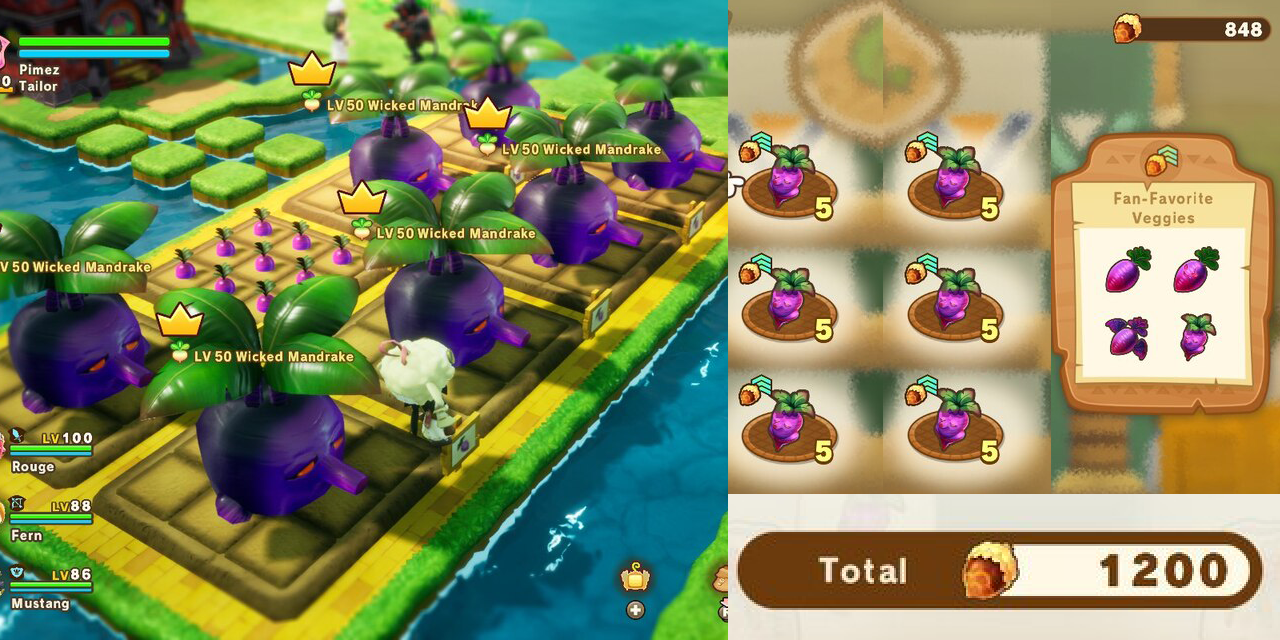
Ah sorry for the confusion. I just mean that when aging, you want to fill the meter half-full instead of completely full. So yeah, still need to plant at 600~900 years.

As for the crafting skills, the special guage fills so slowly that it basically never activates for me unless I am quite underpowered for the recipe, and even so my keybind already lets me easily get all-excellent already, so I prefer filling the progress bar faster instead. Maybe the META will change when they introduce the double-charge skills in the future?

I also got somewhat disappointed when I realise True Time weapons aren't as good, but only after I made my first one when the game was still new. For the effort it took to make, I would hope they have a unique property that surpasses all other weapons/tools, rather than just minor stat difference.
MarkofWisdom 27 Jun @ 9:08pm 
Oh, forgot to mention in the other comment and can't seem to edit it, so I'll ask here-for the element weapons aging skills, is a 2* skill mentioned there for +element damage from what range of grotto? I assume the 1000 year aging from 900+ grottos wouldn't roll an element skill?
MarkofWisdom 27 Jun @ 9:01pm 
so the true time weapons are actually worse than the highest tier element weapons since they can't benefit from the +20%-30% element damage from forging + aging? That's...kind of sad, and really disappointing. I'd been hoping that at least the true time bow could be great with charge damage+ and using ultra piercing arrow since that easily hits the damage cap, but the element damage boosts might beat out even that, or be more applicable in general since you won't always be spamming ultra piercing arrow if you don't want to be stuck in place

For the crafting tools- the X-crafter boosts are better than +20% special charge? I might be thinking back from FL 1 where special charge was a lot better, especially at divine rank since a double charge would auto complete the project at max rank, but I guess the 20% boost to crafting level is worth more than the extra charge rate?