Space Engineers

Space Engineers

278 ratings
STS-31 Space Shuttle Discovery (VANILLA)
   
Award
Favorite
Favorited
Unfavorite
Type: Blueprint
File Size
Posted
Updated
12.244 MB
24 Jul, 2019 @ 10:48am
23 Aug, 2019 @ 6:08am
8 Change Notes ( view )

Subscribe to download
STS-31 Space Shuttle Discovery (VANILLA)

In 1 collection by OctoBooze
Octo's 1:1 replica spacecraft
10 items
Description
Space Transportation System

More Commonly known as the Space Shuttle Program. Missions flew from 1981 all the way until 2011.
This specific model kit is based on the 35th mission known as STS-31, where the space shuttle Discovery transported the Hubble space telescope into orbit.

Don't be alarmed by my long description, this is much simpler than the description makes it seem! Made sure to make the shuttle user friendly :)
Skip to "User guide" if you don't want additional info!

ATTENTION!!!!!
Most up-to-date version of the shuttle can be found in the All-In-One kit!!! I am unable to update this standalone kit. Recommend you download the AIO and cut away the MLP/CRAWLER and make your own BP of the new shuttle version!!! It's got wheels and windows and much improved geometry!

The Shuttle in Space Engineers
Near perfect 1:1 scale using NASA's drawings as reference for all components. Almost all key points are within 0.5m x 0.5m (1 small block)
I tried using as much reference as I could, but turning the interior 100% accurate would make moving in it a pain within SE, so the interior is a close approximation.

Included in this blueprint file are fully functional 1:1 Scale reproductions of
--The Space Shuttle (Orbiter, OV)
--External Tank (ET)
--Left Solid Rocket Booster (SRB)
--Right Solid Rocket Booster (SRB)
--Hubble Space Telescope (HST)

Kept rotor usage to minimum, therefore we have no arm unfortunately. Doing my best to avoid unnecessary clang.
Despite its block count, it doesn't cause any slowdown on my computer, hopefully it will run fine on your end too :)

Features

General info:
--"Survival ready" should you paste it in a survival world to test out your fuel management skills. Obviously not airtight so use the seats to recharge your personal O and H2 tanks.
--Packed with just enough fuel for you to reach 0G, perform a few maneuvers and get back.
--Nose has its own RCS fuel supply and rear has its own. Uranium fueled reactors located in the nose. Both front and rear systems are easy to access from the medium cargo containers on the walls should you need to fuel the orbiter.
--SRB and ET do not have feedline ports.

Solid Rocket Boosters
--Fulfills its role as a much needed booster.
--Realistic separation behaviour
--Recoverable! Soft landing with parachutes.

External fuel Tank
--Looks like a fuel tank, but works in the same manner as an SRB in my build.
--"Gives" orbiter fuel by giving thrust so you don't need to keep the shuttle's main engines on as high of a throttle allowing it to burn longer.
(Simulation enough for me, without it you'll run out of fuel)

Orbiter
--Full interior and Payload bay
--Fully functional cockpit. Works so well you don't ever need to bring up your HUD! Full mission can be completed from 1st person view! Simulate the mission! Built around Whip's Artificial horizon which is crucial for landing sequence.
--Status indicators on the dash make things easy to know without needing to go to external view.
--Opening Payload Bay doors with no clang danger in SP! (Untested in MP)
--Approach system and atmo drag/lifting body "simulation"!

Hubble Space Telescope
--Realistic-ish interior structure.
--Camera and Antenna fueled by a loaded nuclear reactor lasting for years.

USER GUIDE

This is a fair bit of steps, but if you read it carefully it comes out as a MUCH SIMPLER process than it first seems. These manuals are included inside the Orbiter on the right hand wall and are enough for a survival mission. For creative mode you can ignore takeoff just put pedal to the medal. Landing guide applies to both gamemodes.

Entry via Payload Bay, button to open on the side. To take control find REMOTE CONTROL from the menu. We have no cockpit blocks here.

Take-OFF. Needed keybind in ( )

1. Turn on main thrusters (1)
---Increase main throttle Override to max. (2)
---Detach umbilical (releases from MLP, you must retake remote control due to grid changing too much) (7)
---Increase speed until at MAX
---Decrease thrust override until SPD starts to drop. (3)
---Continue this thrust reduction process until 0.1G

2. 0.5G, separate Solid Rocket Boosters. (8)

3. 0.1G, separate External fuel Tank. (9)
---Turn on Orbital maneuvering System (4)
---Manual flight until 0G, Dampeners OFF

4. At 0.G
---Open Payload bay doors (Tab 2, 7)
---Full stop (dampeners on/off)
---Detach your payload (Tab 2, 9) and take the shuttle down some 20m
---EVA to the Payload
---Hit button aft of Hubble to "deploy"
( Need to manually weld the parts shown )

Landing Guide.

Starts at gravity capture. On the artificial horizon the chevron represents your nose, and the yellow marker your direction, aka it is the velocity vector.

1. Disable RCS/OMS (Tab 1, 4)
--Enable dampeners
--Bottom down from 20K to 10K (Nose is level with horizon, mimics re-entry)
--Monitor power rise until 40% happens after you're below 9000

2. At 40% Aim nose down~30deg above vector.
--slowly raise nose and "drag" vector up
--Aim to be level at 1500.

3.When level, enable Approach mode (tab 2, 1)
--At 50m open brake chute (Tab 2, 3)
--On touchdown turn off dampeners to stop you from floating weirdly.

Hints / Notes
Maintain your speed until glide stage! And preferably during glide as well.
Approach Mode works by slightly reducing upward lift so that you will softly descend when normally you would either use "c" or turn off dampening which results in jerky motion.
Don't be afraid to toggle approach mode on/off if it looks like you descend or slow down too fast.

Known issues:
For some reason the gyros lock up if you're not moving. All that is needed to restore free movement is to give a tiny nudge in any direction. Can't figure out what is causing it.

Skybox is "Space Just got Real". https://steamhost.cn/steamcommunity_com/sharedfiles/filedetails/?id=1136188499

Hope you guys enjoy it as much as I enjoyed making it! Let me know what you think :)
75 Comments
w 19 Dec, 2024 @ 1:50pm 
where is the control seat at
Oven 13 Jun, 2024 @ 1:48pm 
Game crashes when I detach the extended tank.
Jayed 1 Mar, 2024 @ 6:01pm 
I cant take off or control it
that guy 4 Dec, 2023 @ 4:50am 
no pcu count?
Kerry 10 Jan, 2020 @ 2:38pm 
My version is complete.

Here: https://steamhost.cn/steamcommunity_com/sharedfiles/filedetails/?id=1965409085

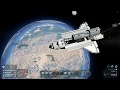
It's a payload-less variant of this one. And yes, I did give you credit Octo.
en3he 4 Jan, 2020 @ 11:32pm 
☆ RESPECT ☆ :lunar2019shockedpig:
Biednyyy 9 Oct, 2019 @ 9:41am 
<3
Kerry 26 Sep, 2019 @ 12:47am 
Basically, nothing - but I want your permission to modify it and I also want your permission to republish it.

You will get credit for the original Shuttle, as it is yours. My only contributions to the republished ship will be adding the airlock and changing out the payload.
OctoBooze  [author] 26 Sep, 2019 @ 12:22am 
What's stopping you from doing all this? The kit is here... This is a generic shuttle and the payload mimics that of STS-31, which happened to be discovery. Nothing stopping you from renaming it in your head and clearing the payload bay as there's no physical differences to be made in SE (can't go about changing the thermal tile layout)
Kerry 25 Sep, 2019 @ 1:25pm 
Hey OctoMoose, suggestion.

How about doing a modification to your shuttle so that instead of packing the Hubble, it has a few empty large grid cargo crates in the payload bay.

Then it becomes a supply shuttle. Or as NASA originally proposed for the Space Transport System, a "space pickup truck".

Also, add an airlock to the side of the shuttle as well, where the doors are on the real shuttle, so we don't have to open the payload bay on the ground.

Oh, and also, change the name for the supply version from Discovery to Enterprise, so we don't get confused.

Dock Enterprise to the modded version of the ISS I've described on its' page, or at a connector port by using a piston + connector, to supply the station with parts for the hangar to build drones and make on-orbit construction and repairs.

Also, on Enterprise, modify your projector block so that it illustrates this piston + connector system instead of the Hubble parts.

Can you do all this for me? Please?